AV Consultant
As Harmonic Software production studios AV consultant, my job list includes research and design for software and hardware, assisting with recording and video editing for conferences, presentations and livestreams. Implementation and education of new systems and equipment as well as troubleshooting and tech support. Within this role I support and help with all of Harmonic’s AV needs.
Video’s I helped edit and record
^ Click the logo to visit their website ^
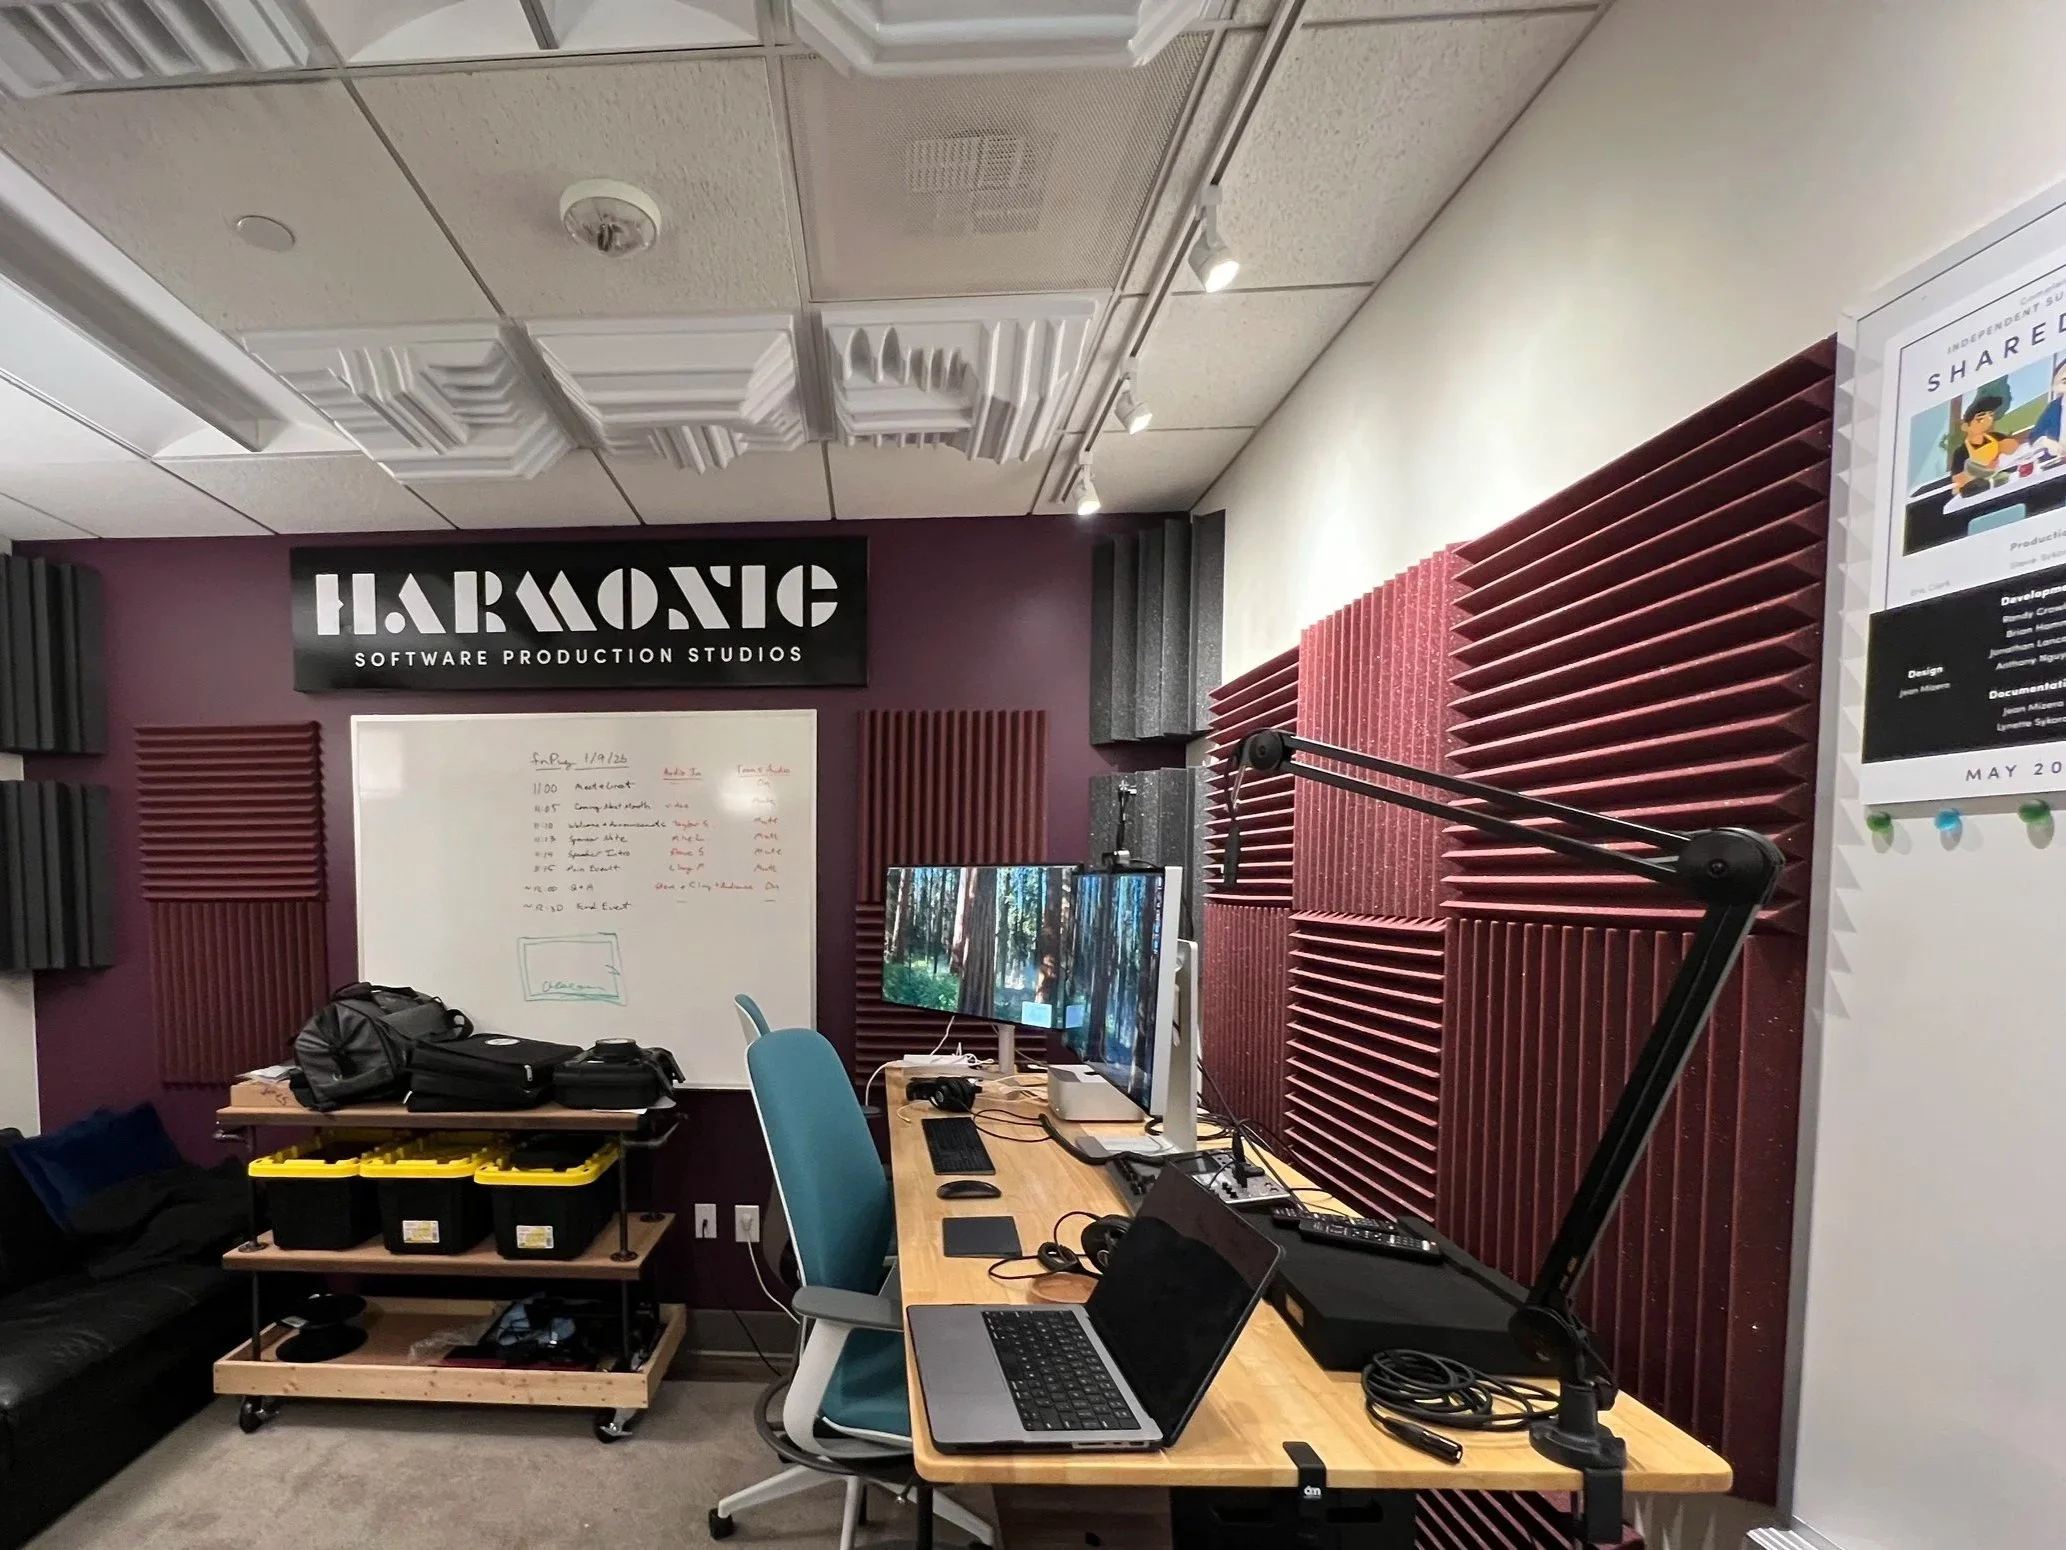
Control Room
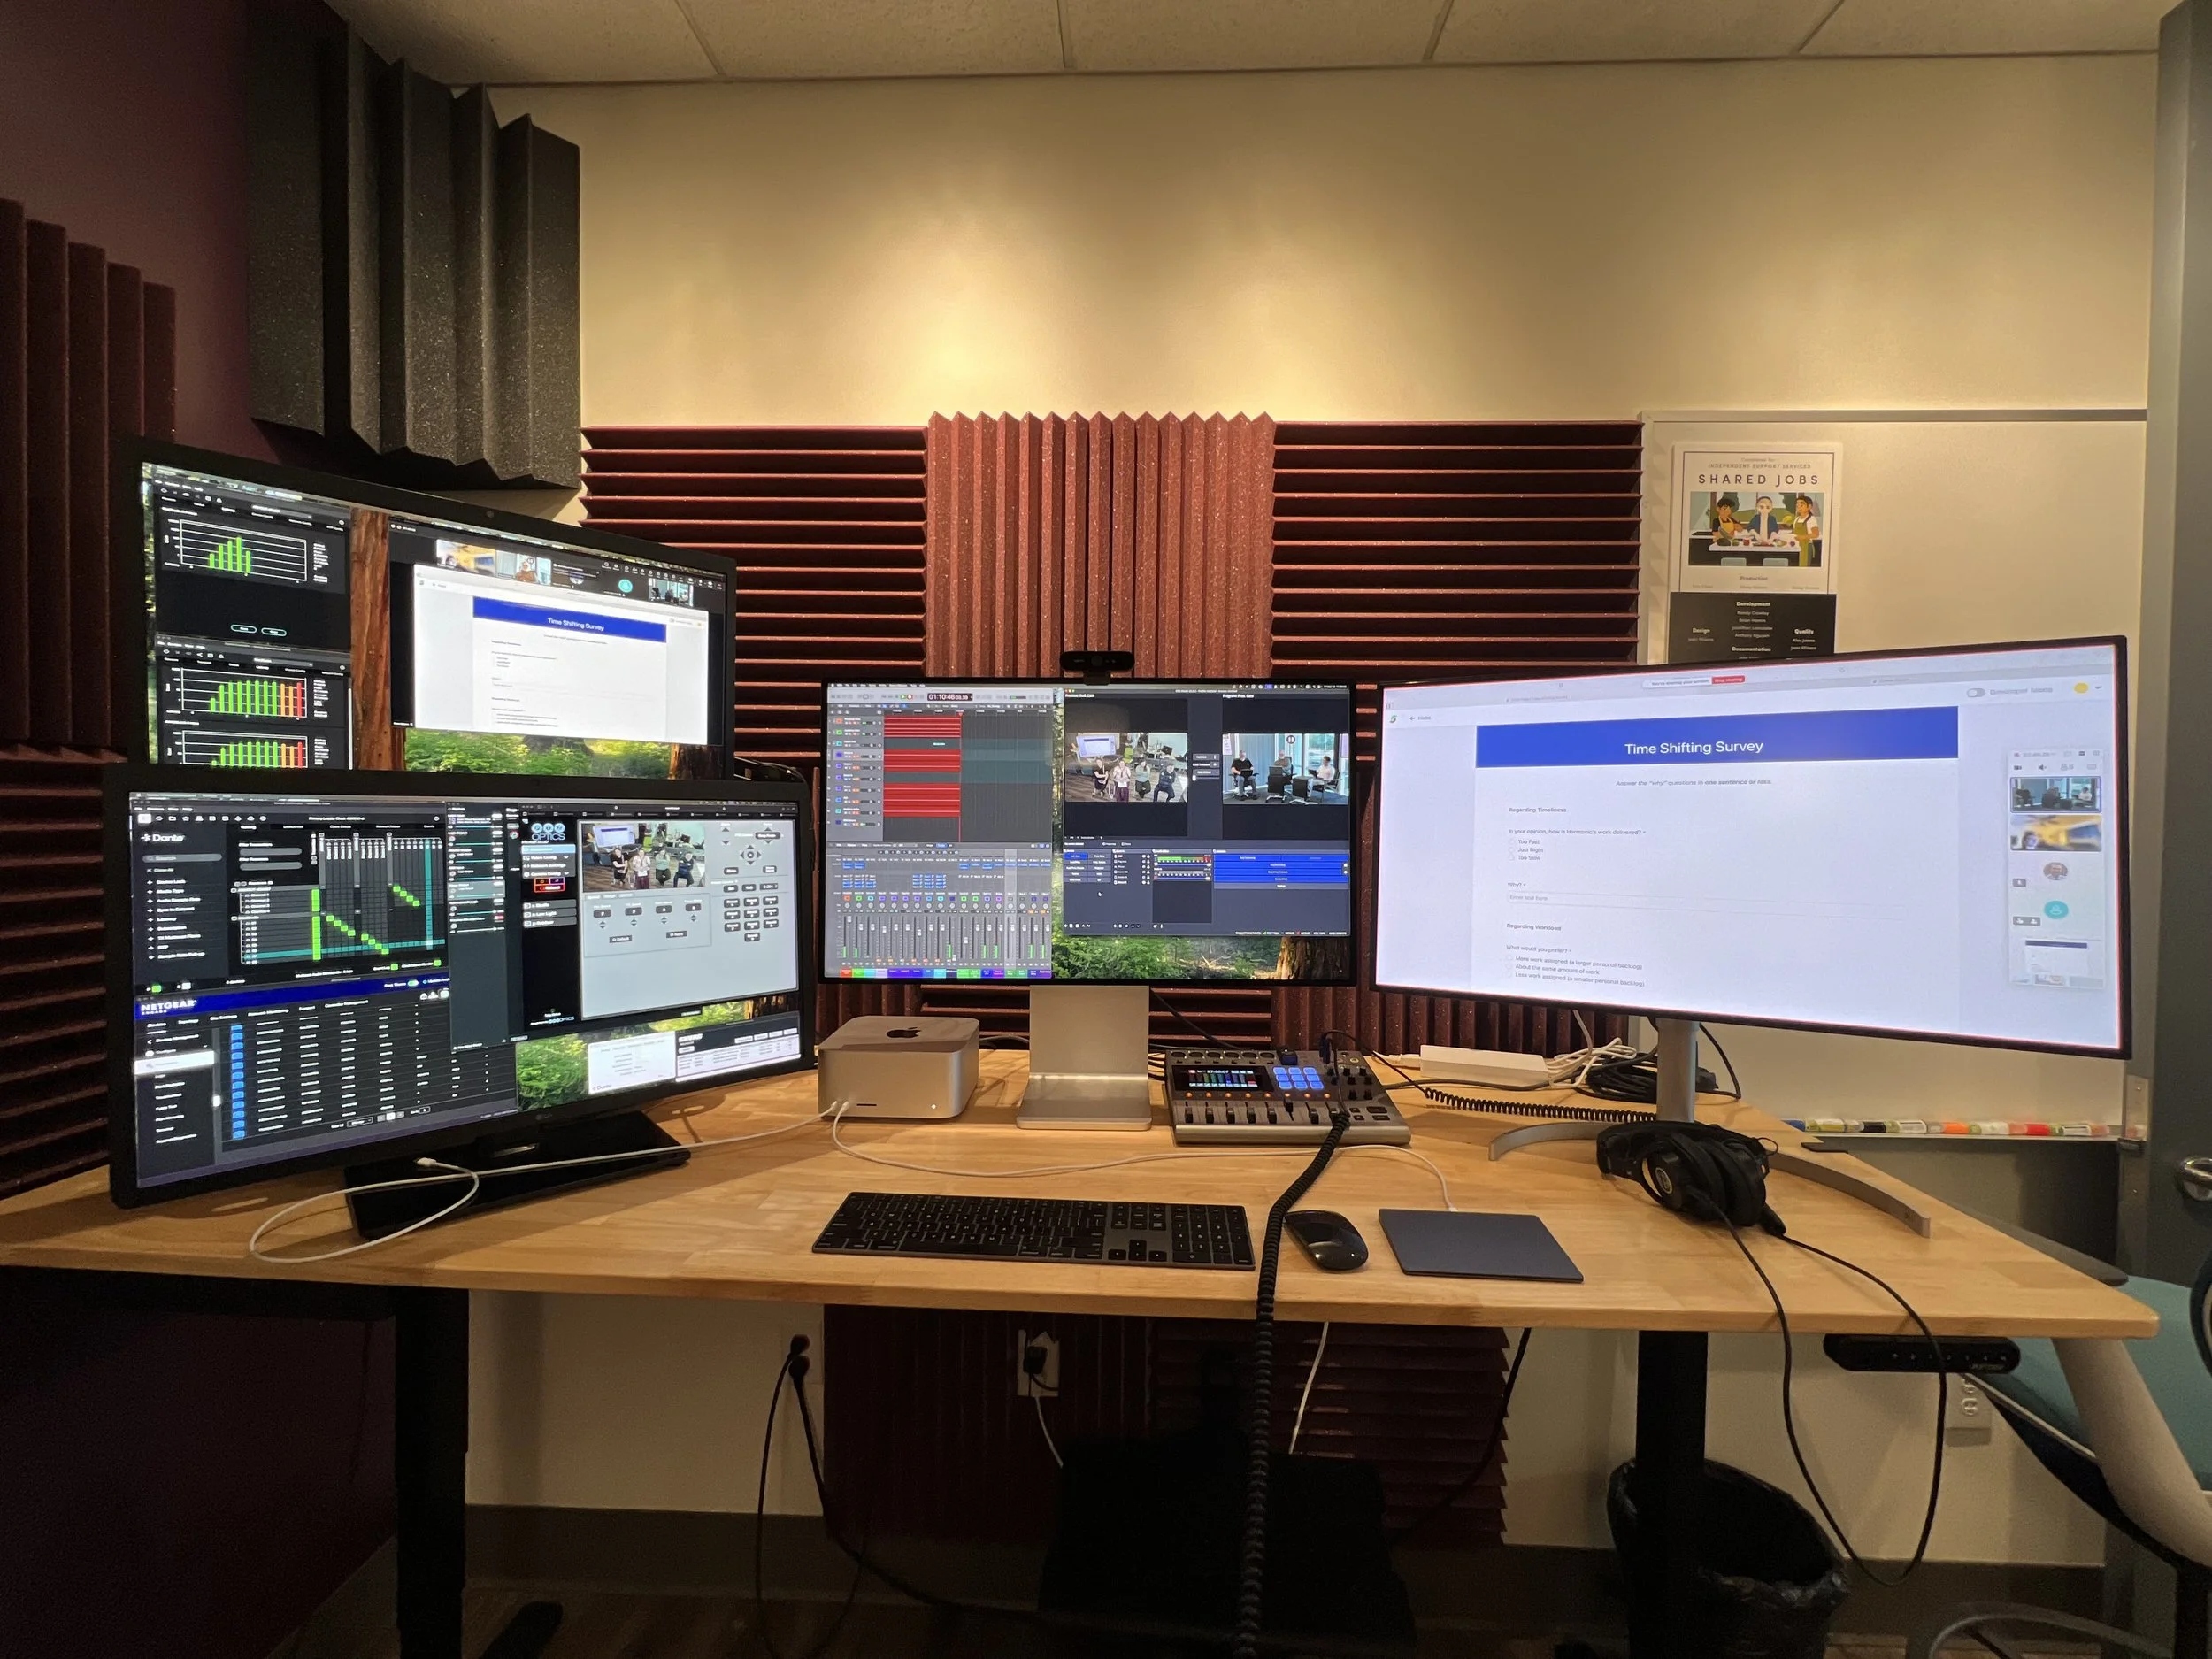
The AV control room uses a M4 Ultra Mac Studio running OBS, Logic Pro, DVS, PTZ Controller, and Loopback to allow for full control and modularity of all audio and video sources on the network. This room has a Zoom Podtrak p8 for playback and recording since the control room doubles as an editing and recording space.
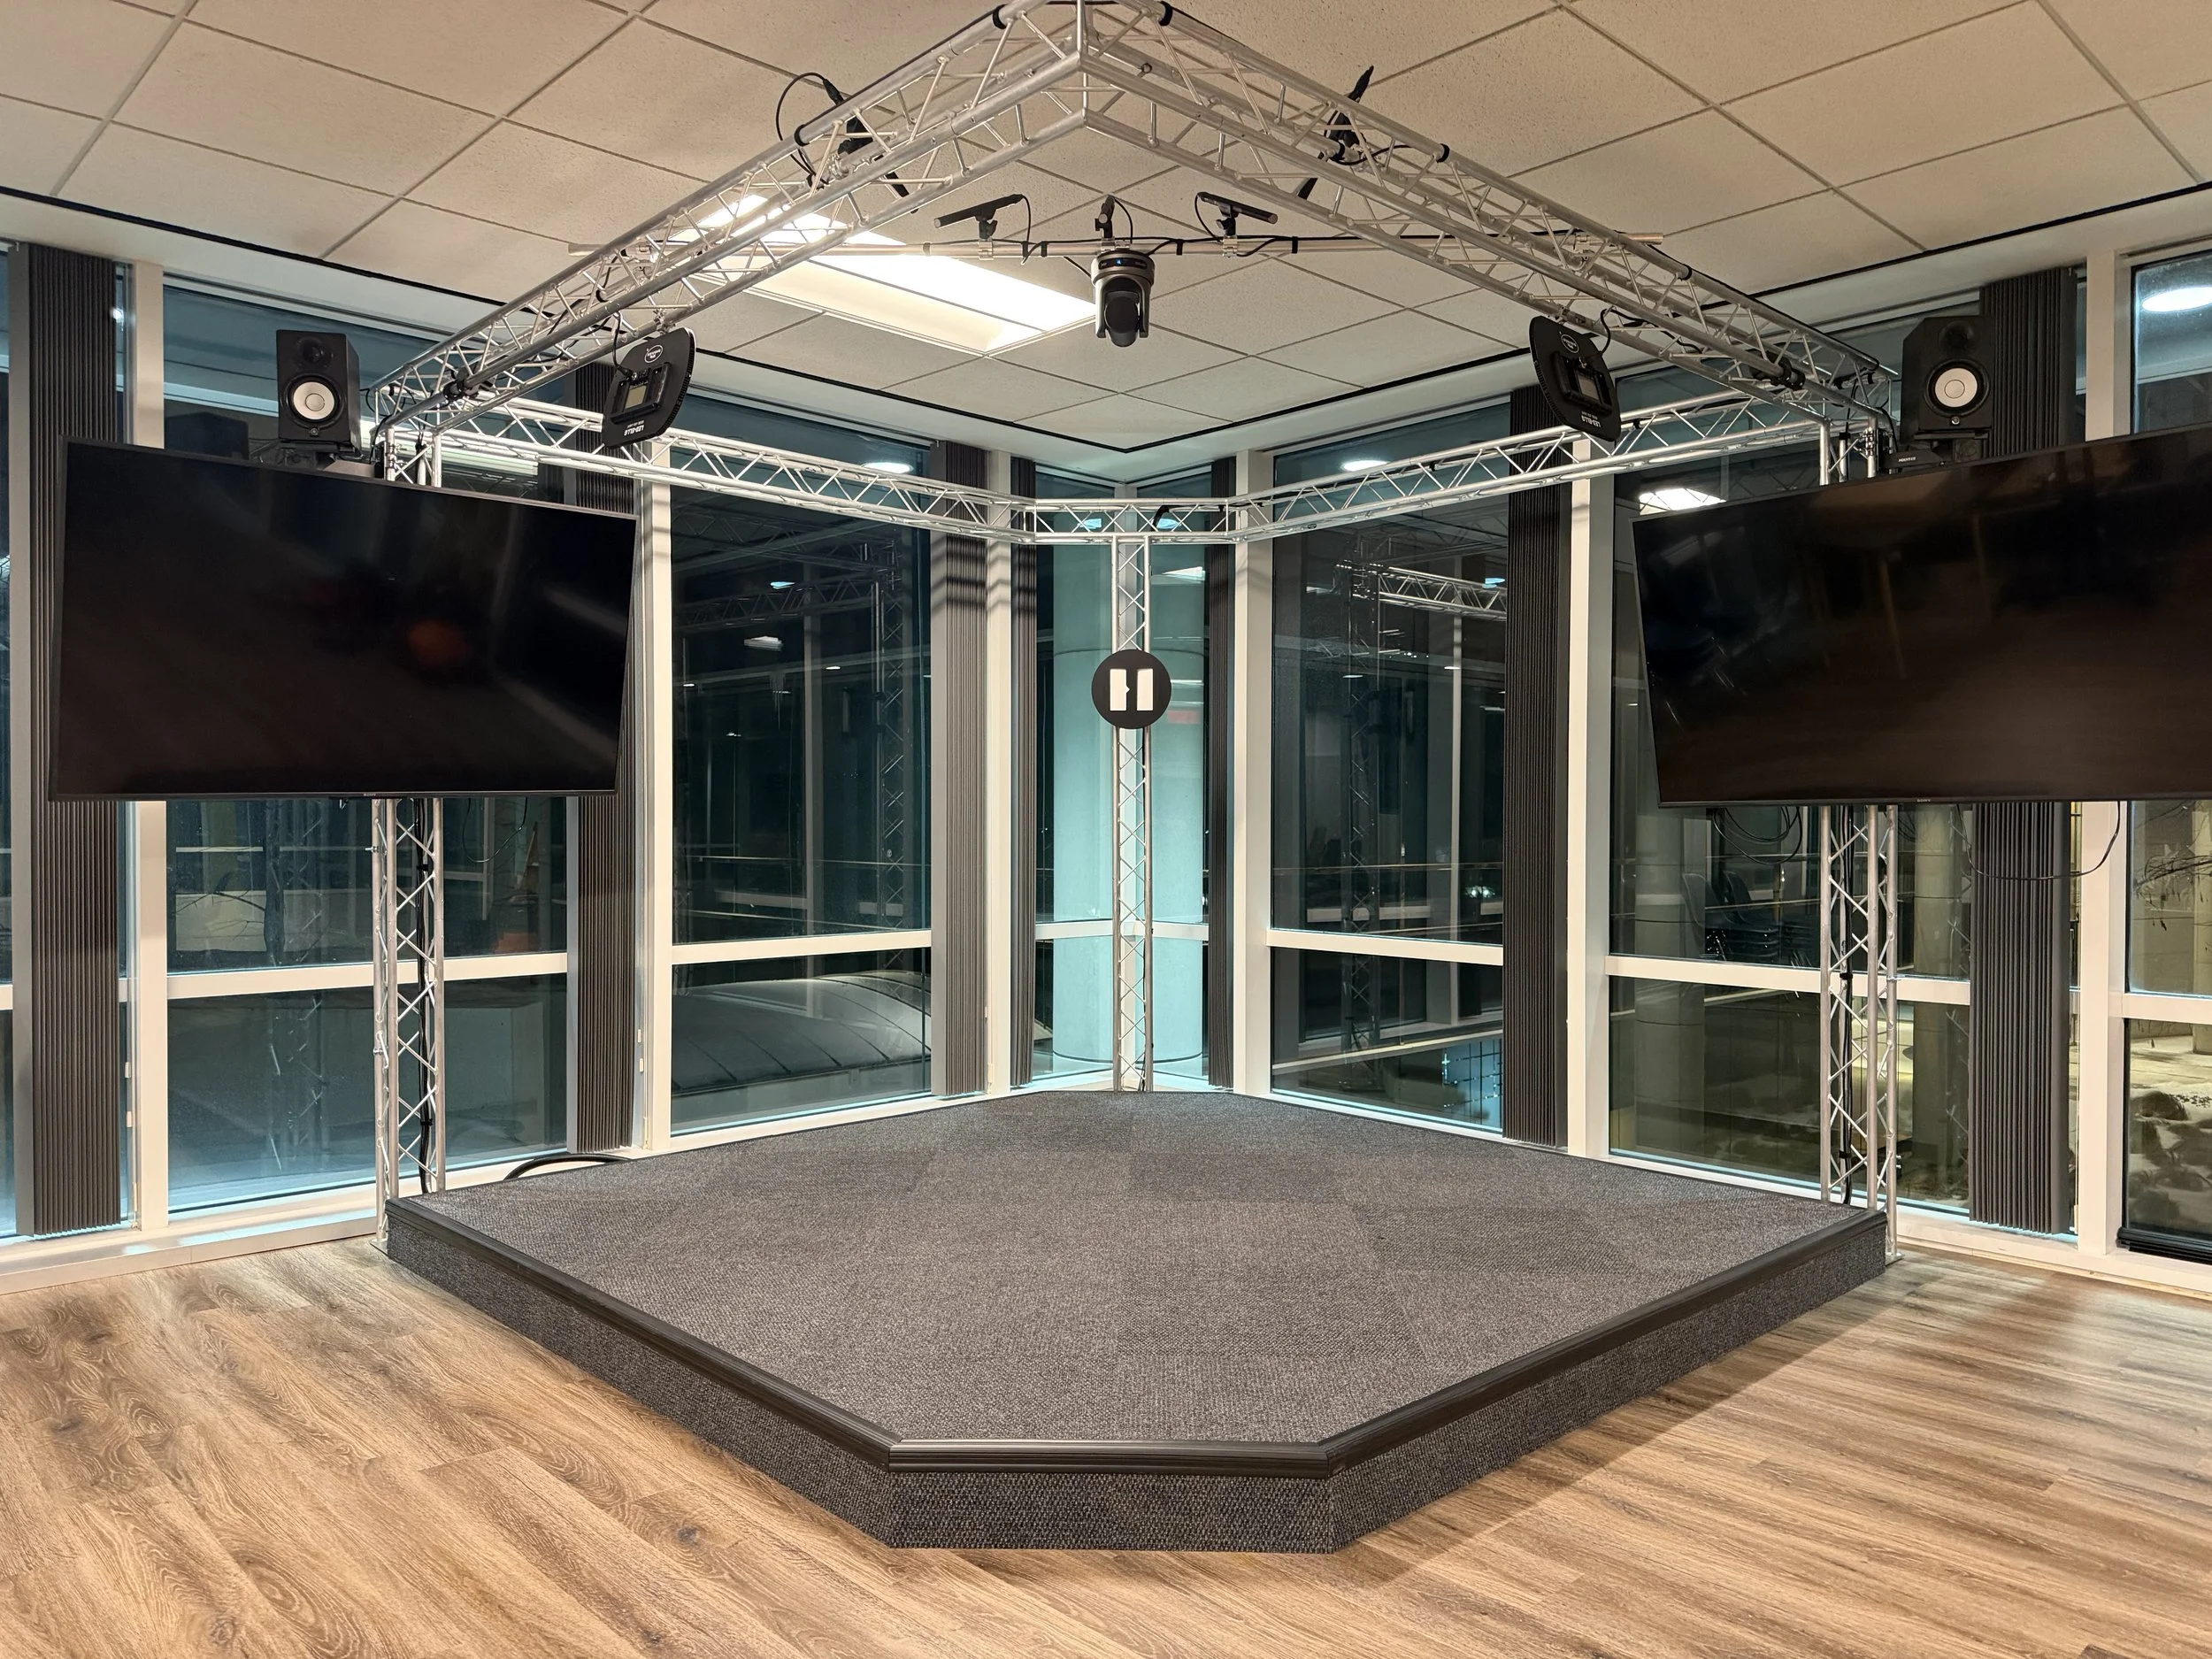
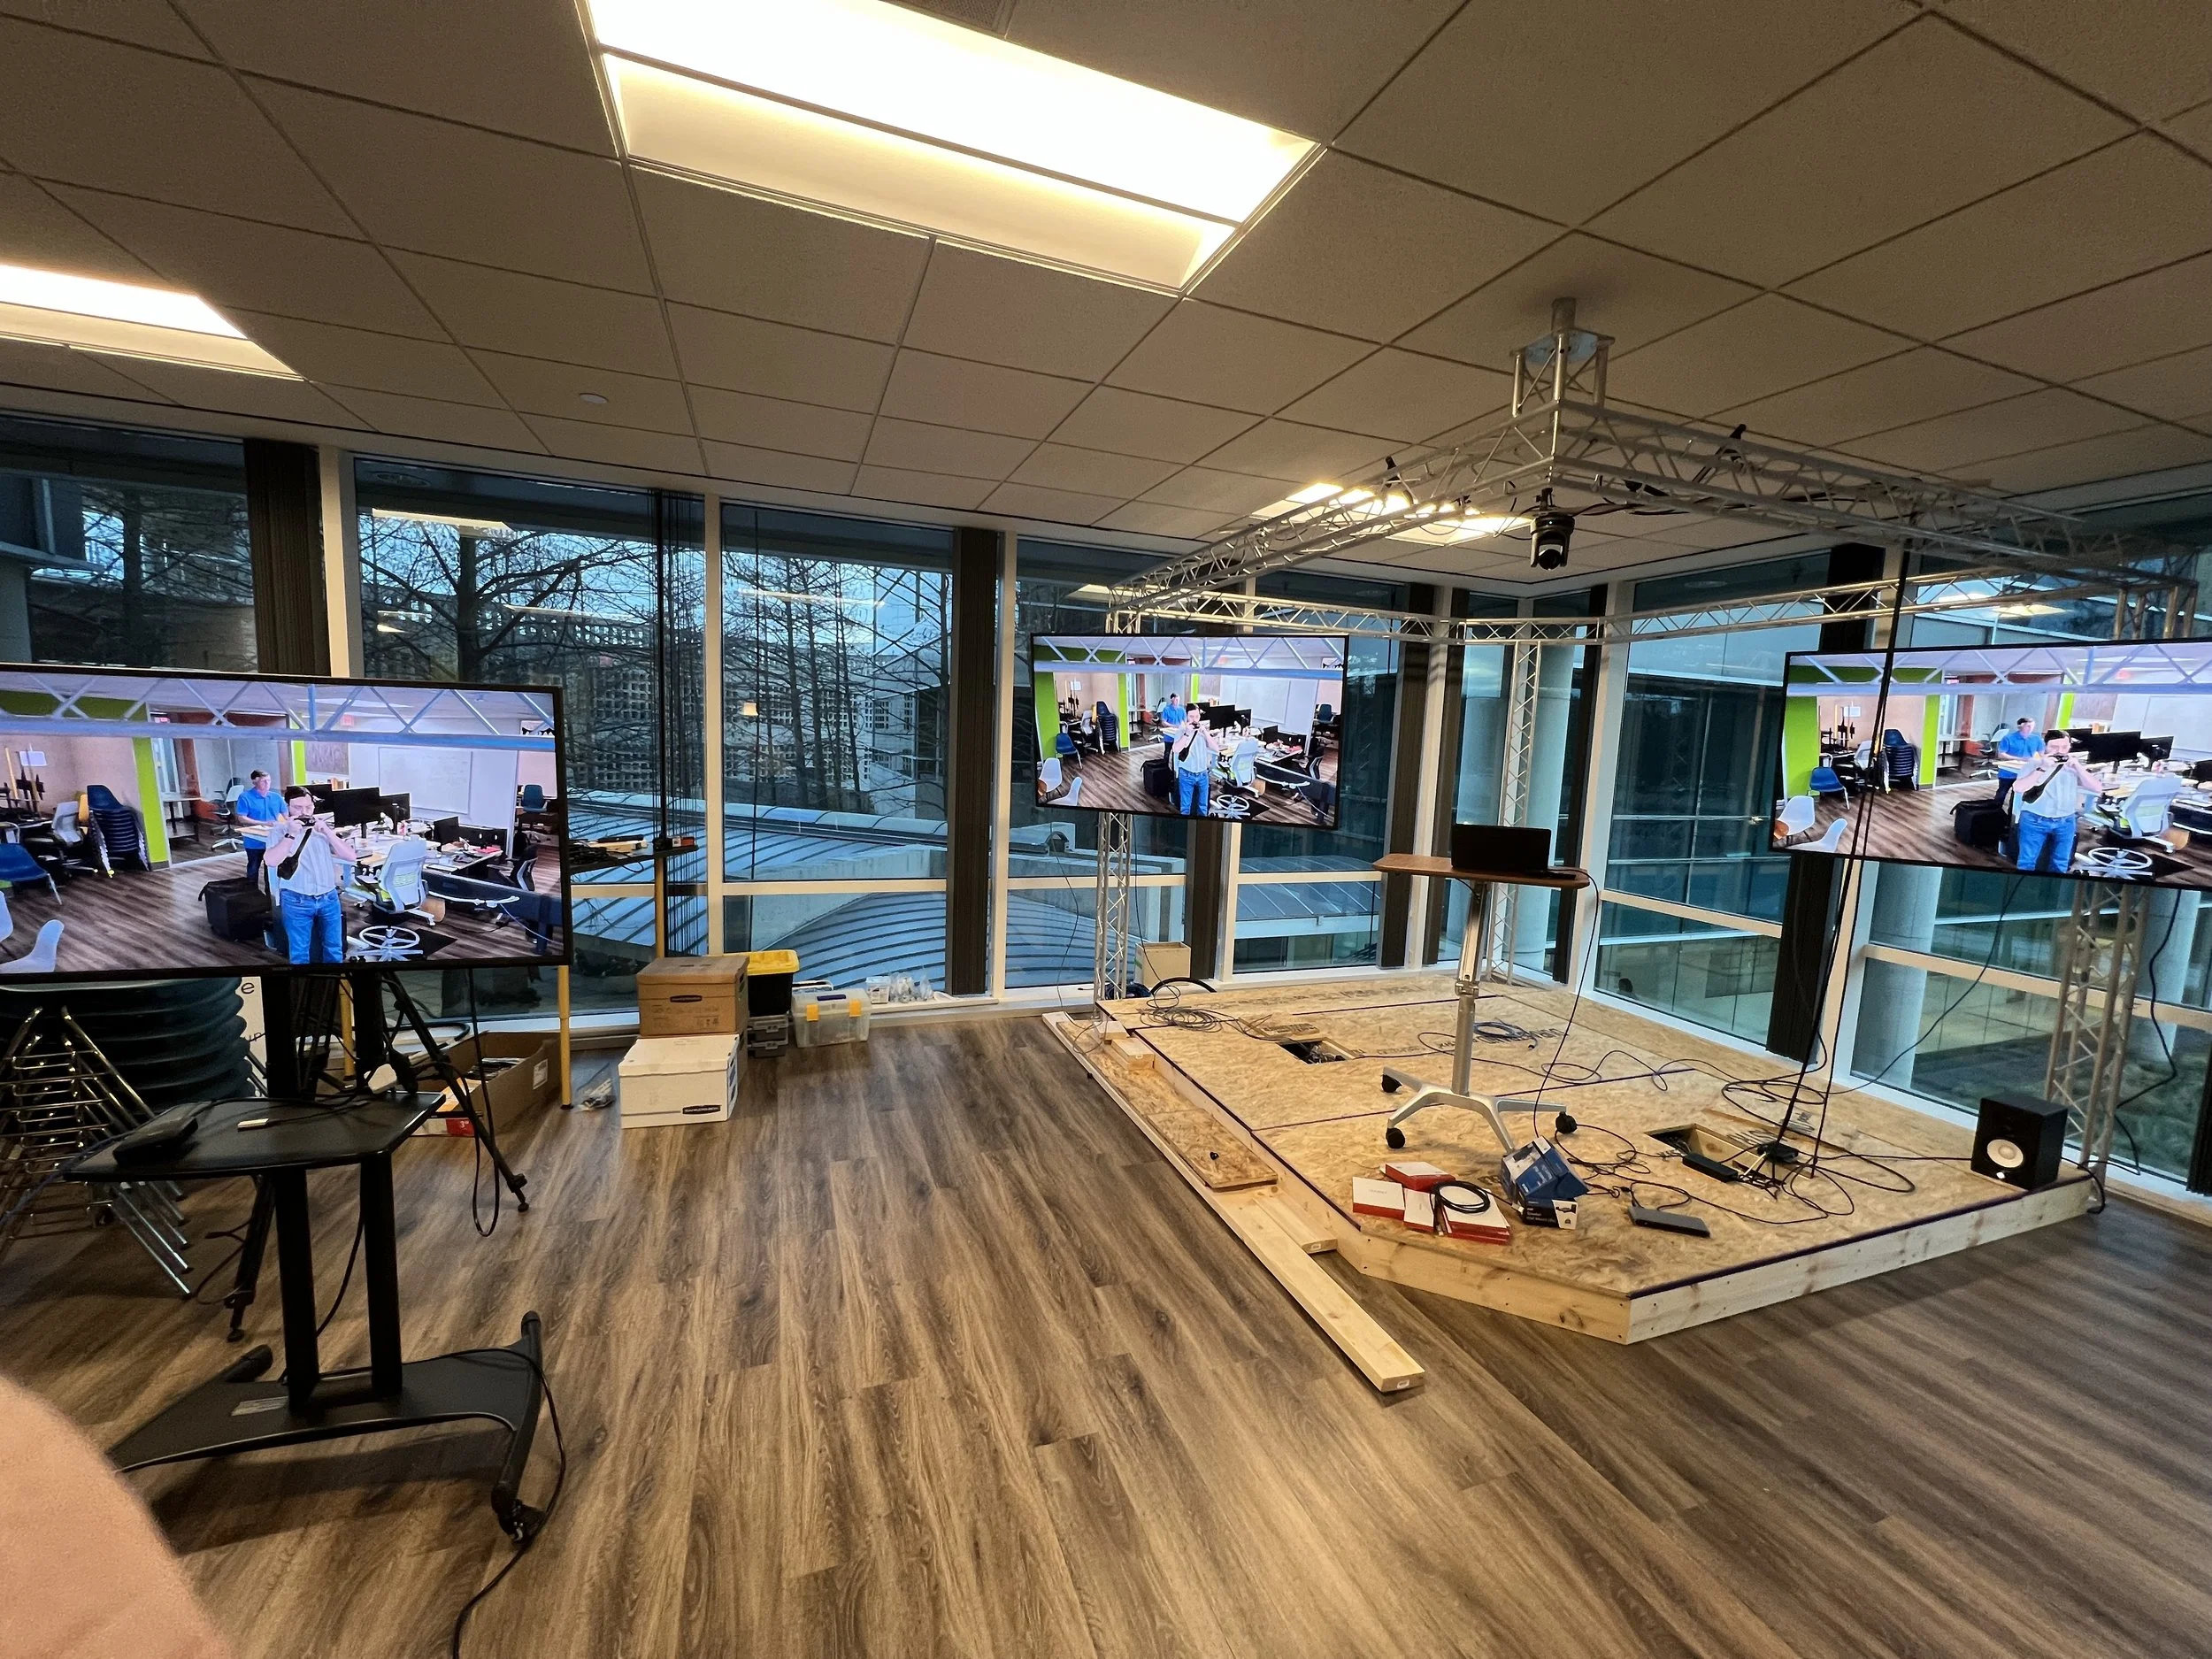
The Harmonic Stage
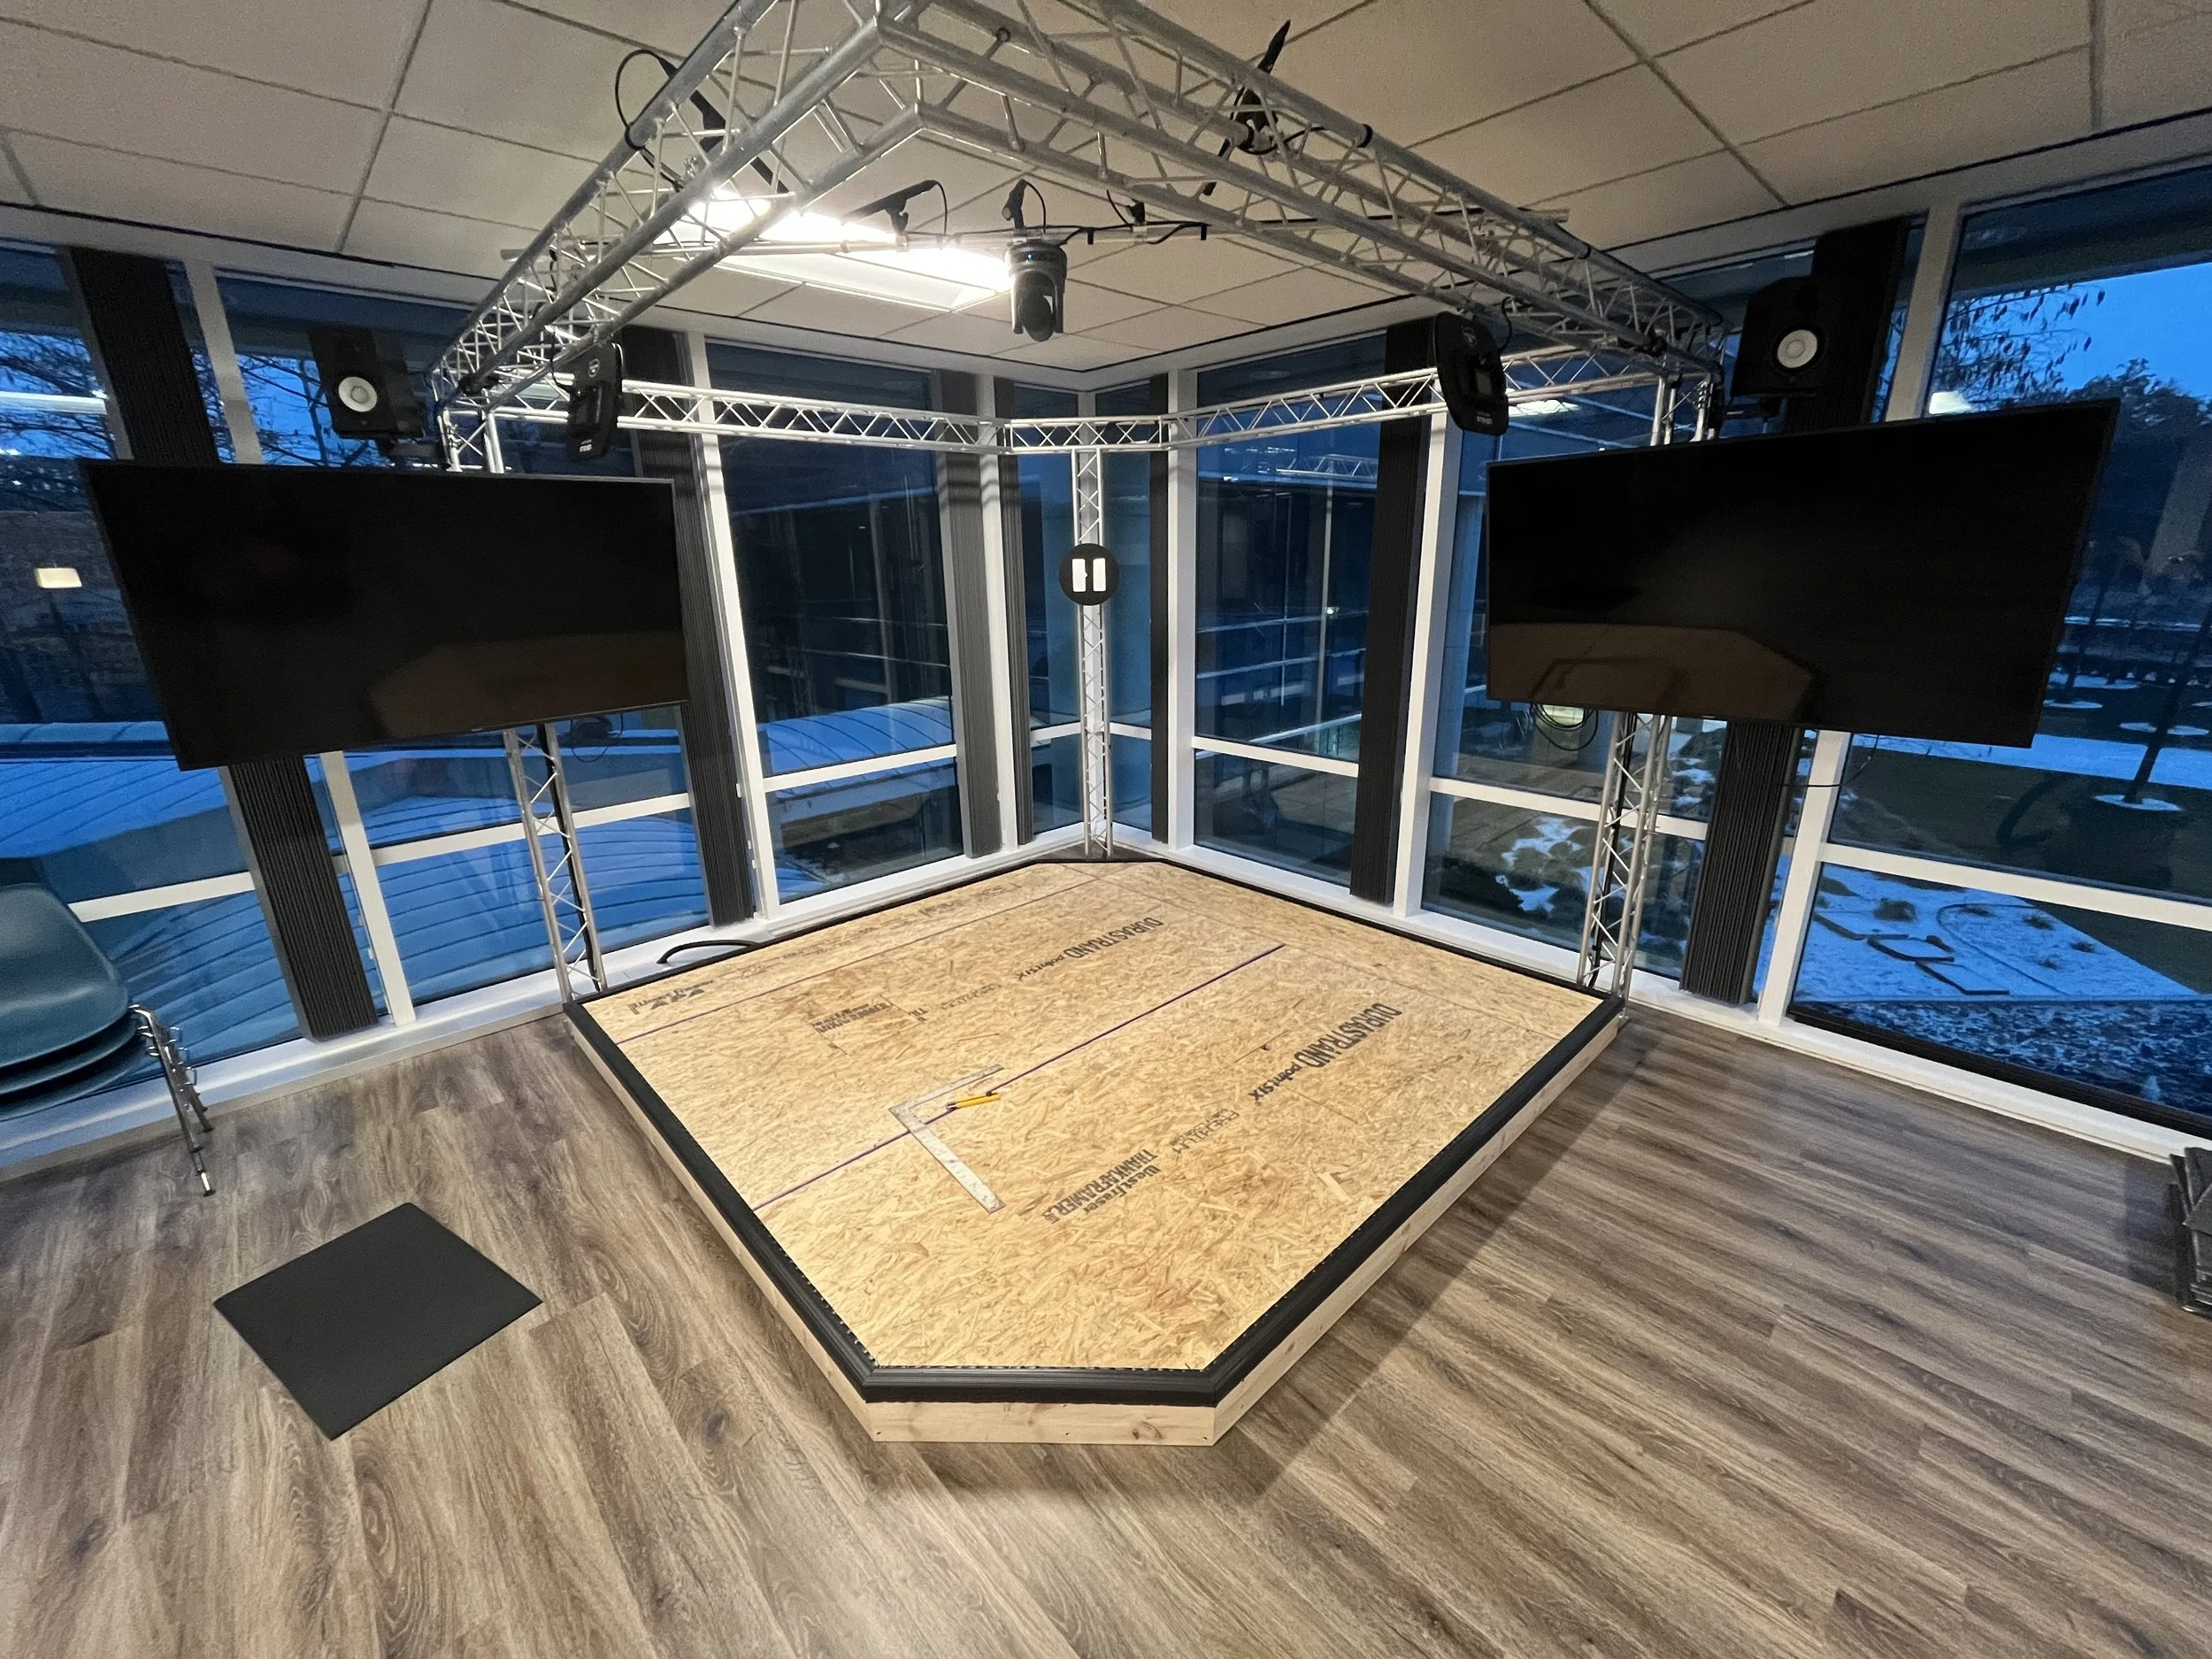
One of the jobs I was consulted for was the AV research and design, construction, implementation, and training related to the Harmonic Stage. This stage is internally used for meetings, presentations, and collaborative work. The stage is also used for Public livestreams and Content creation (podcasts, training videos, corporate pitches etc.). The Stage uses DANTE and NDI to send audio and video over ethernet for modular setups and use cases. These NDI and Dante feeds are routed through a Managed AV switch and controlled from a Mac Studio in the control room.
The Pitch
This stage started with the idea of upgrading the Harmonic AV Capabilities. I was tasked with researching and pitching a system which would meet these criteria: 4K PTZ multi cam (Stage and room) over IP, 8in/4out audio over IP, HDMI video over IP (up to 6 different screens at once), Remotely controlled from a separate room, and “one step setup”.
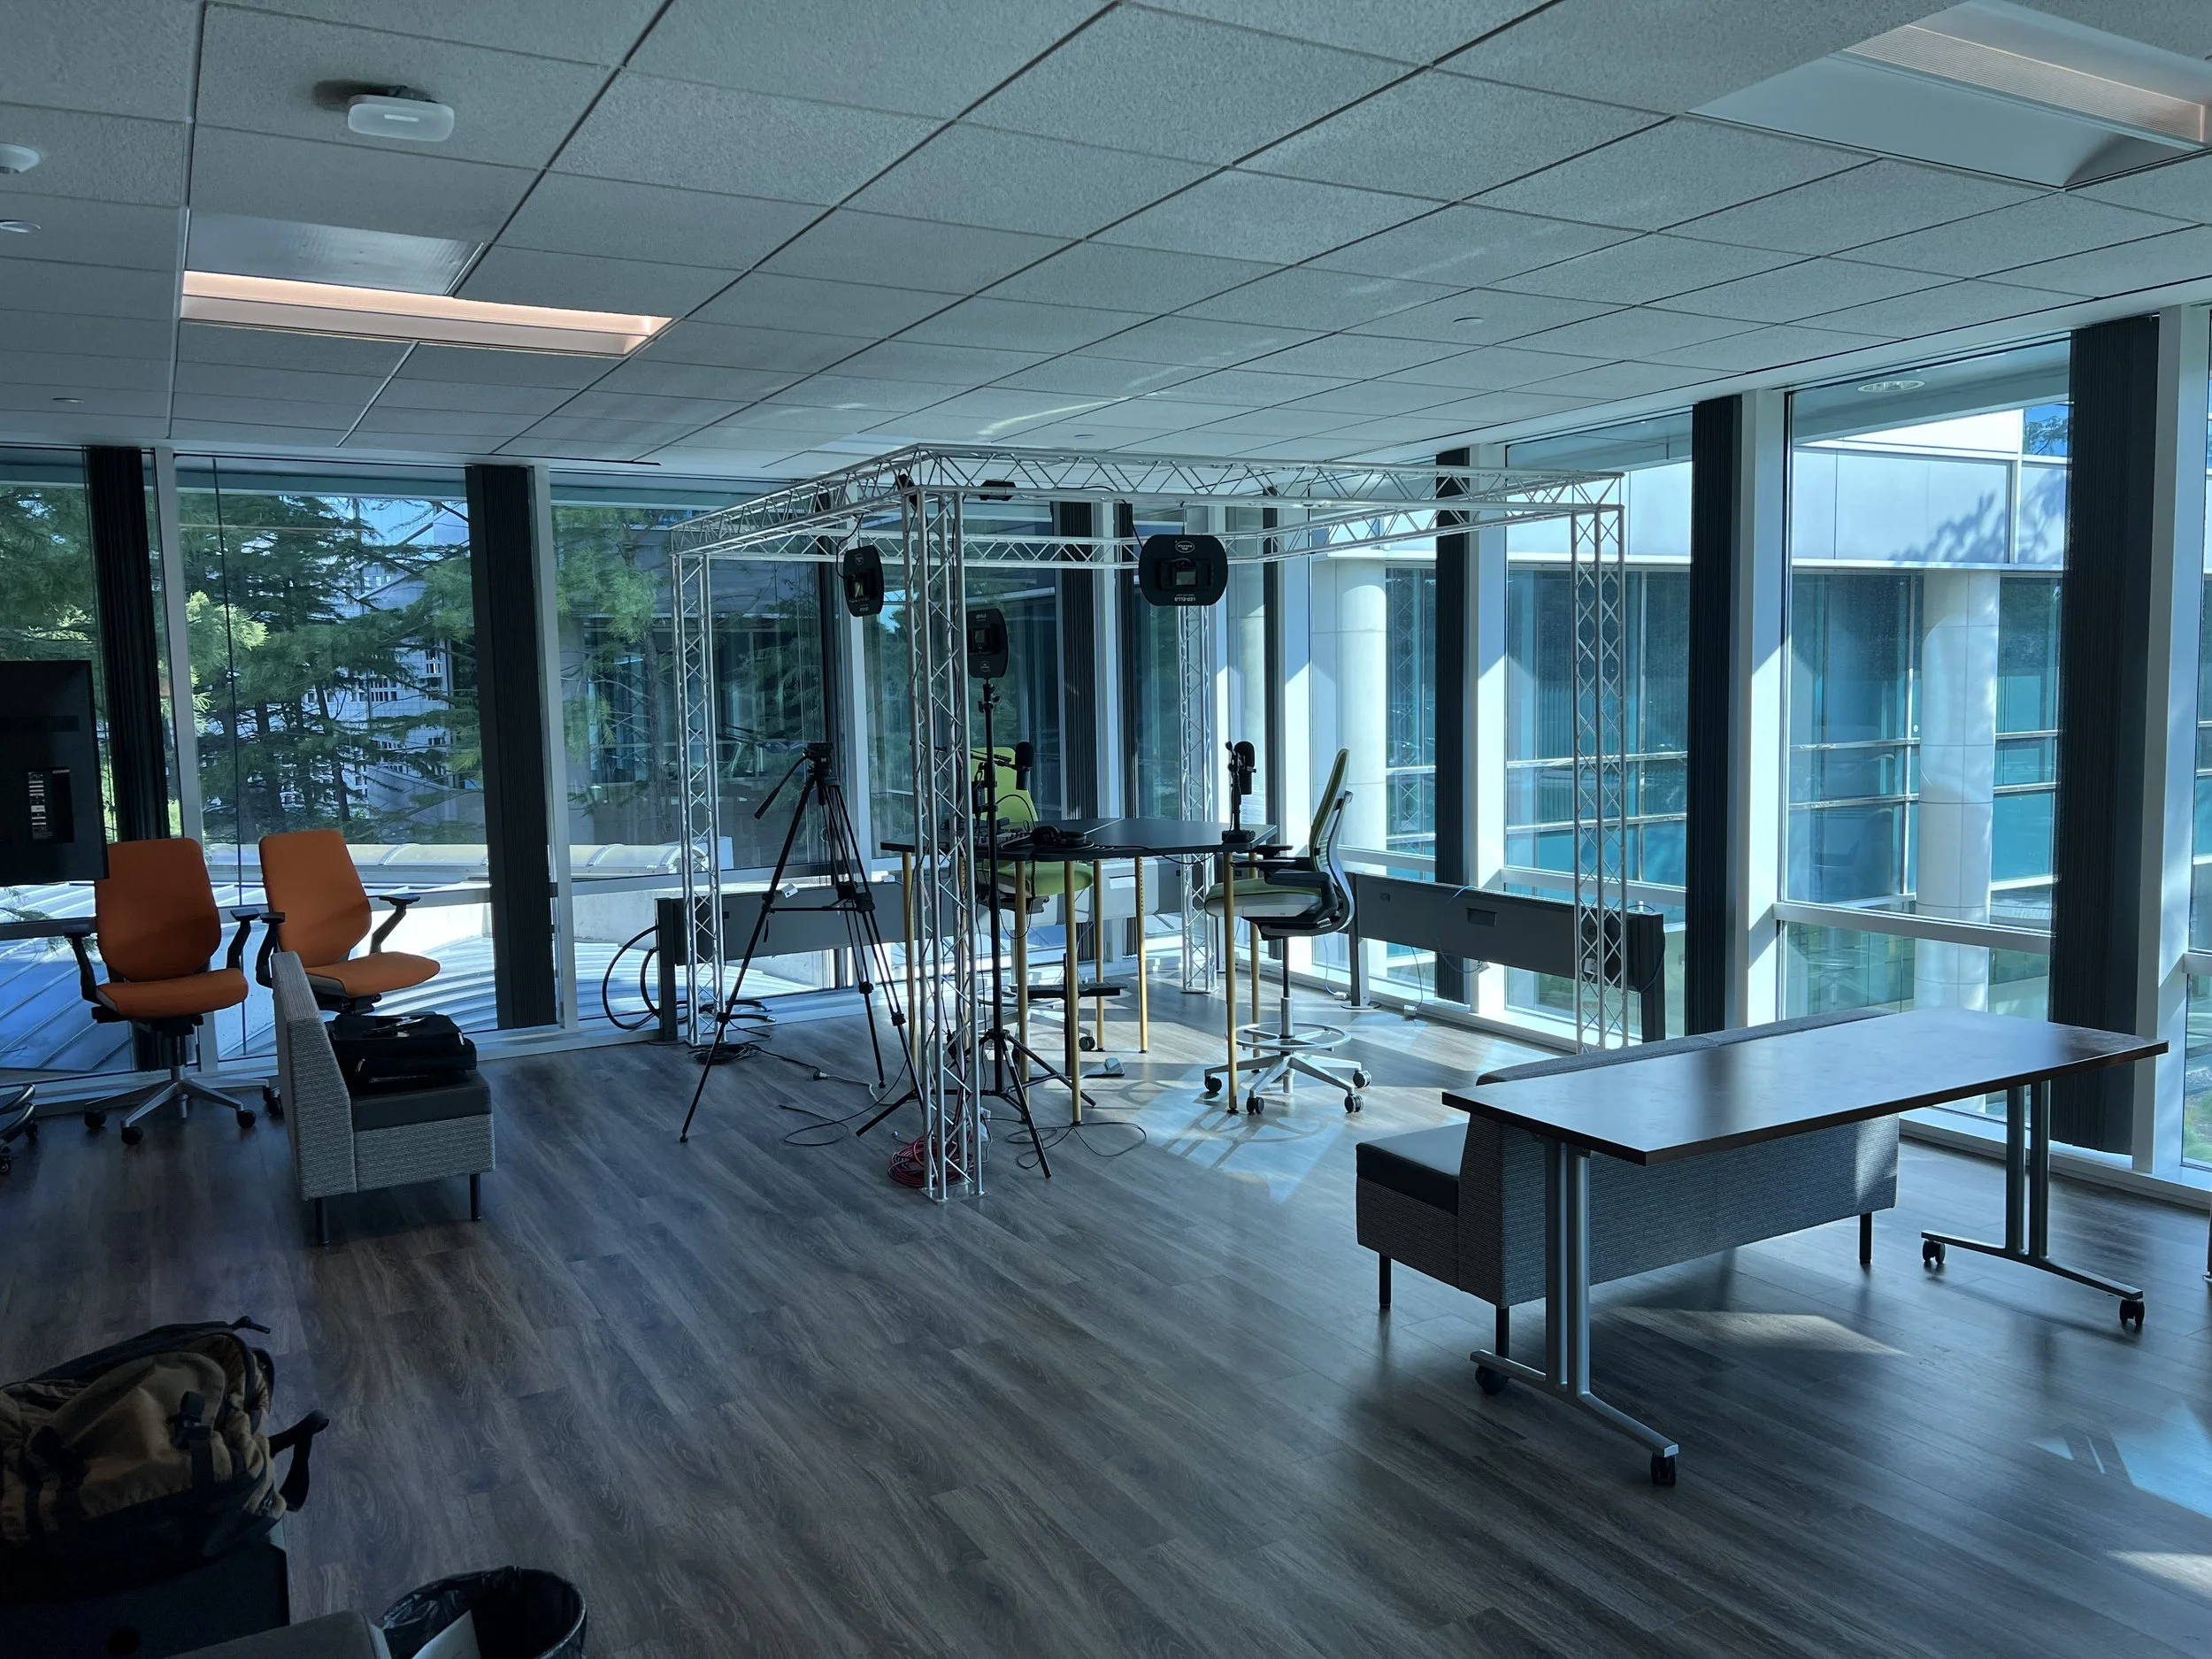
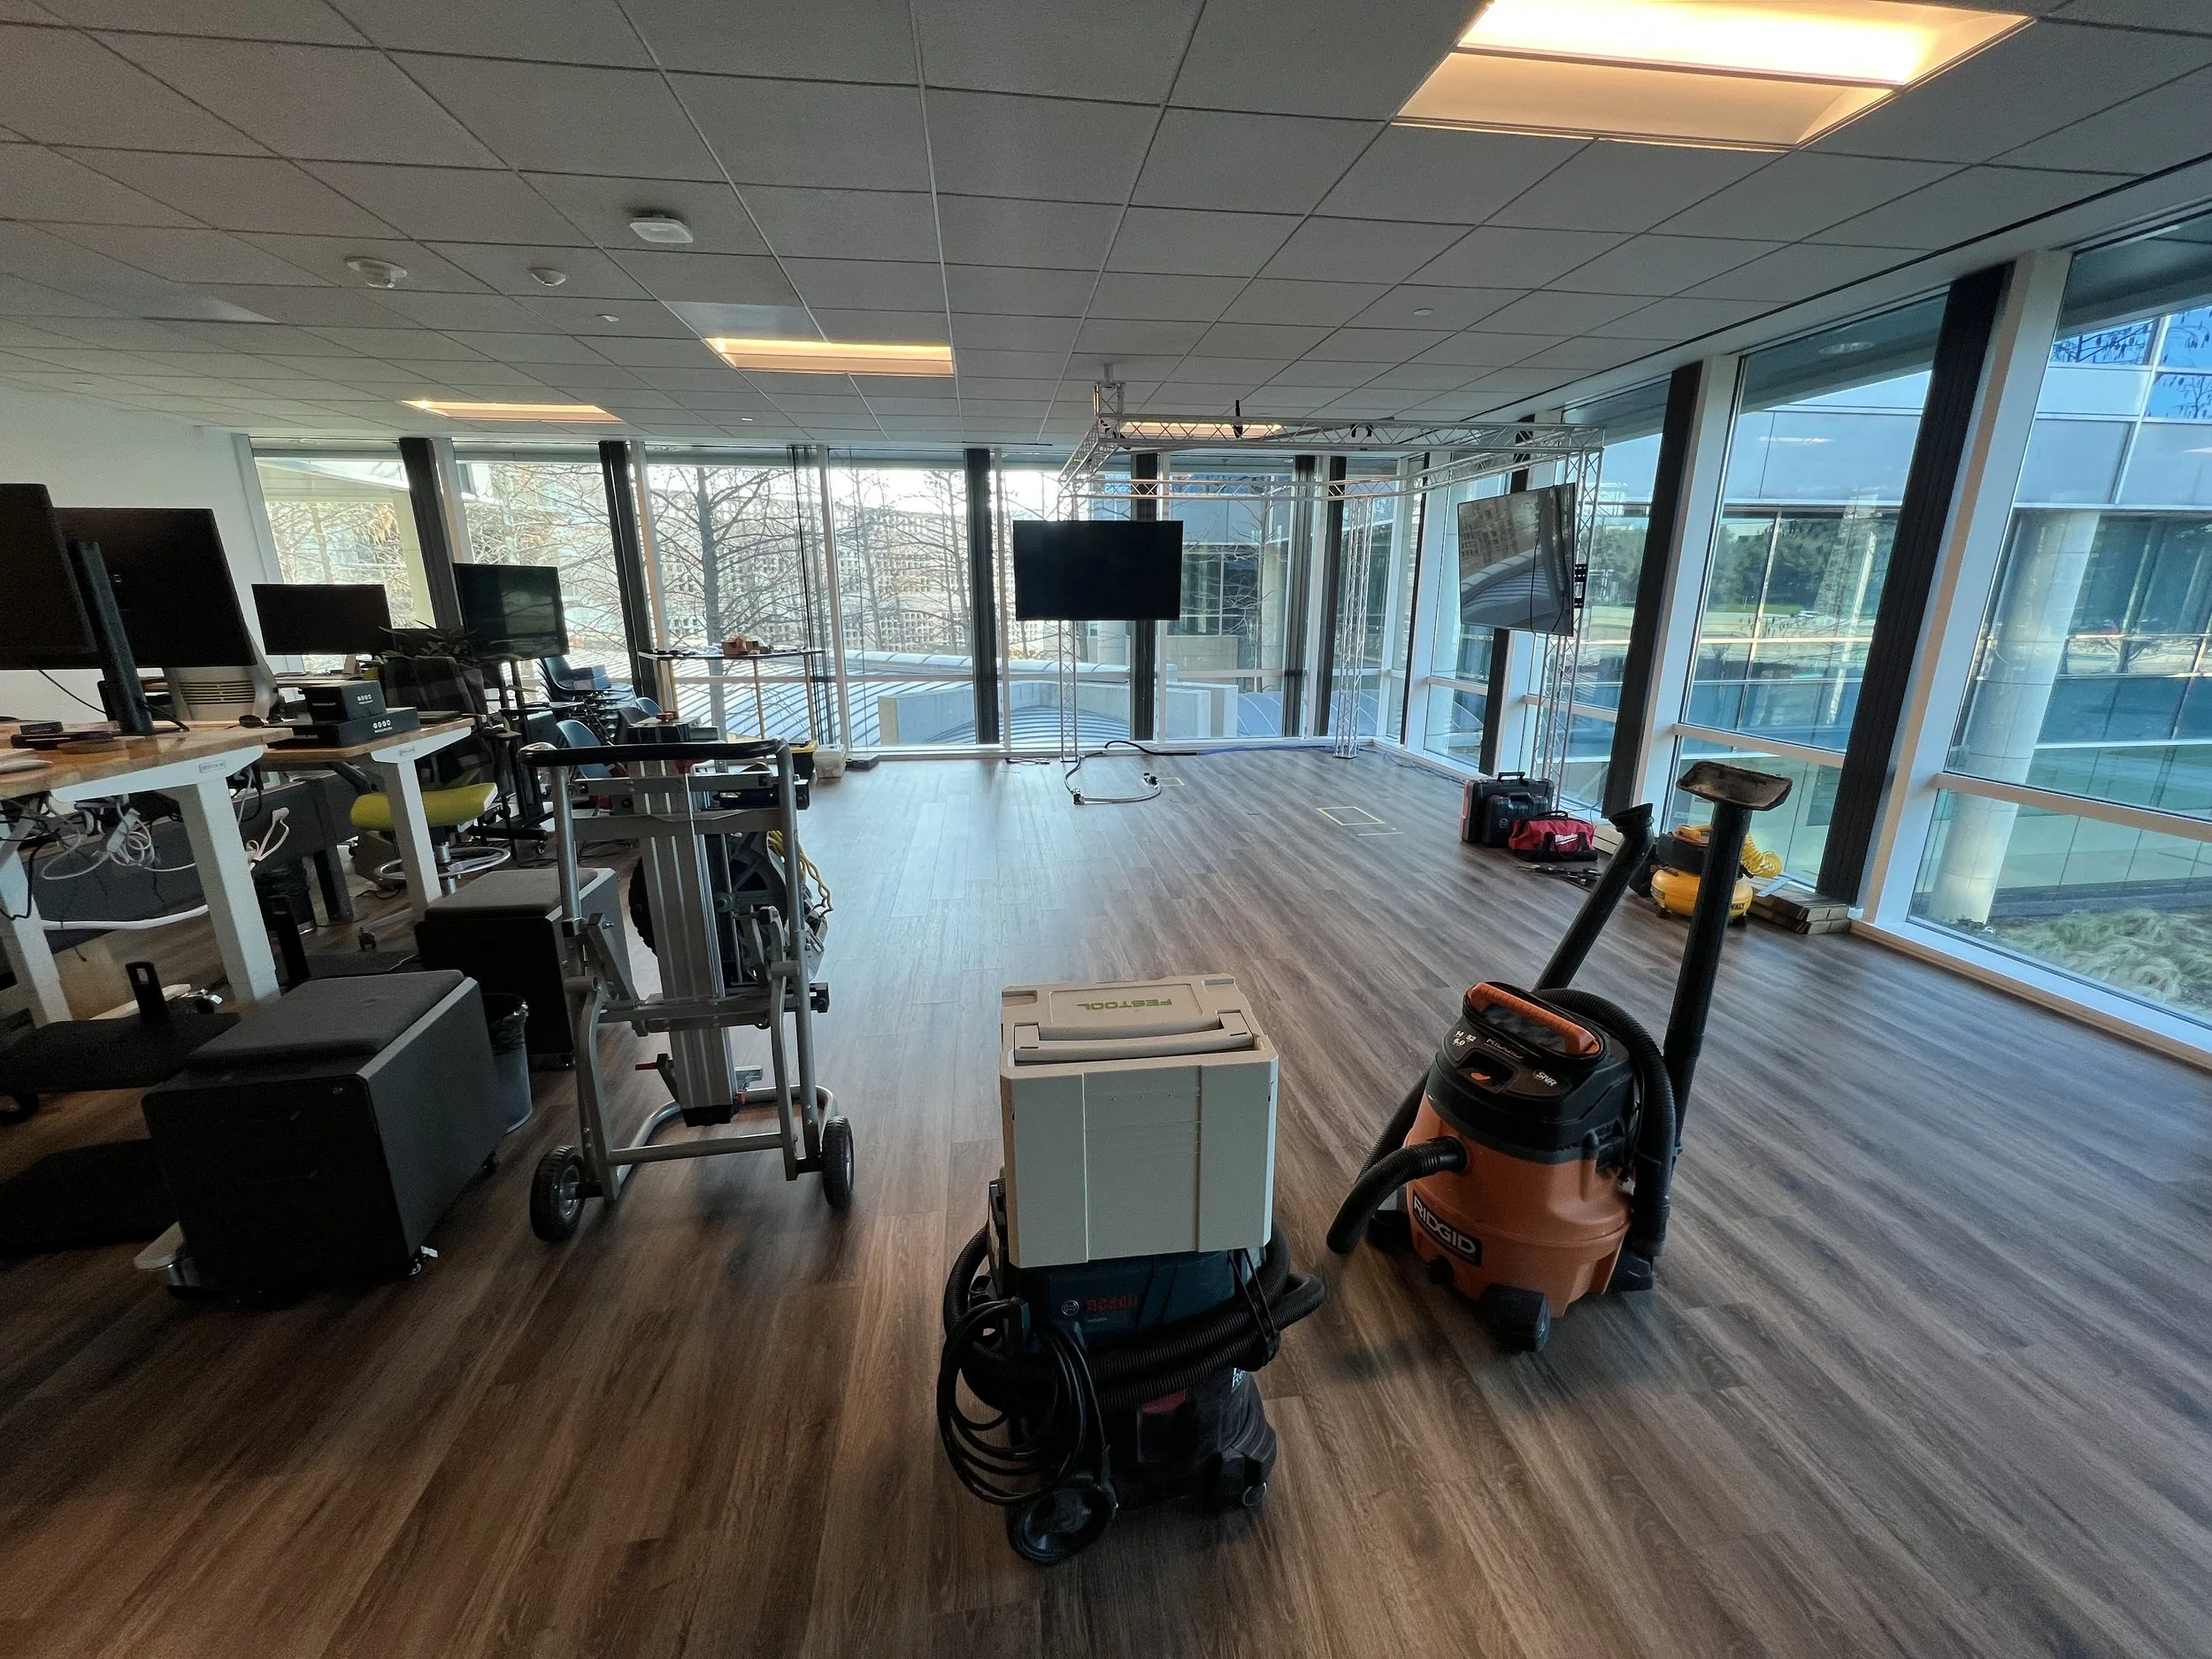
Construction / Stage setup
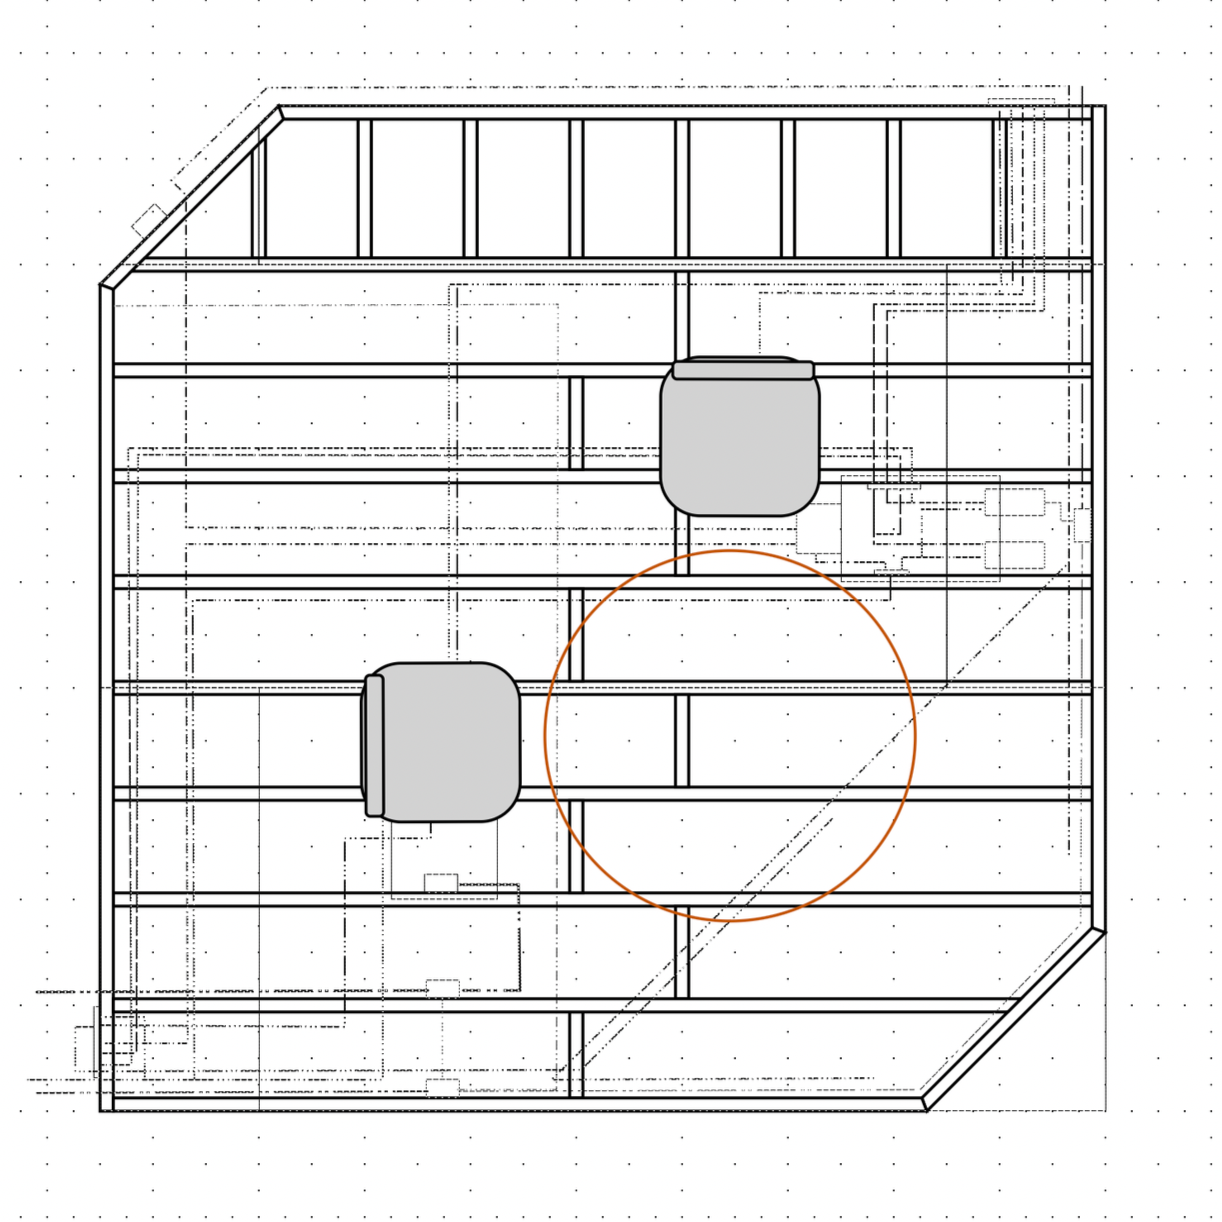
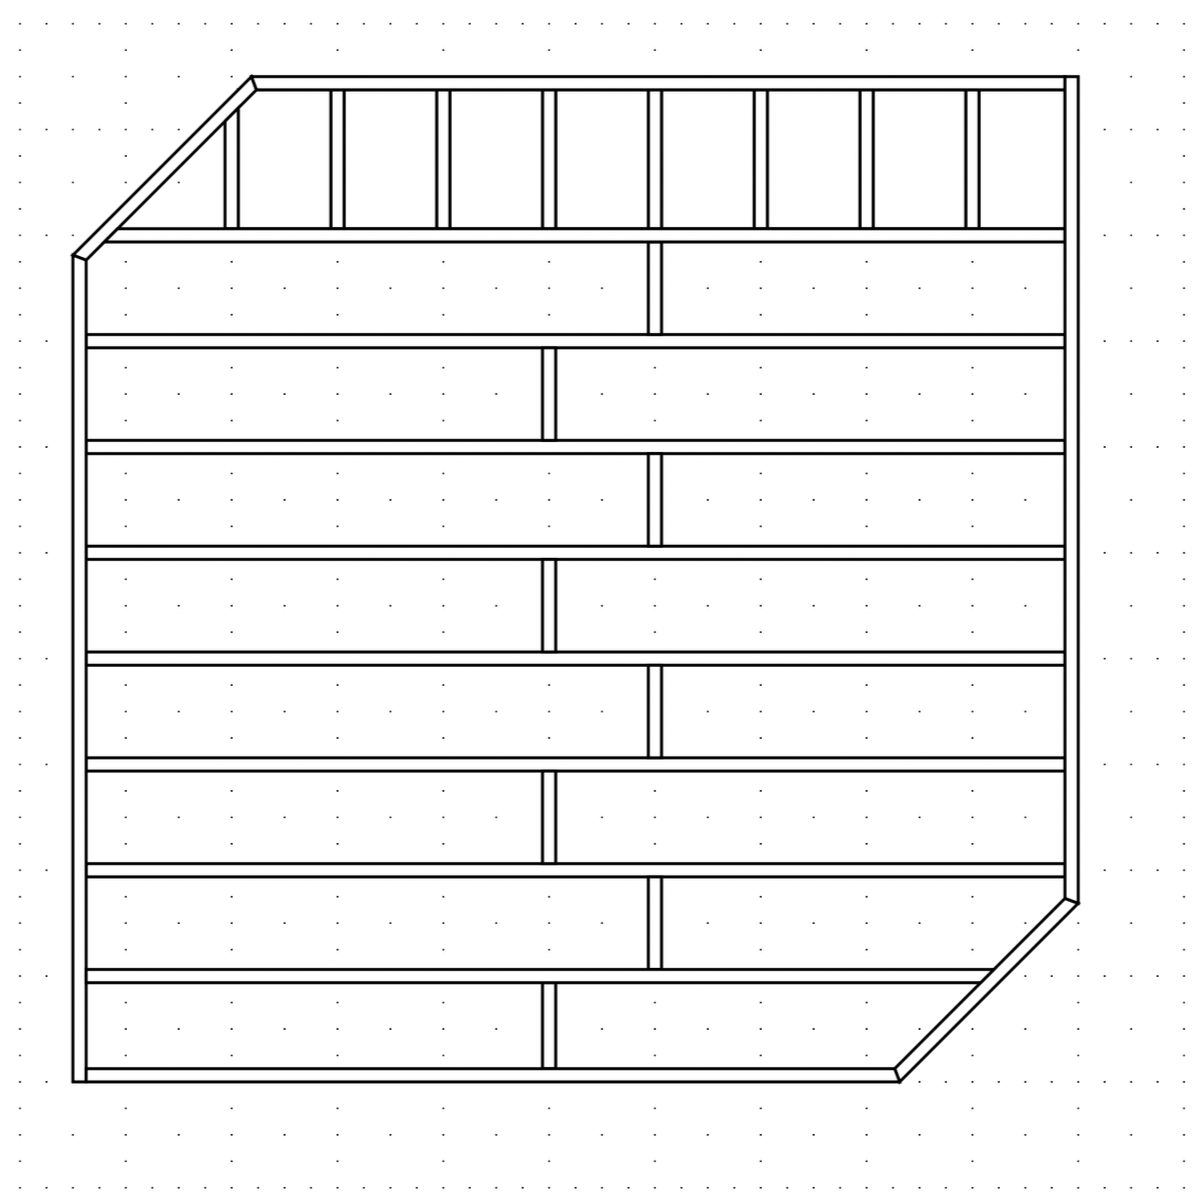
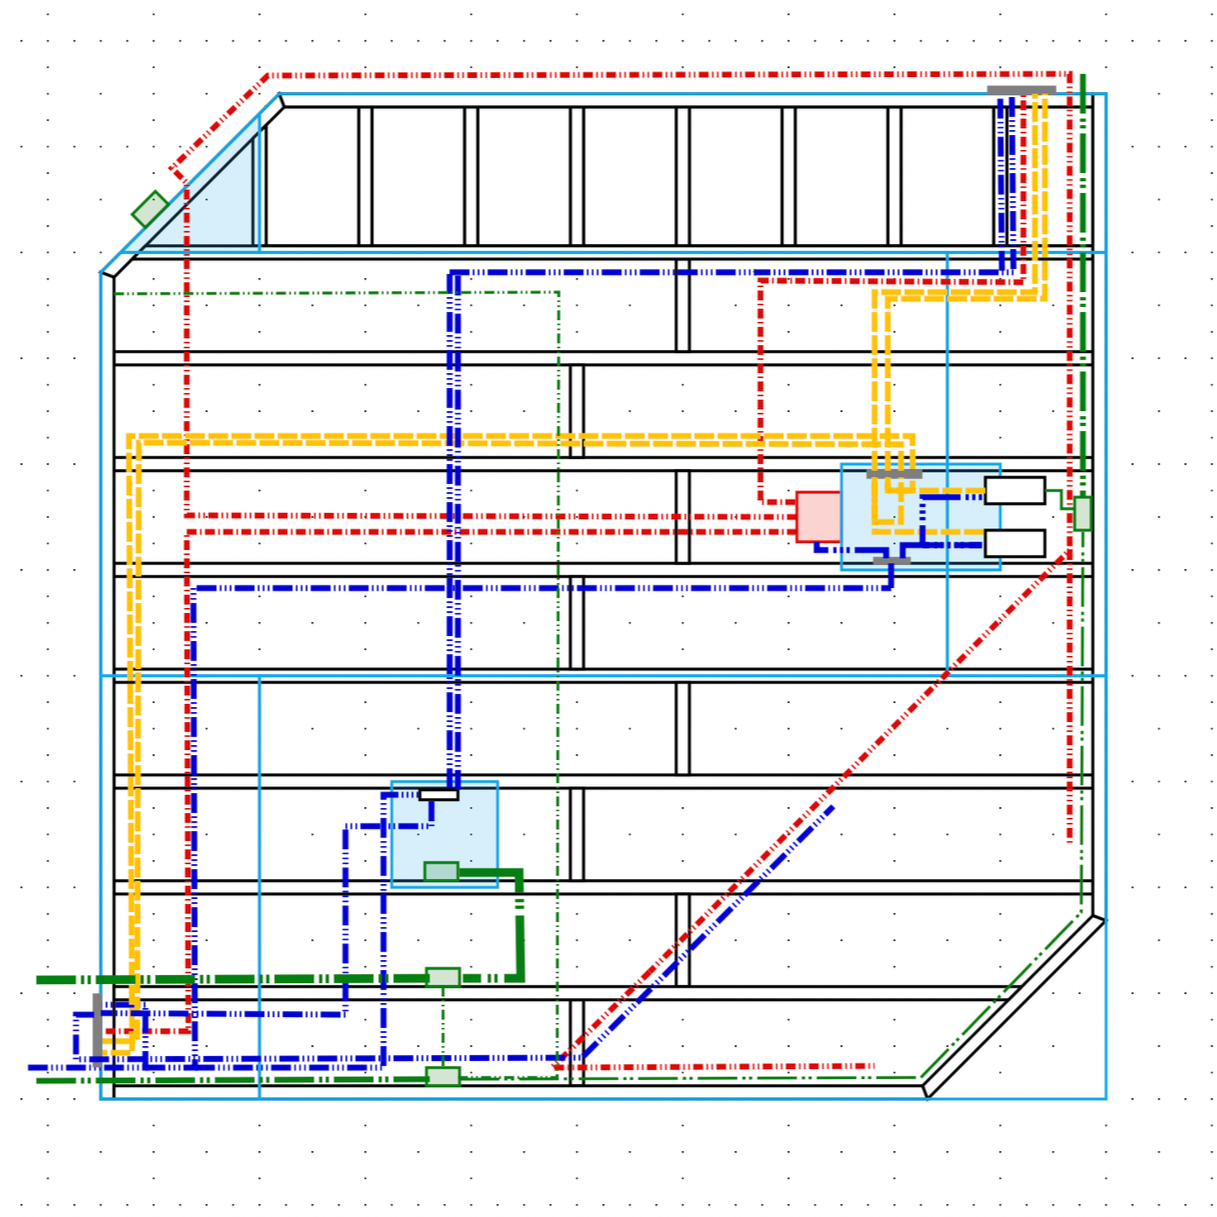
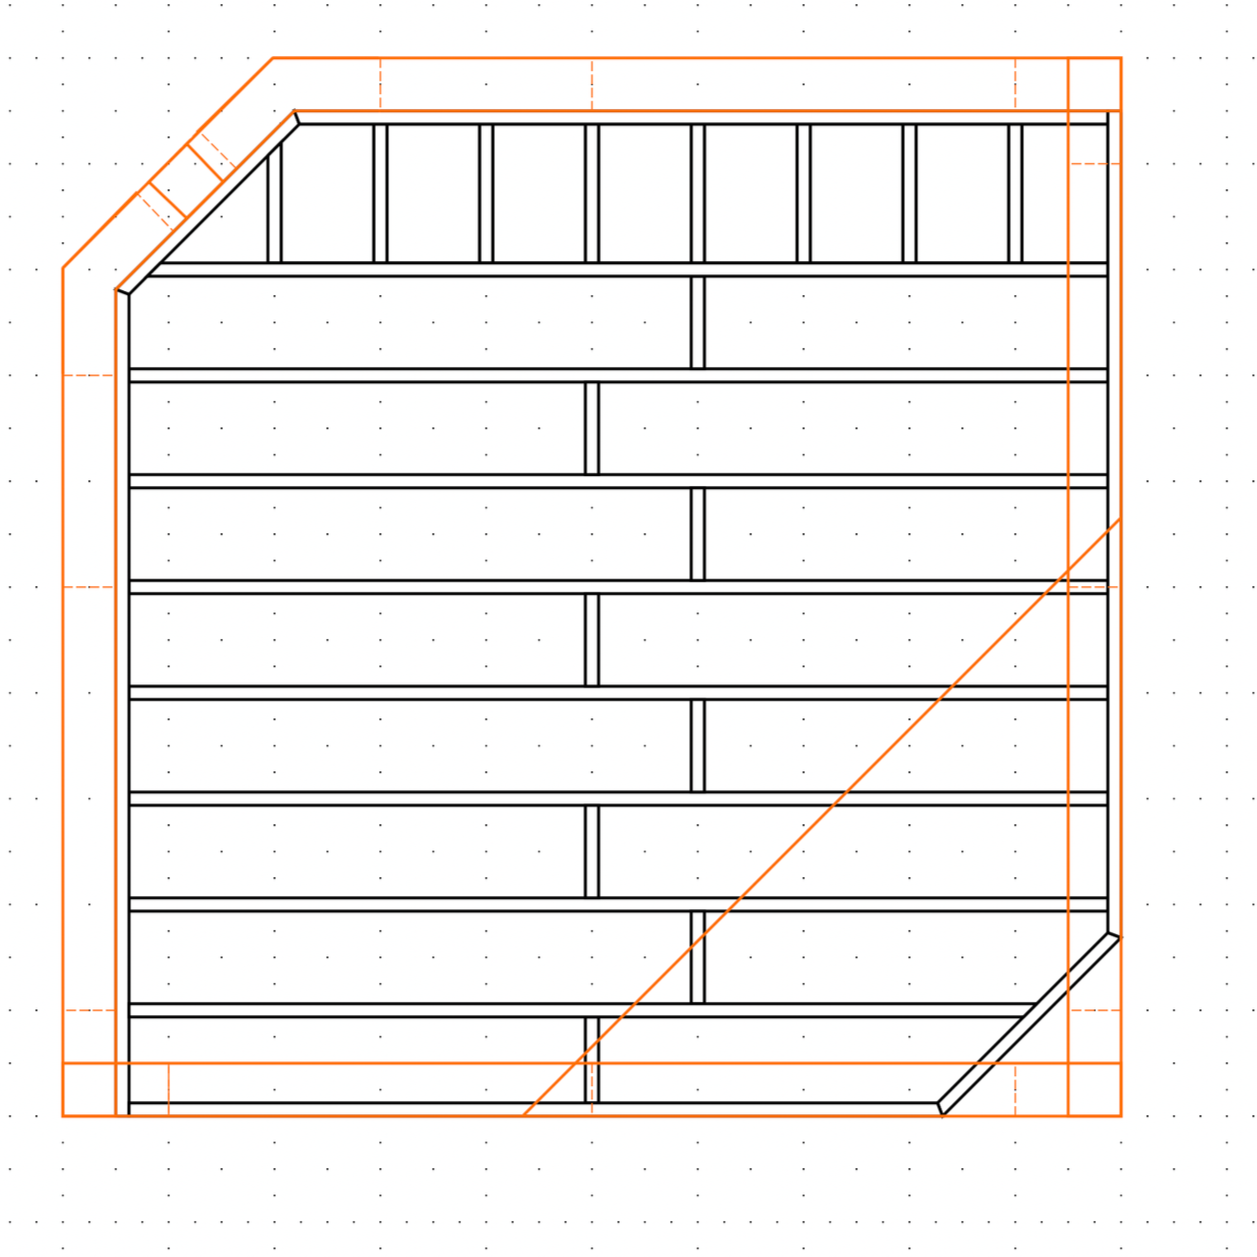
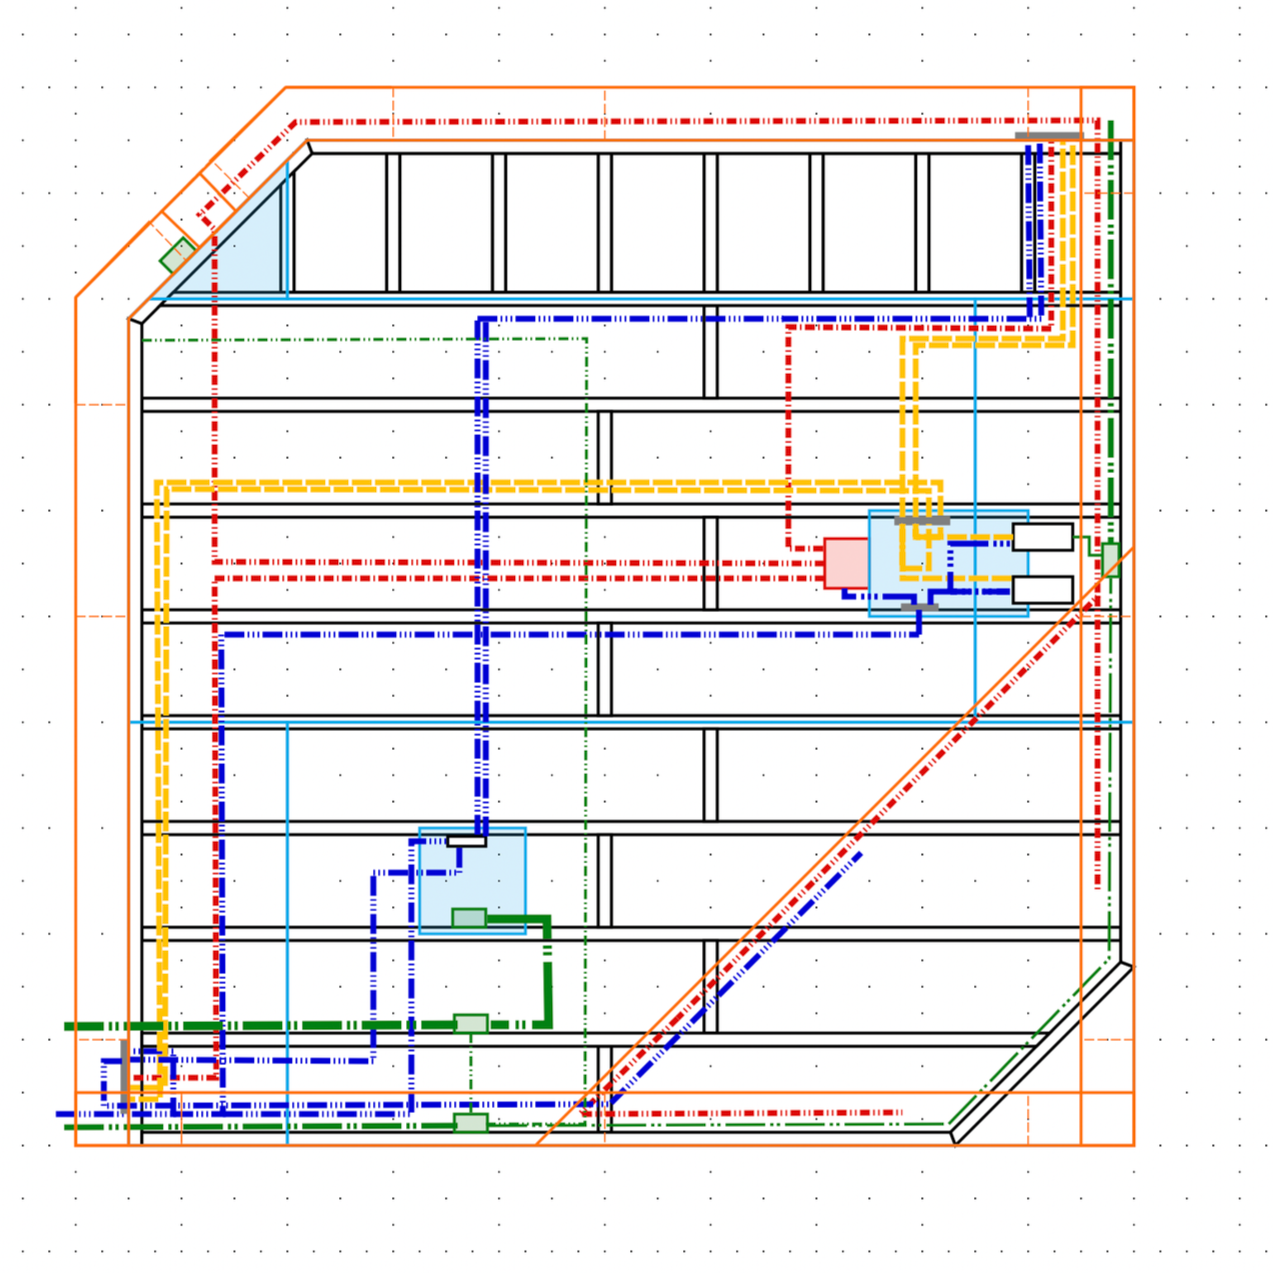
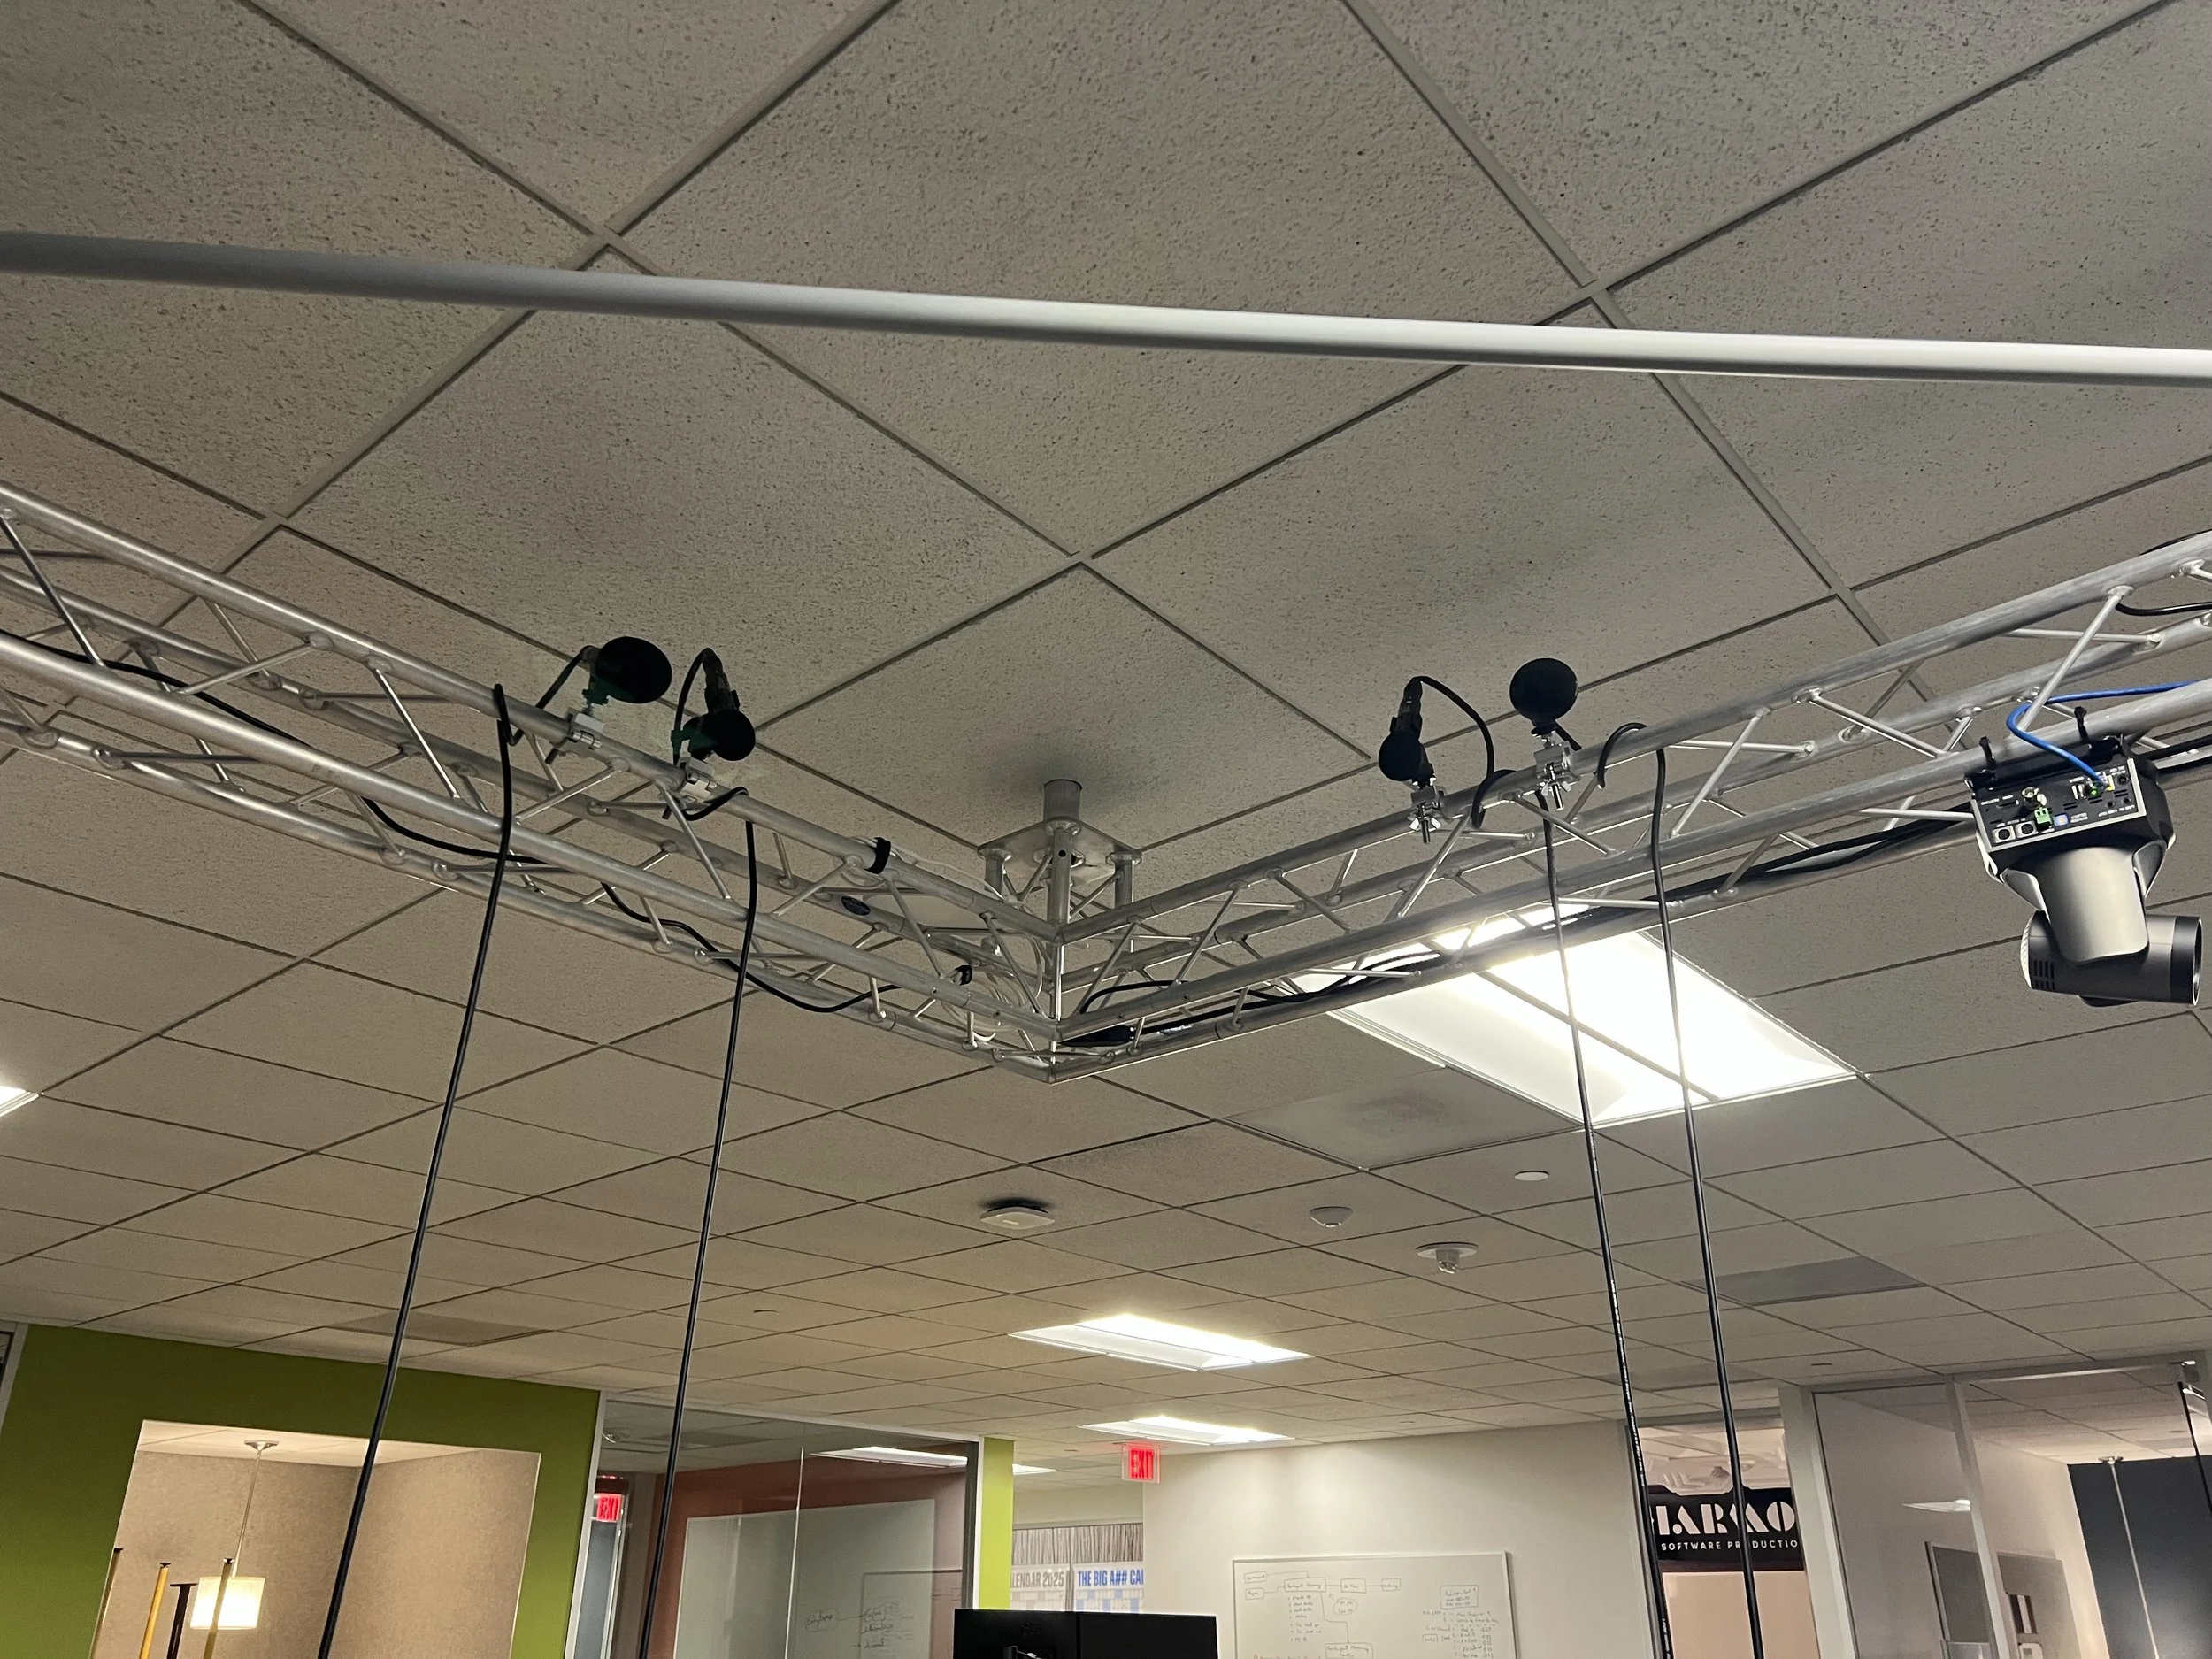
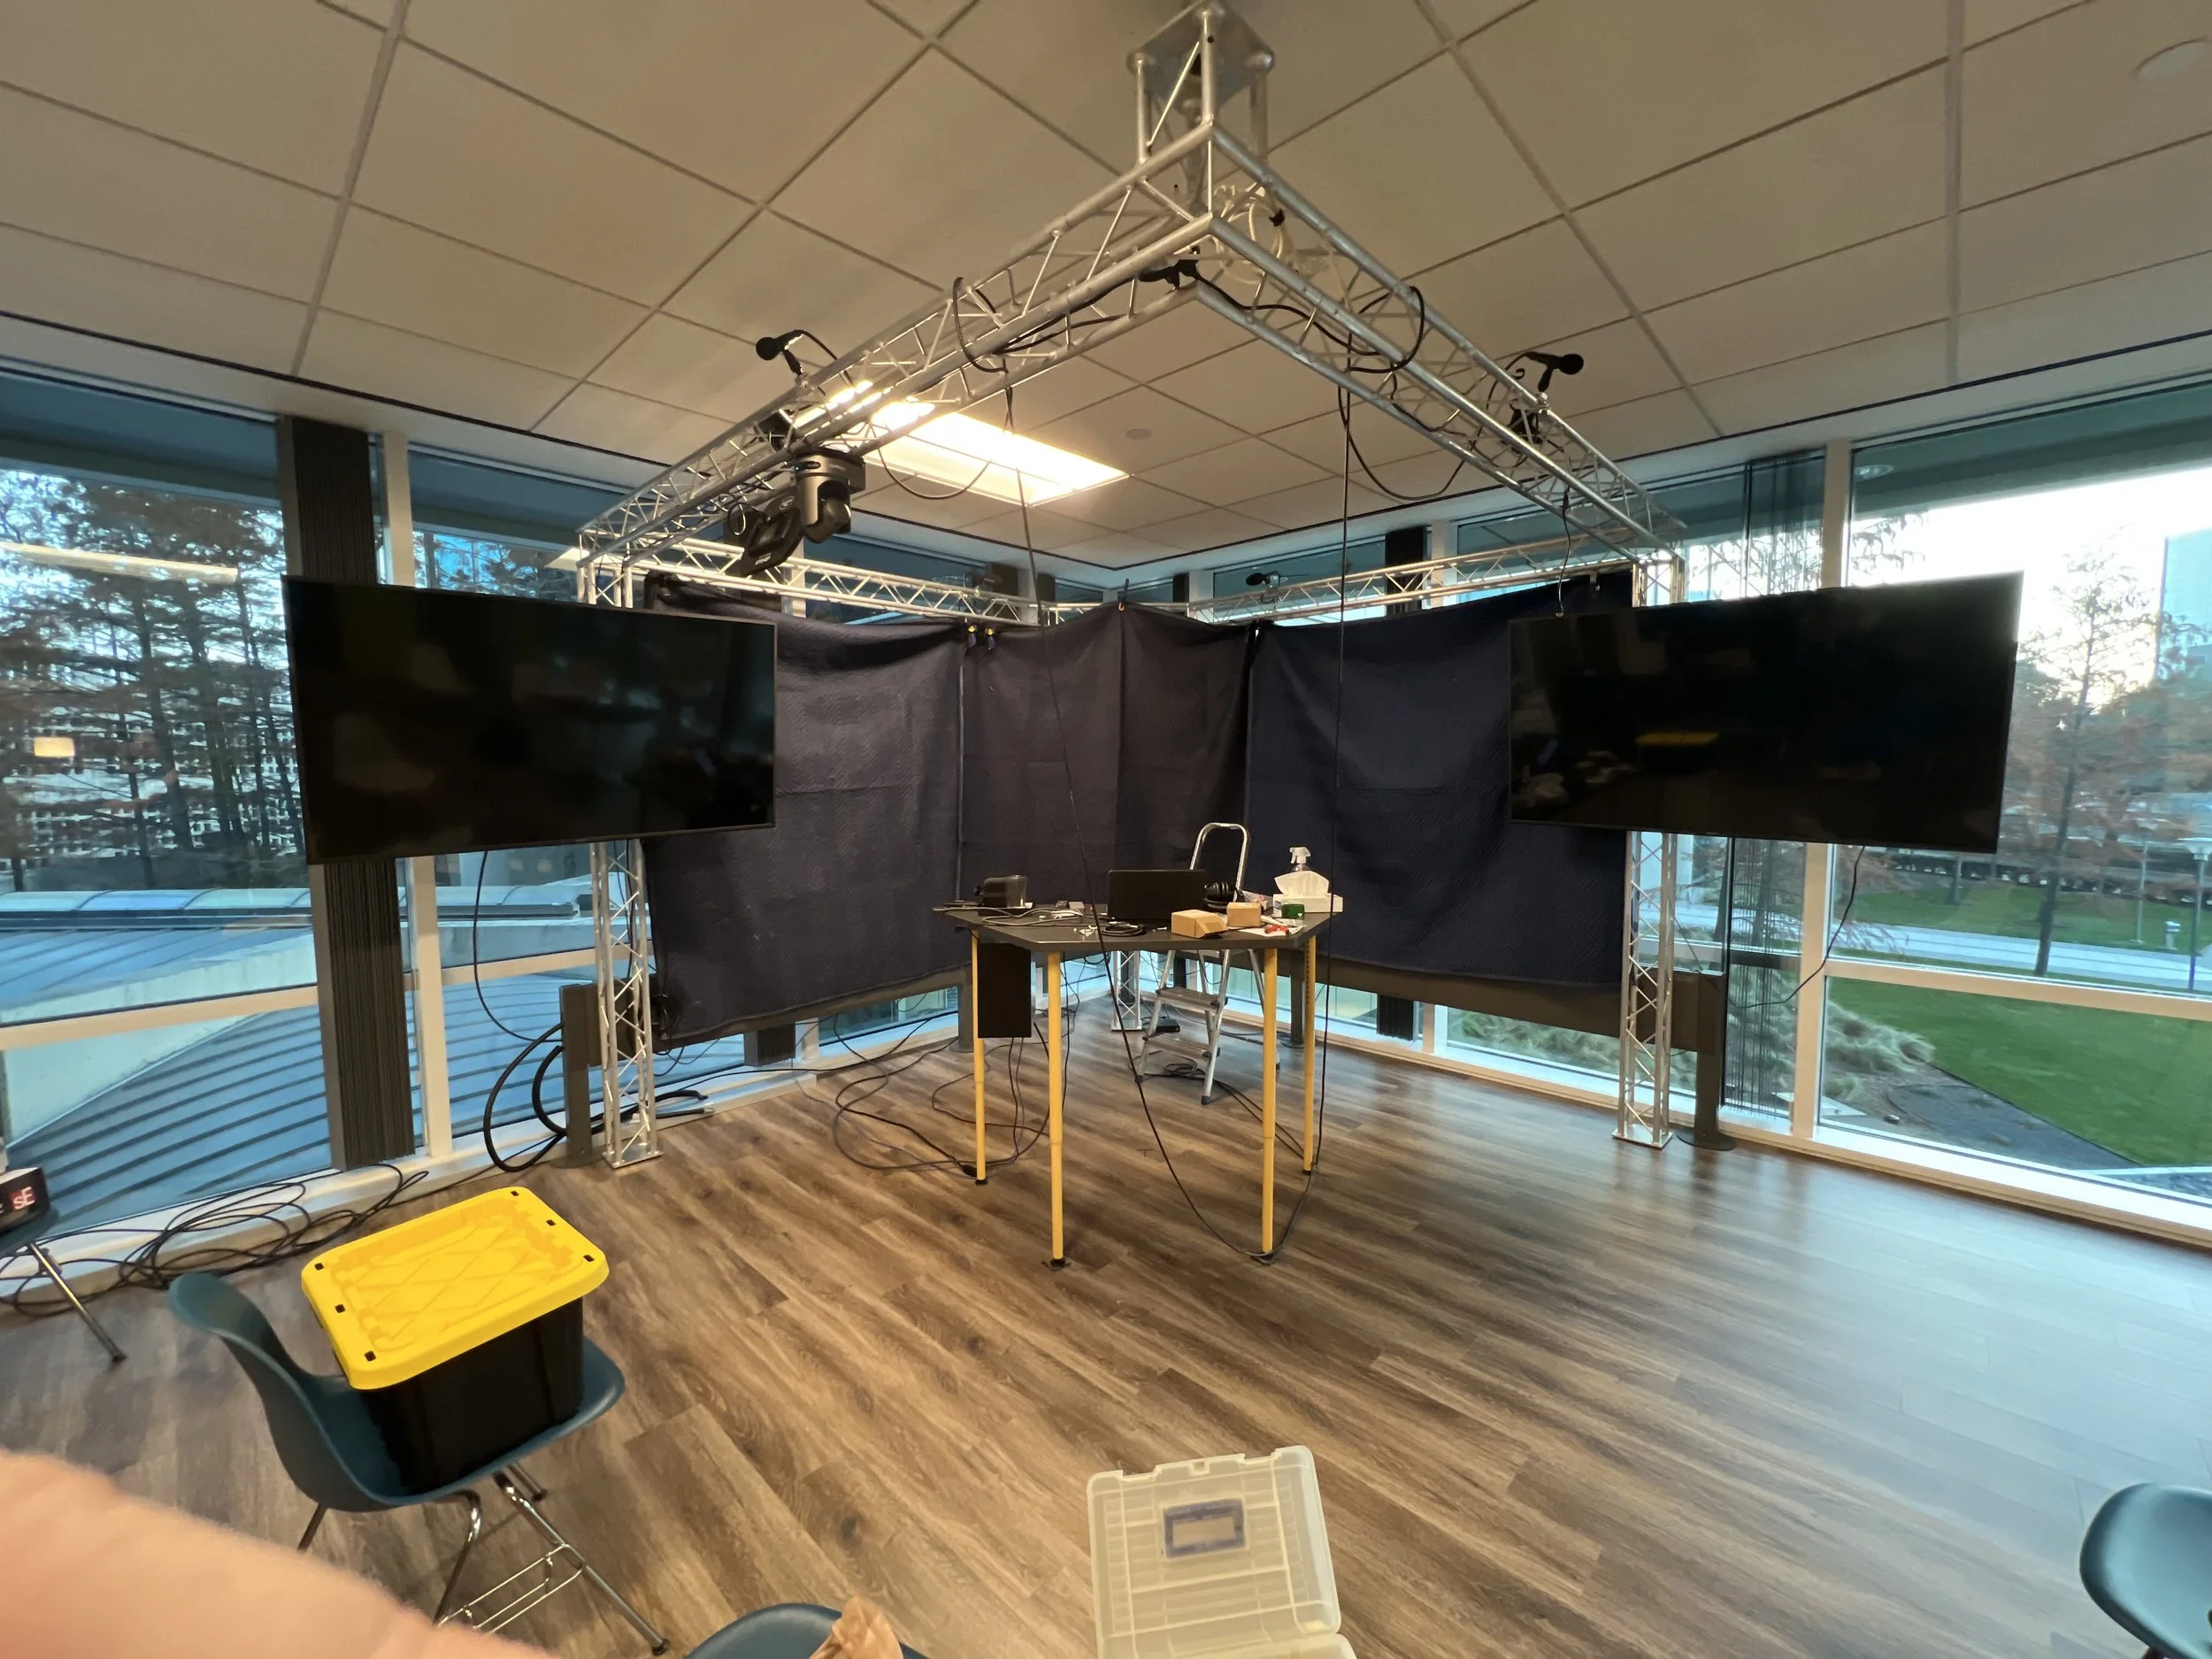
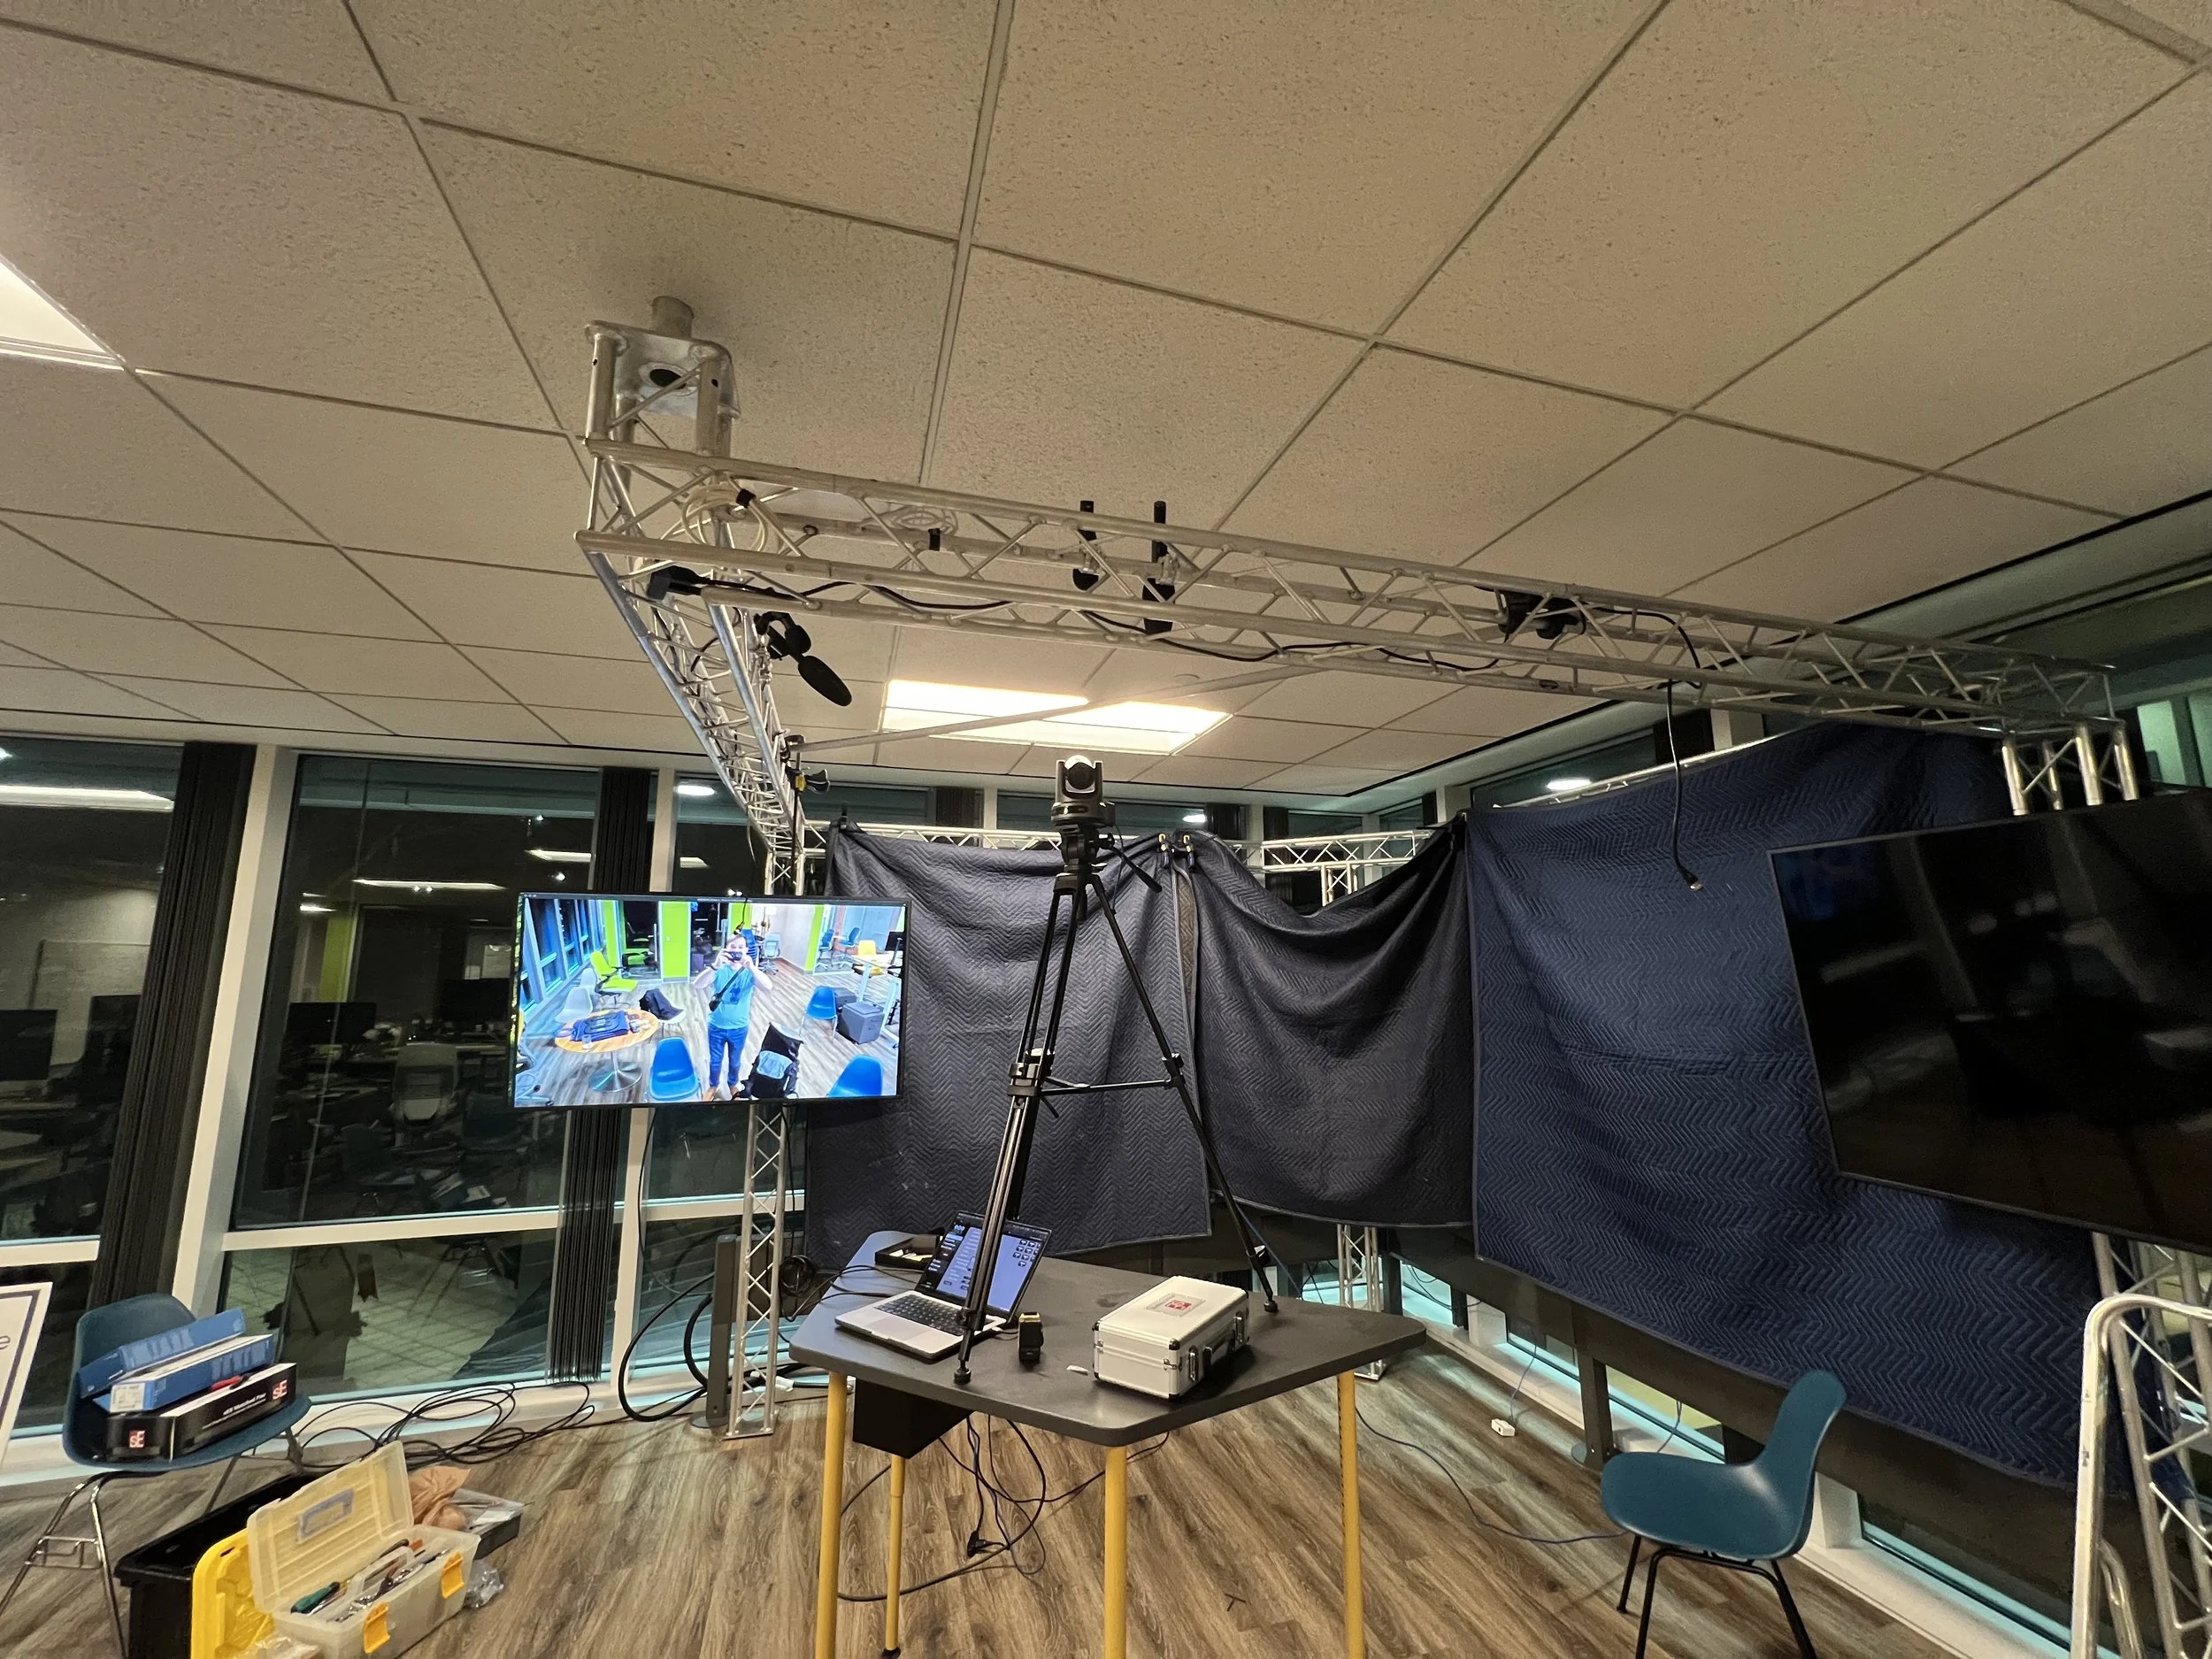
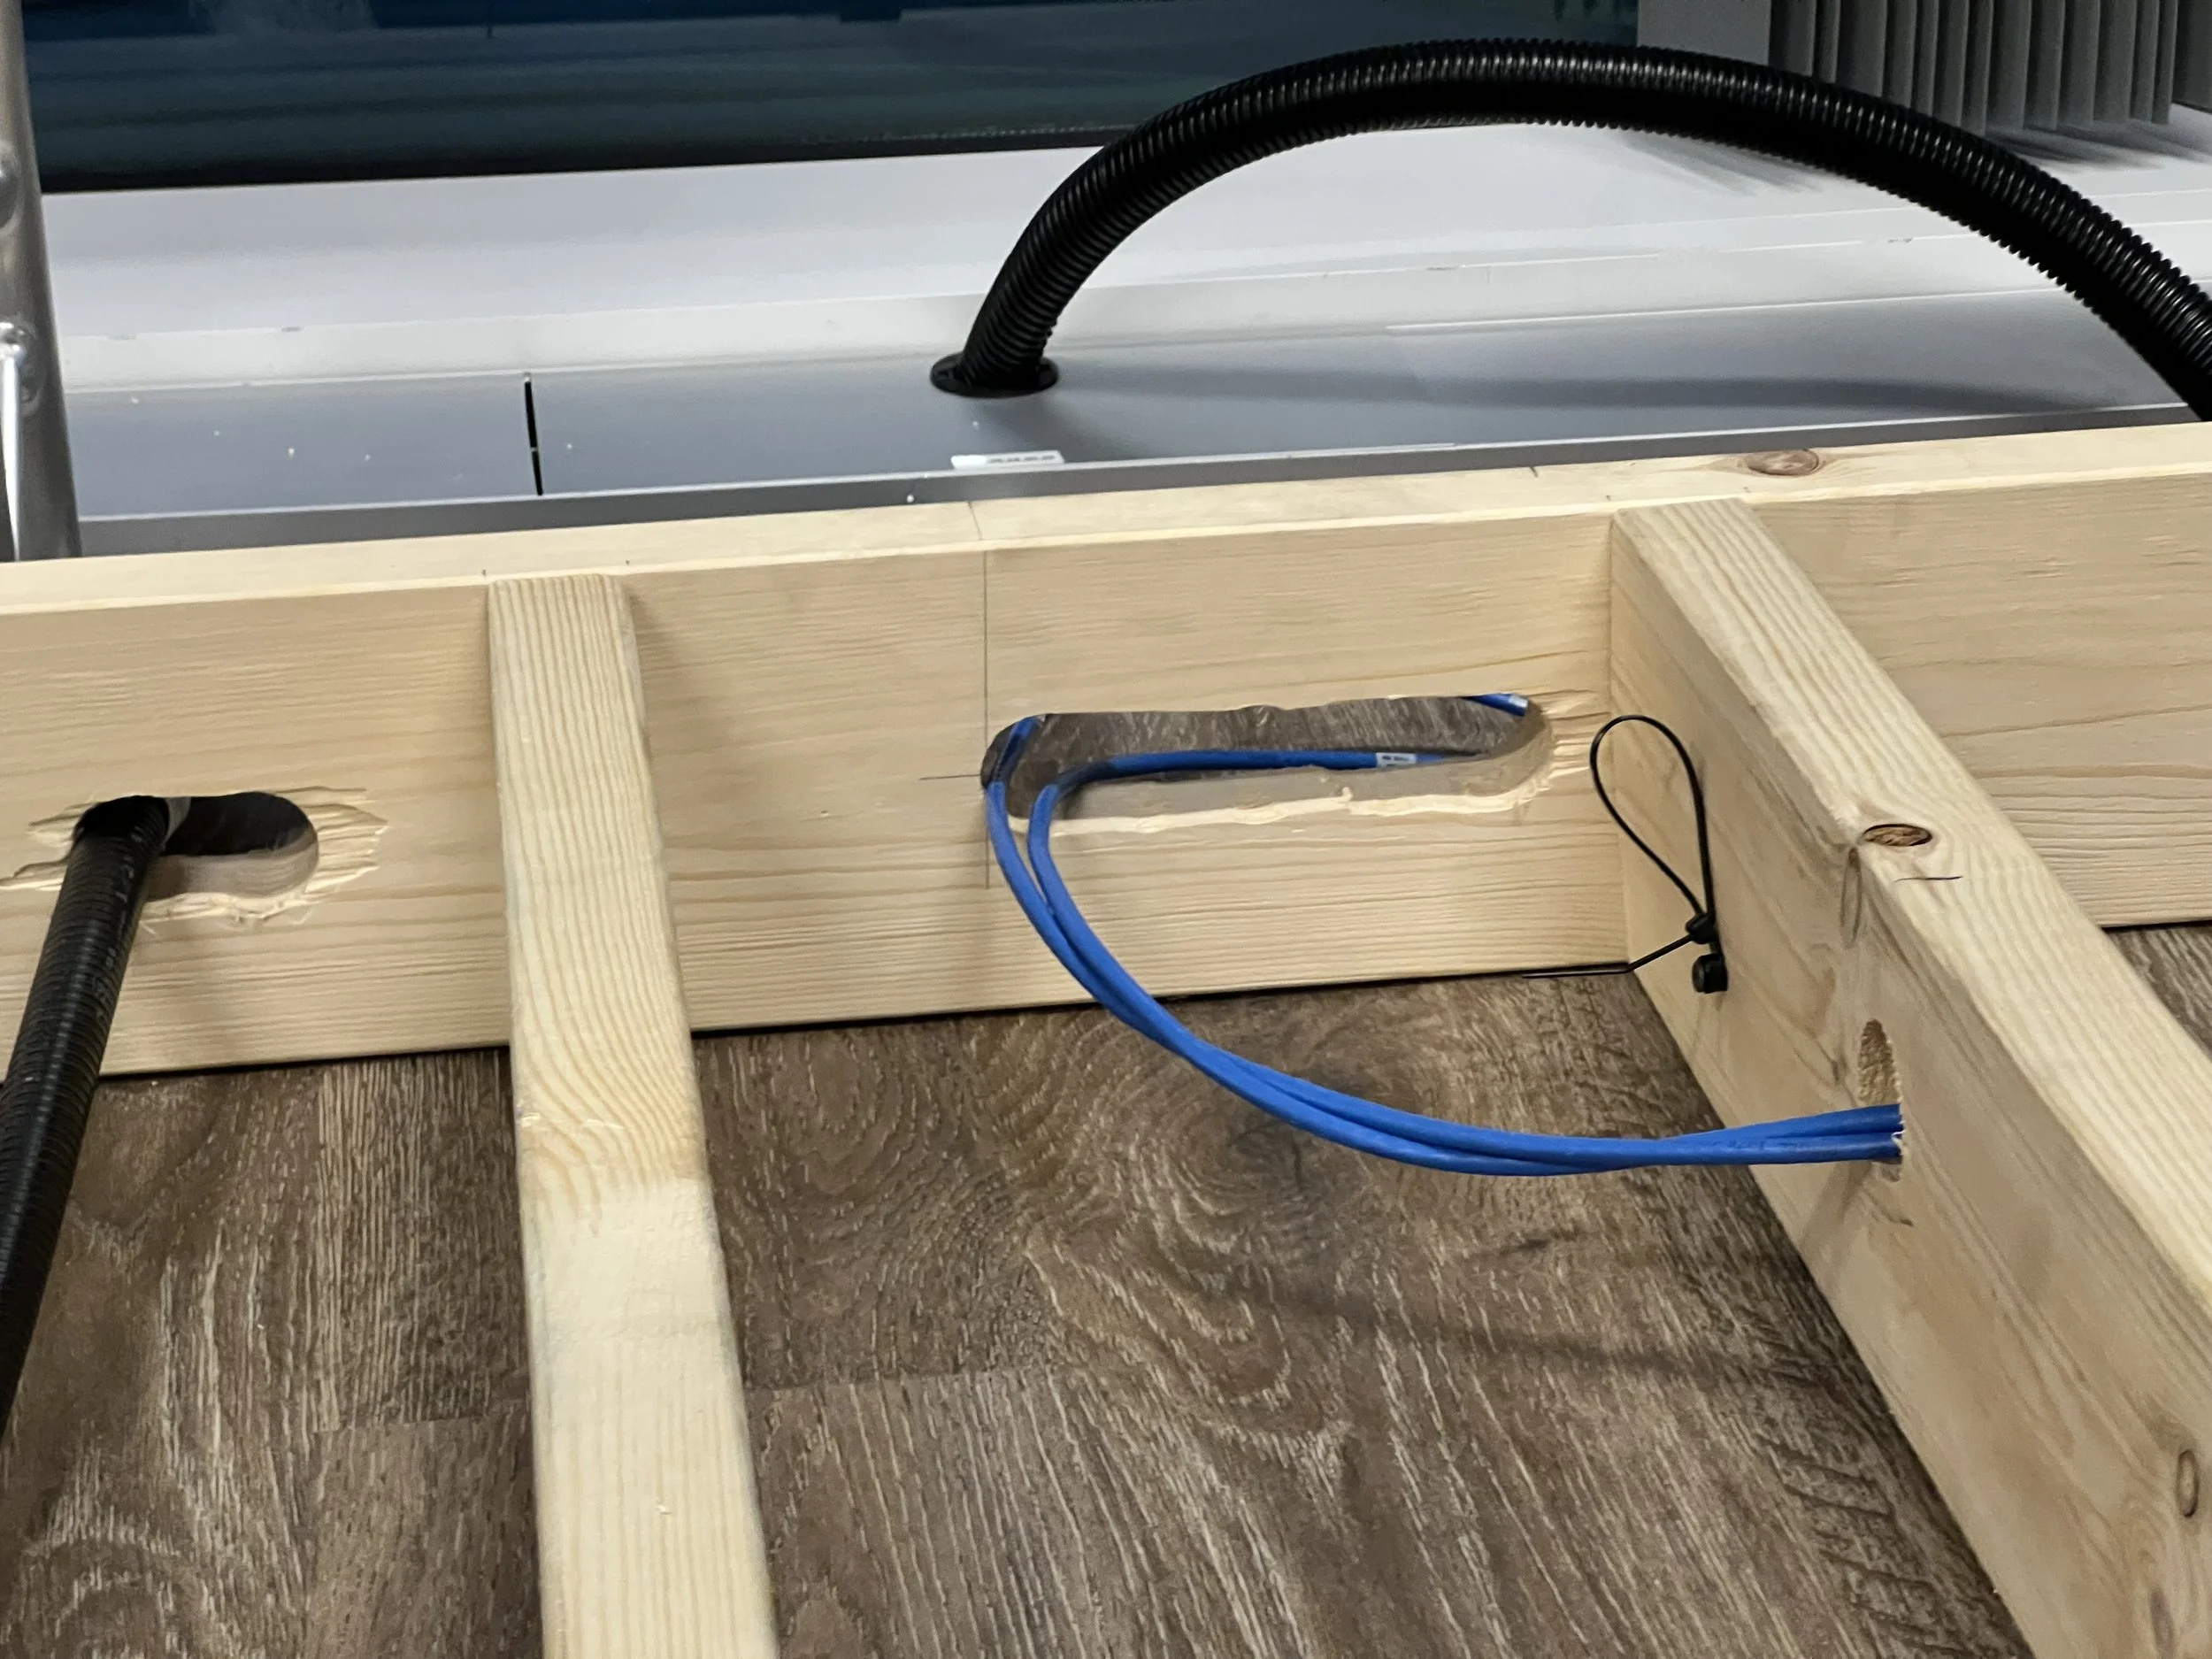
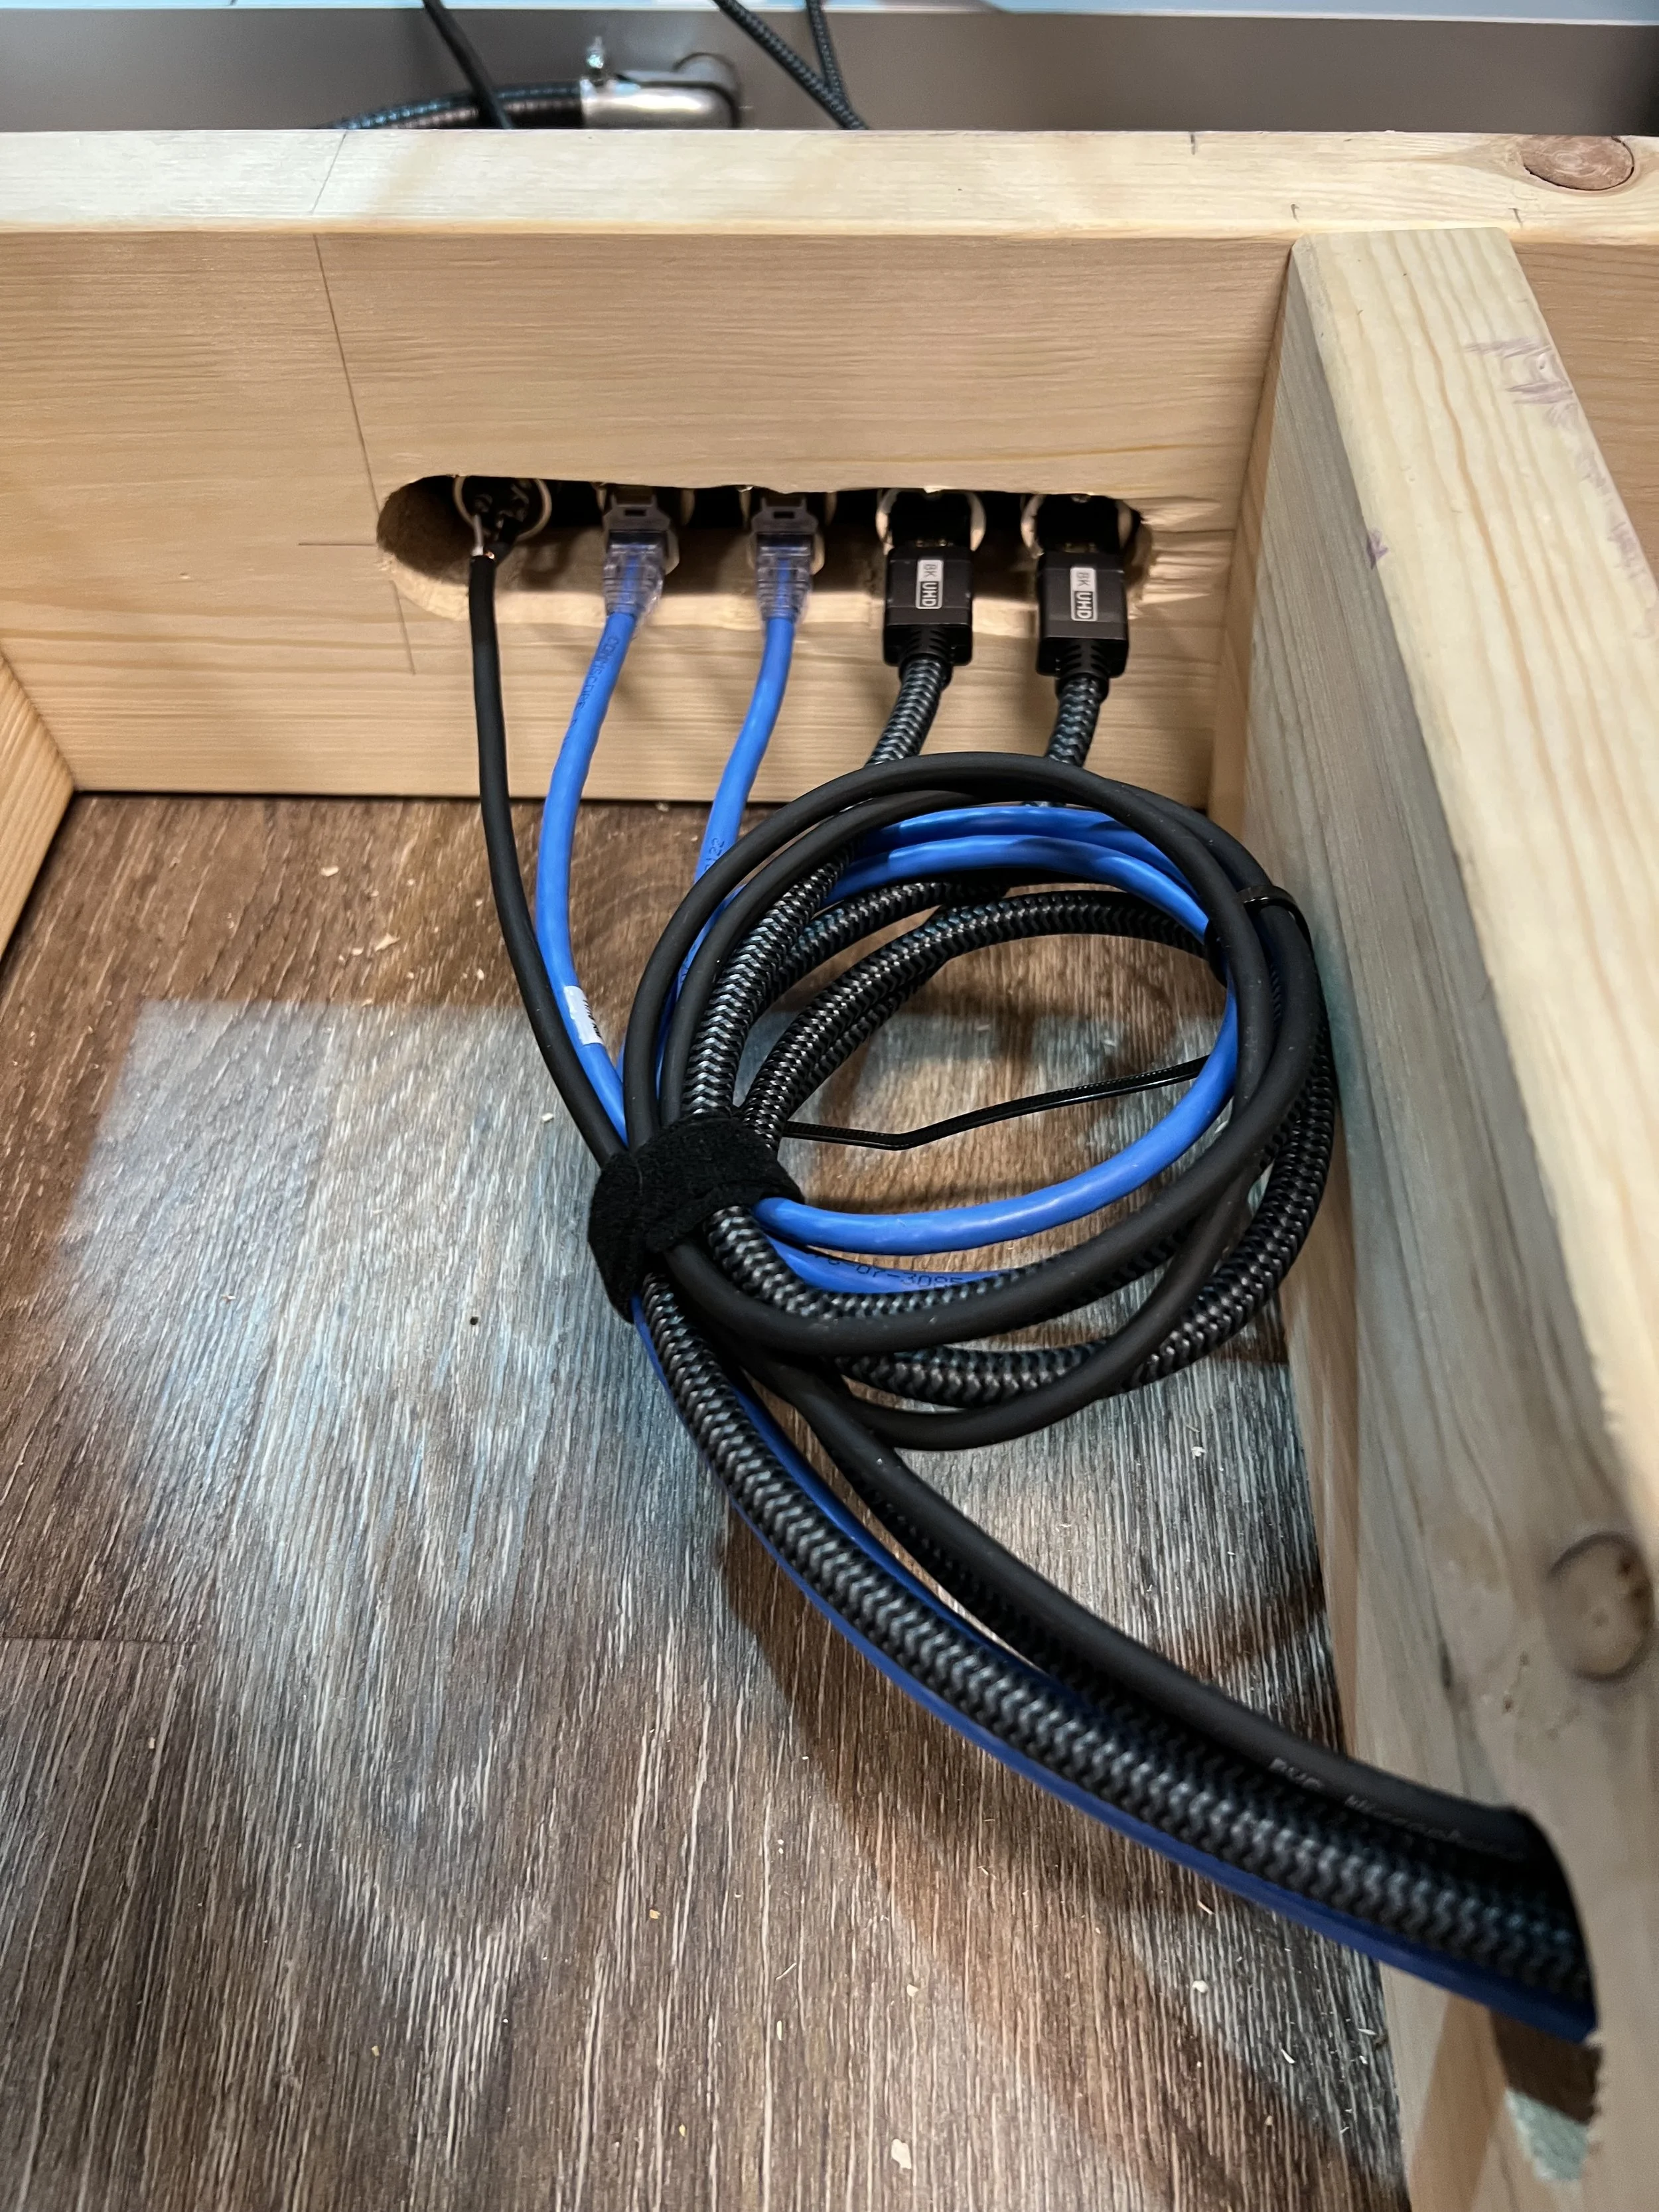
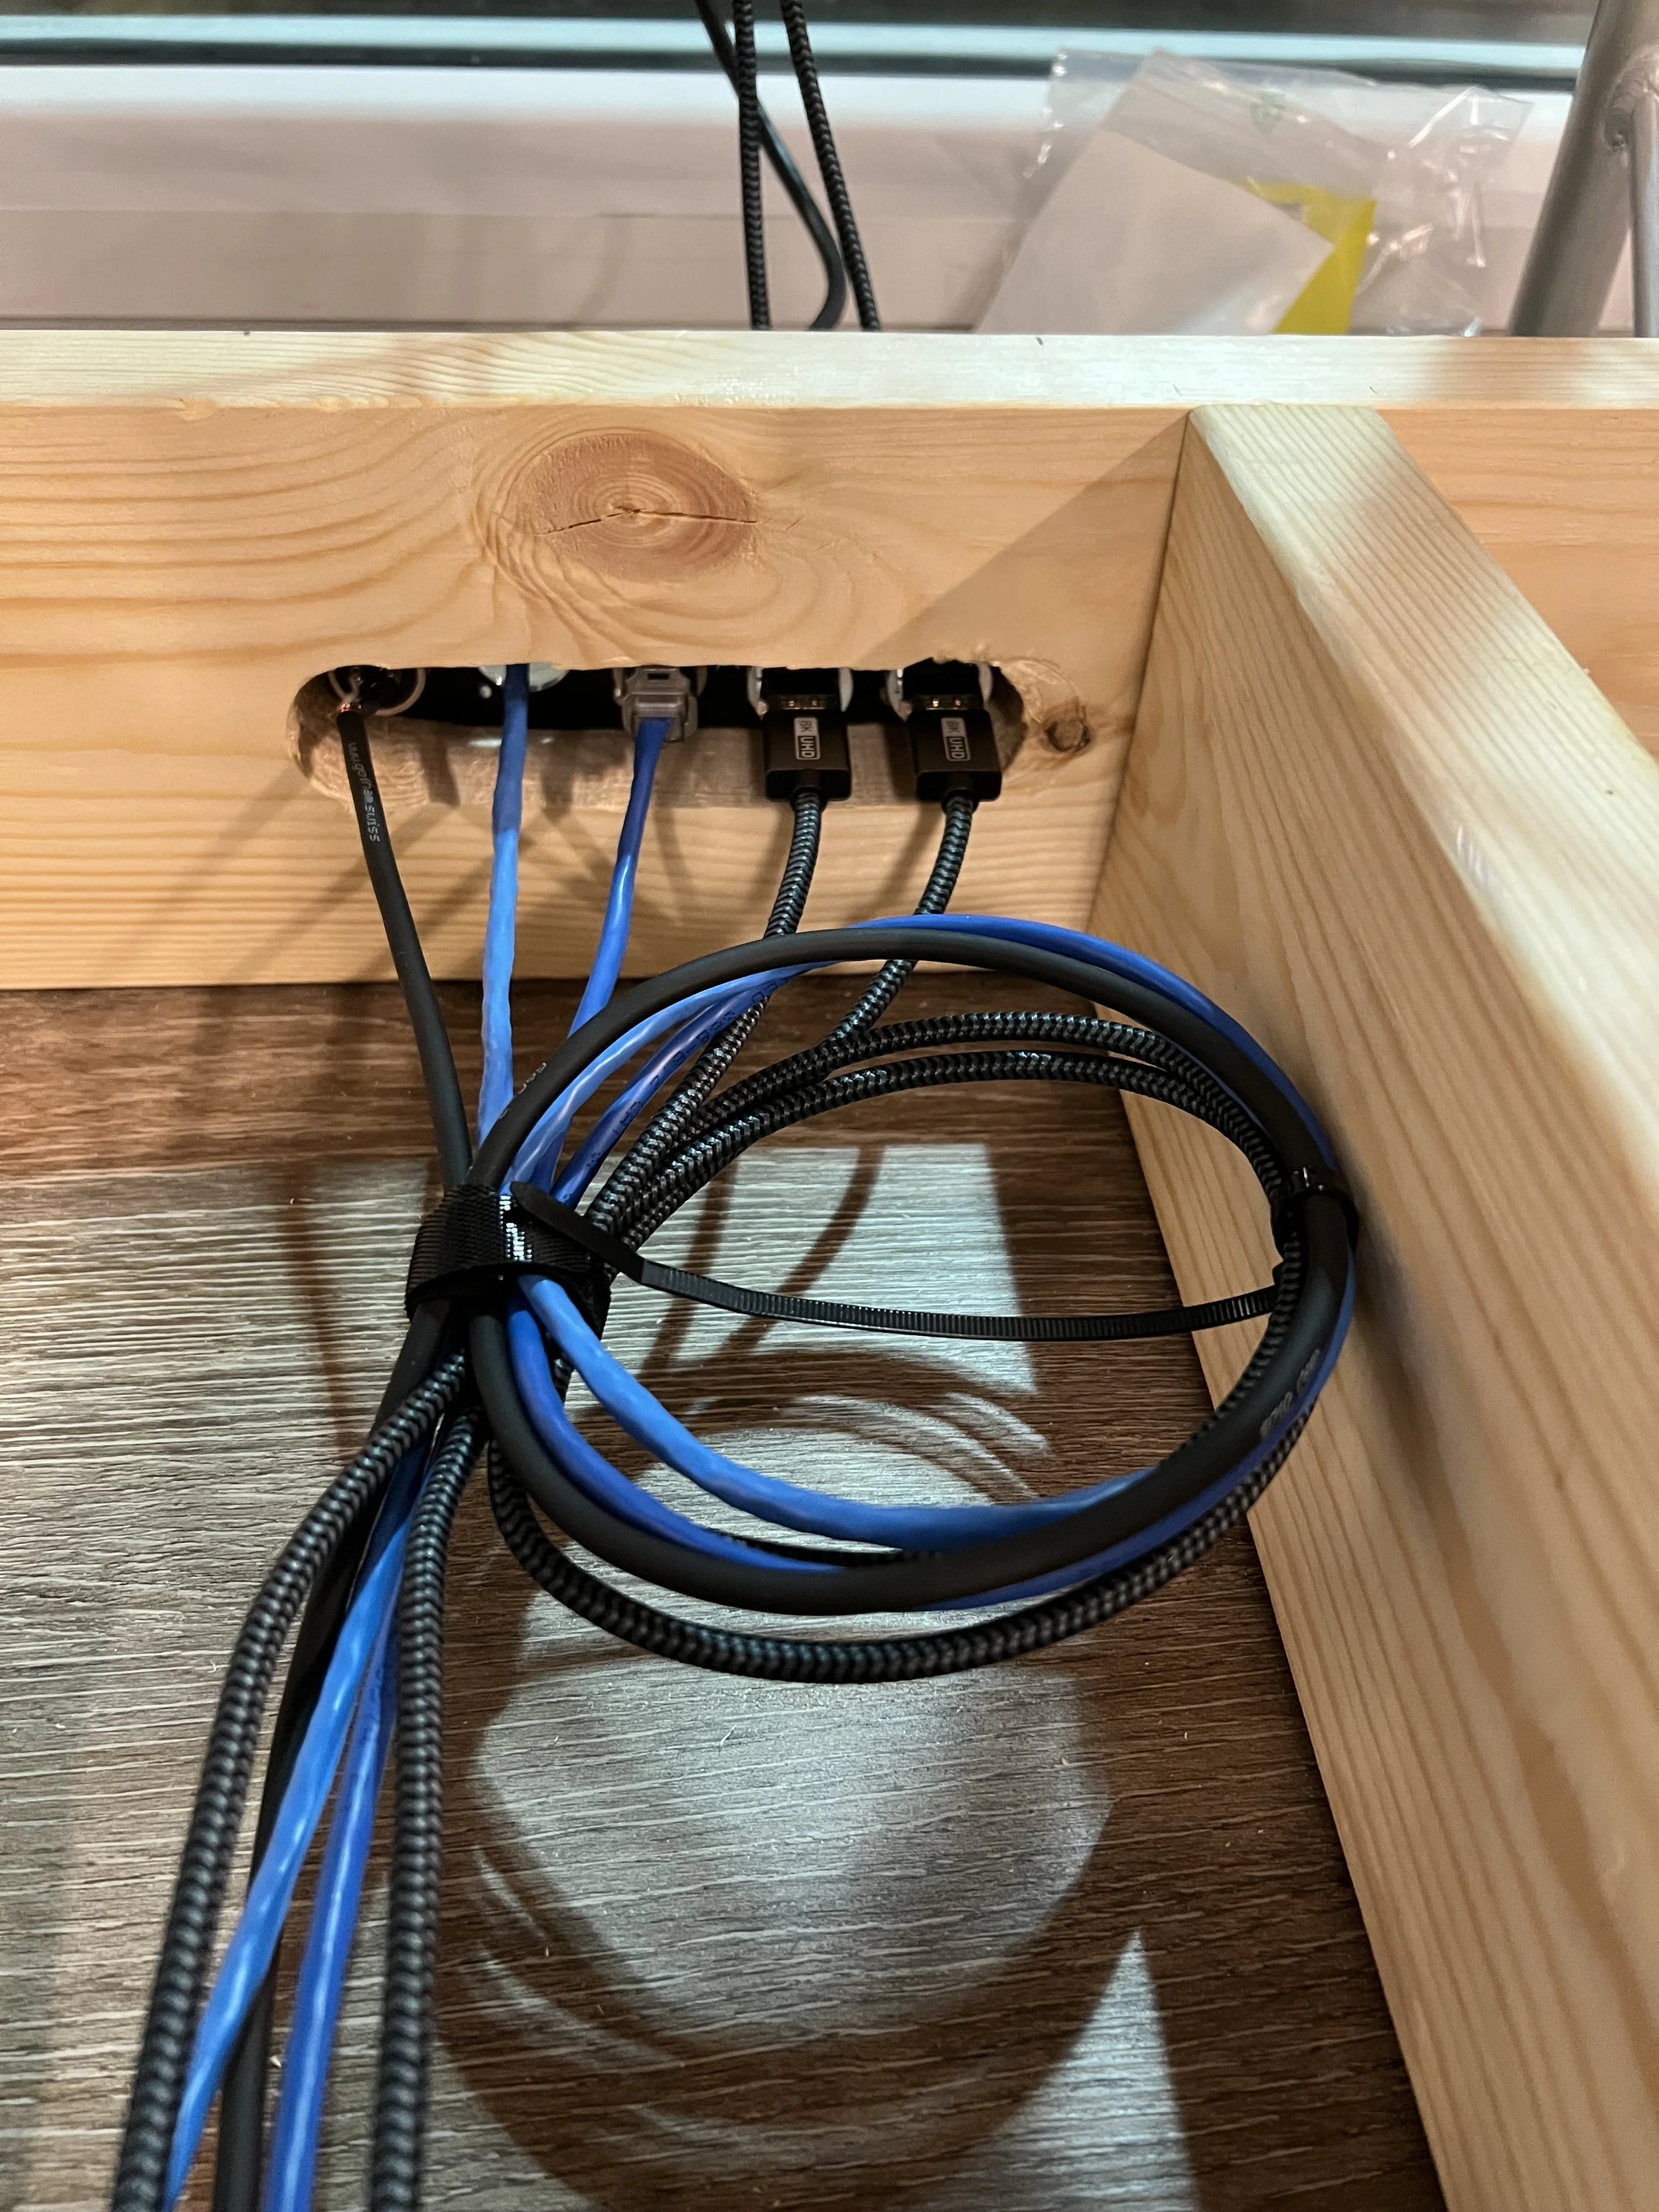
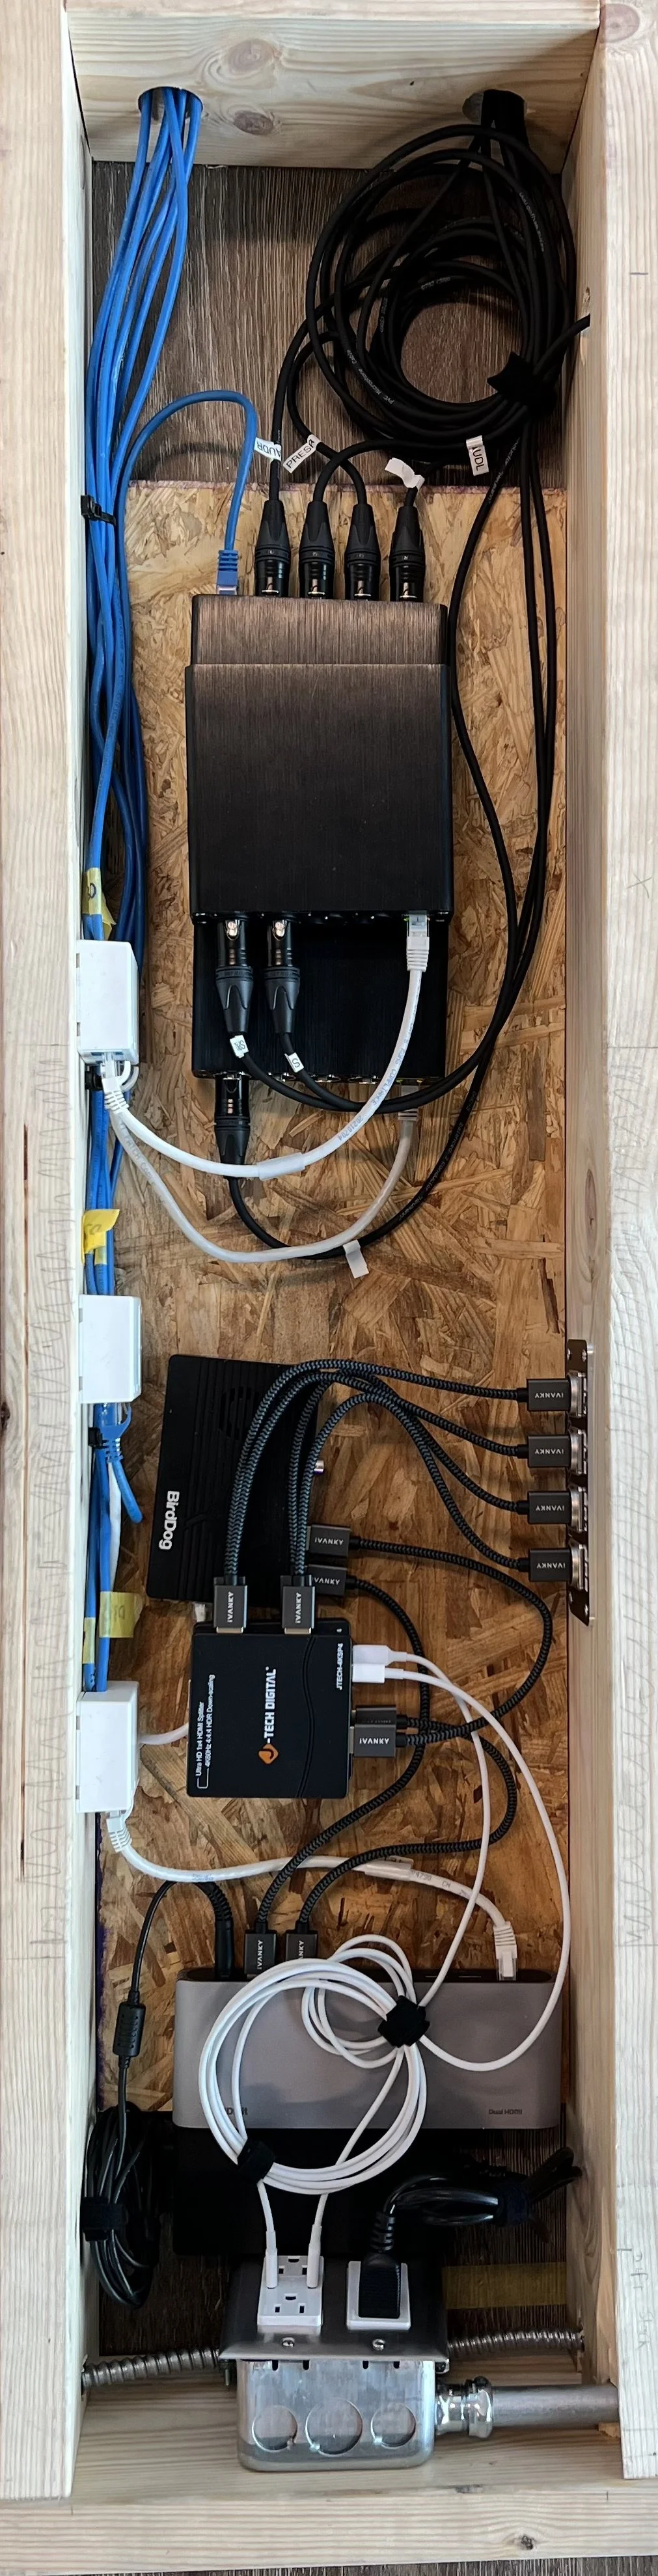
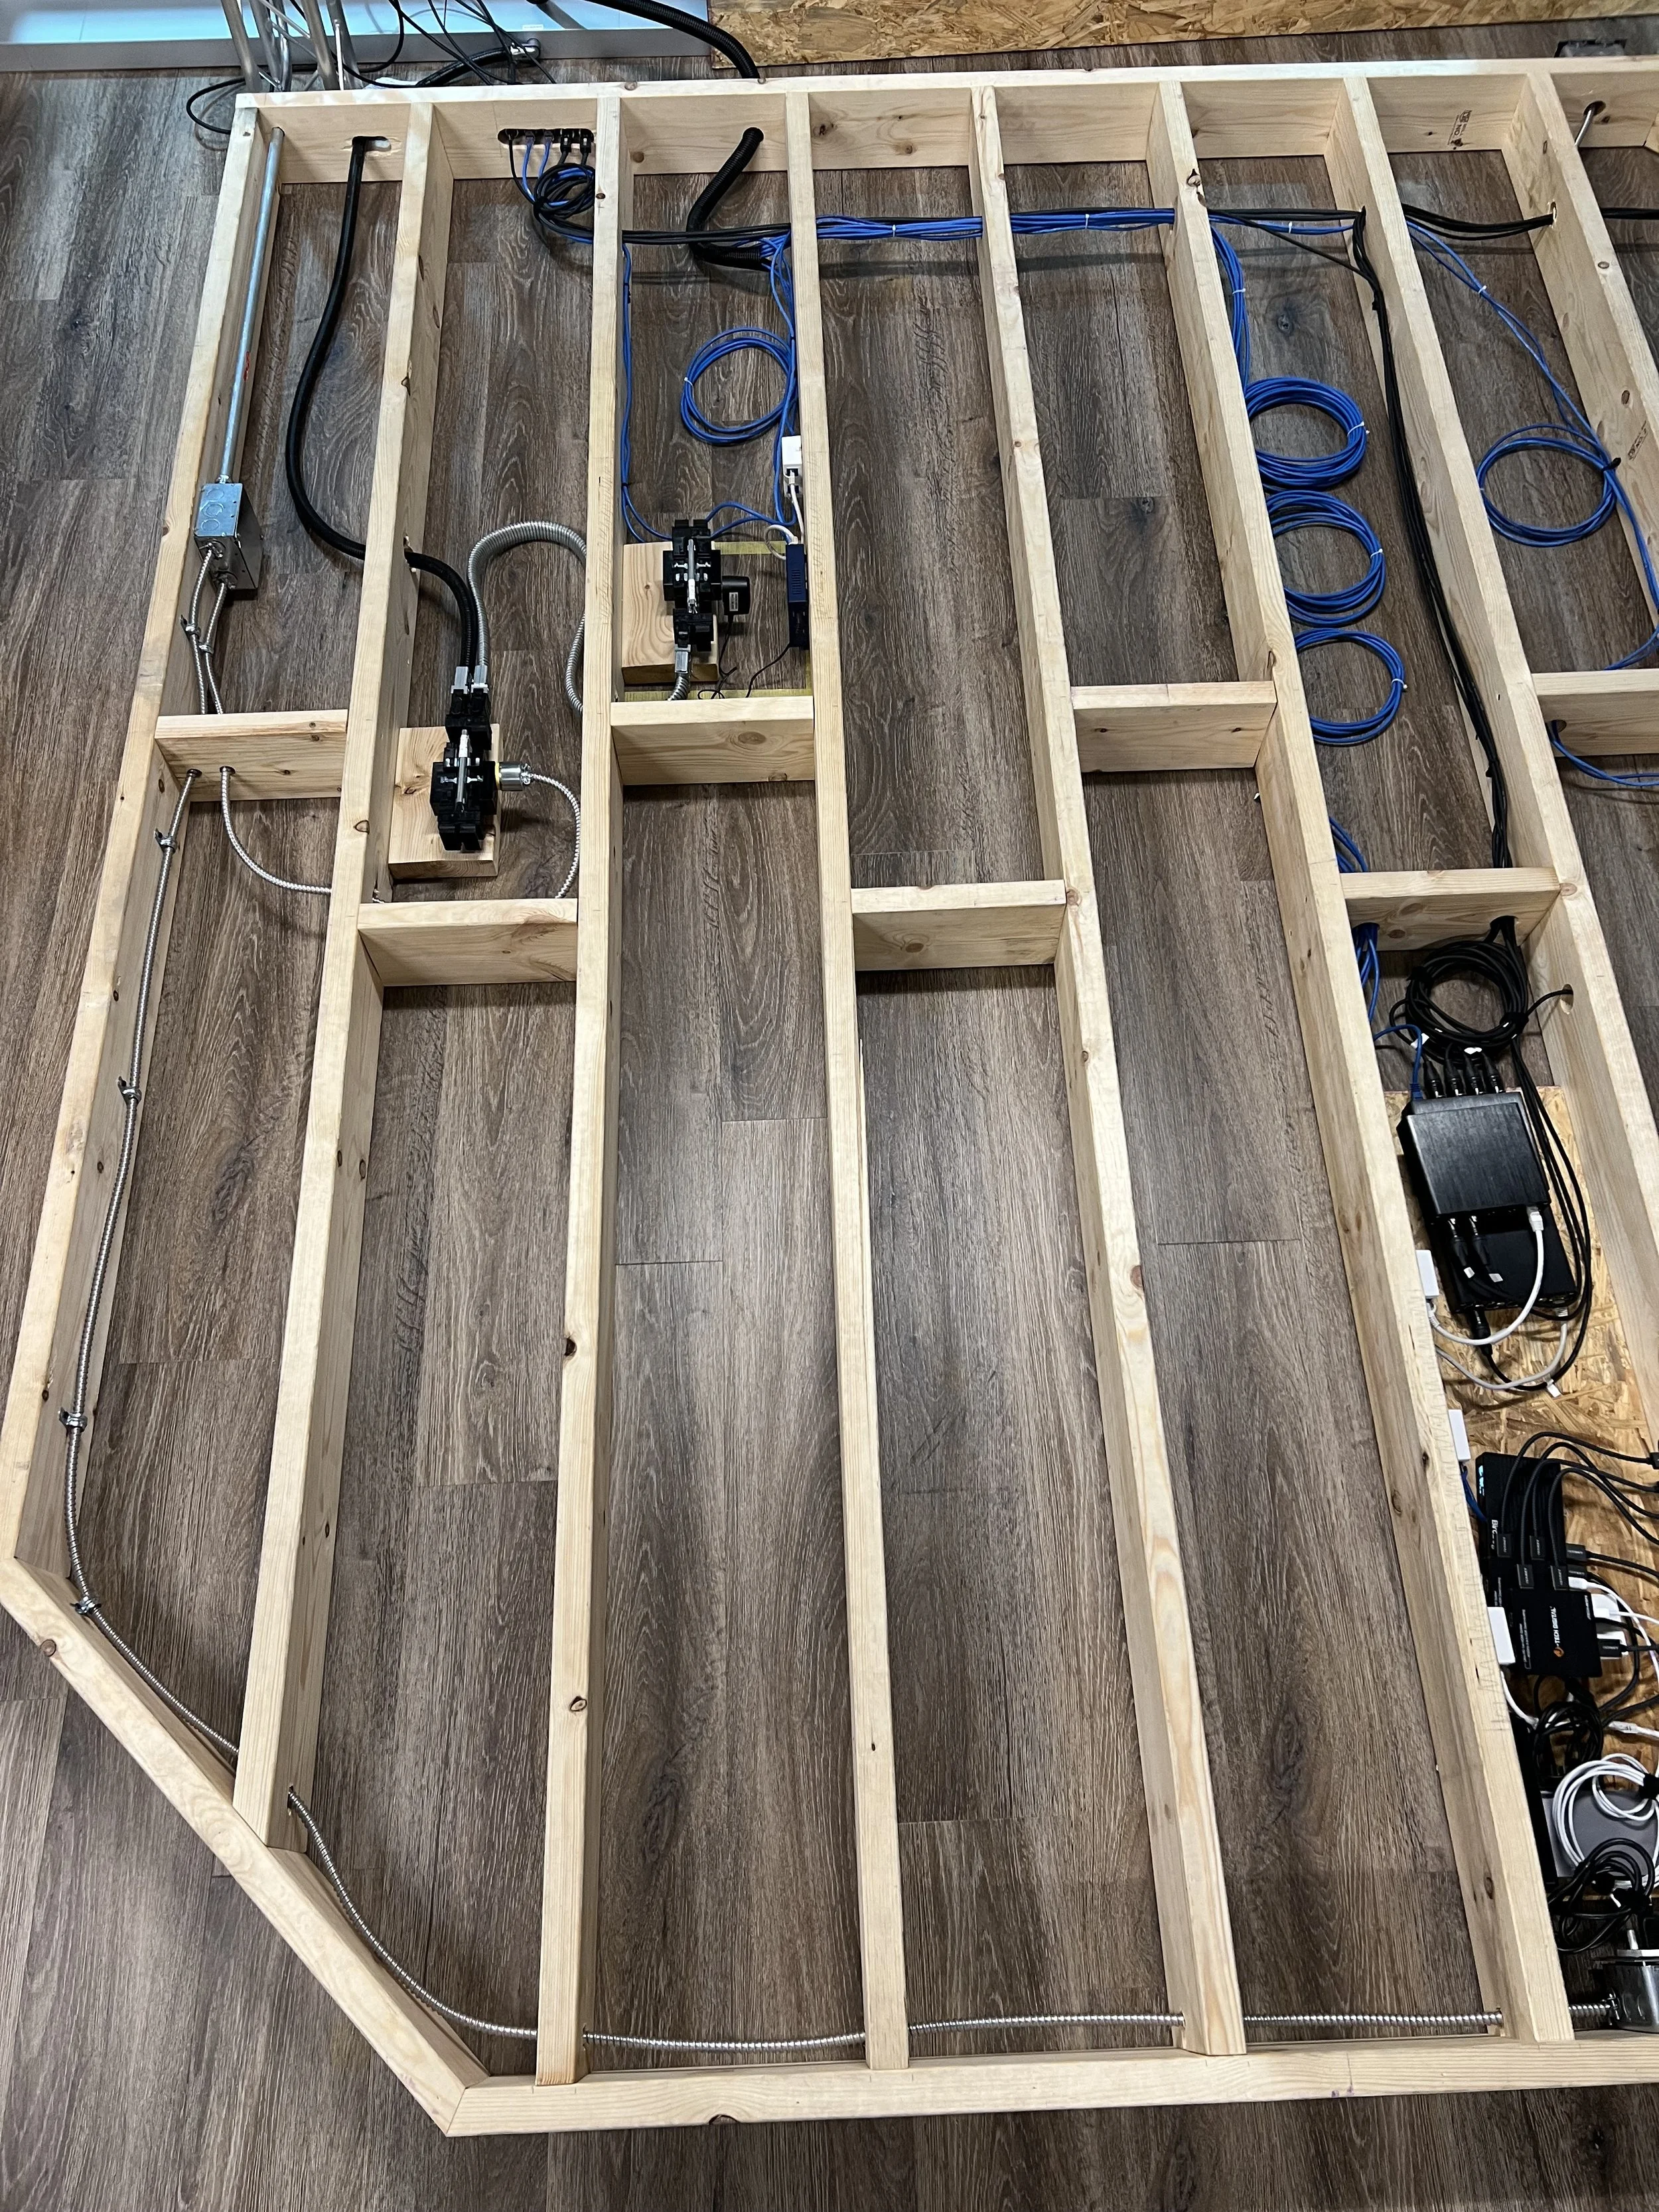
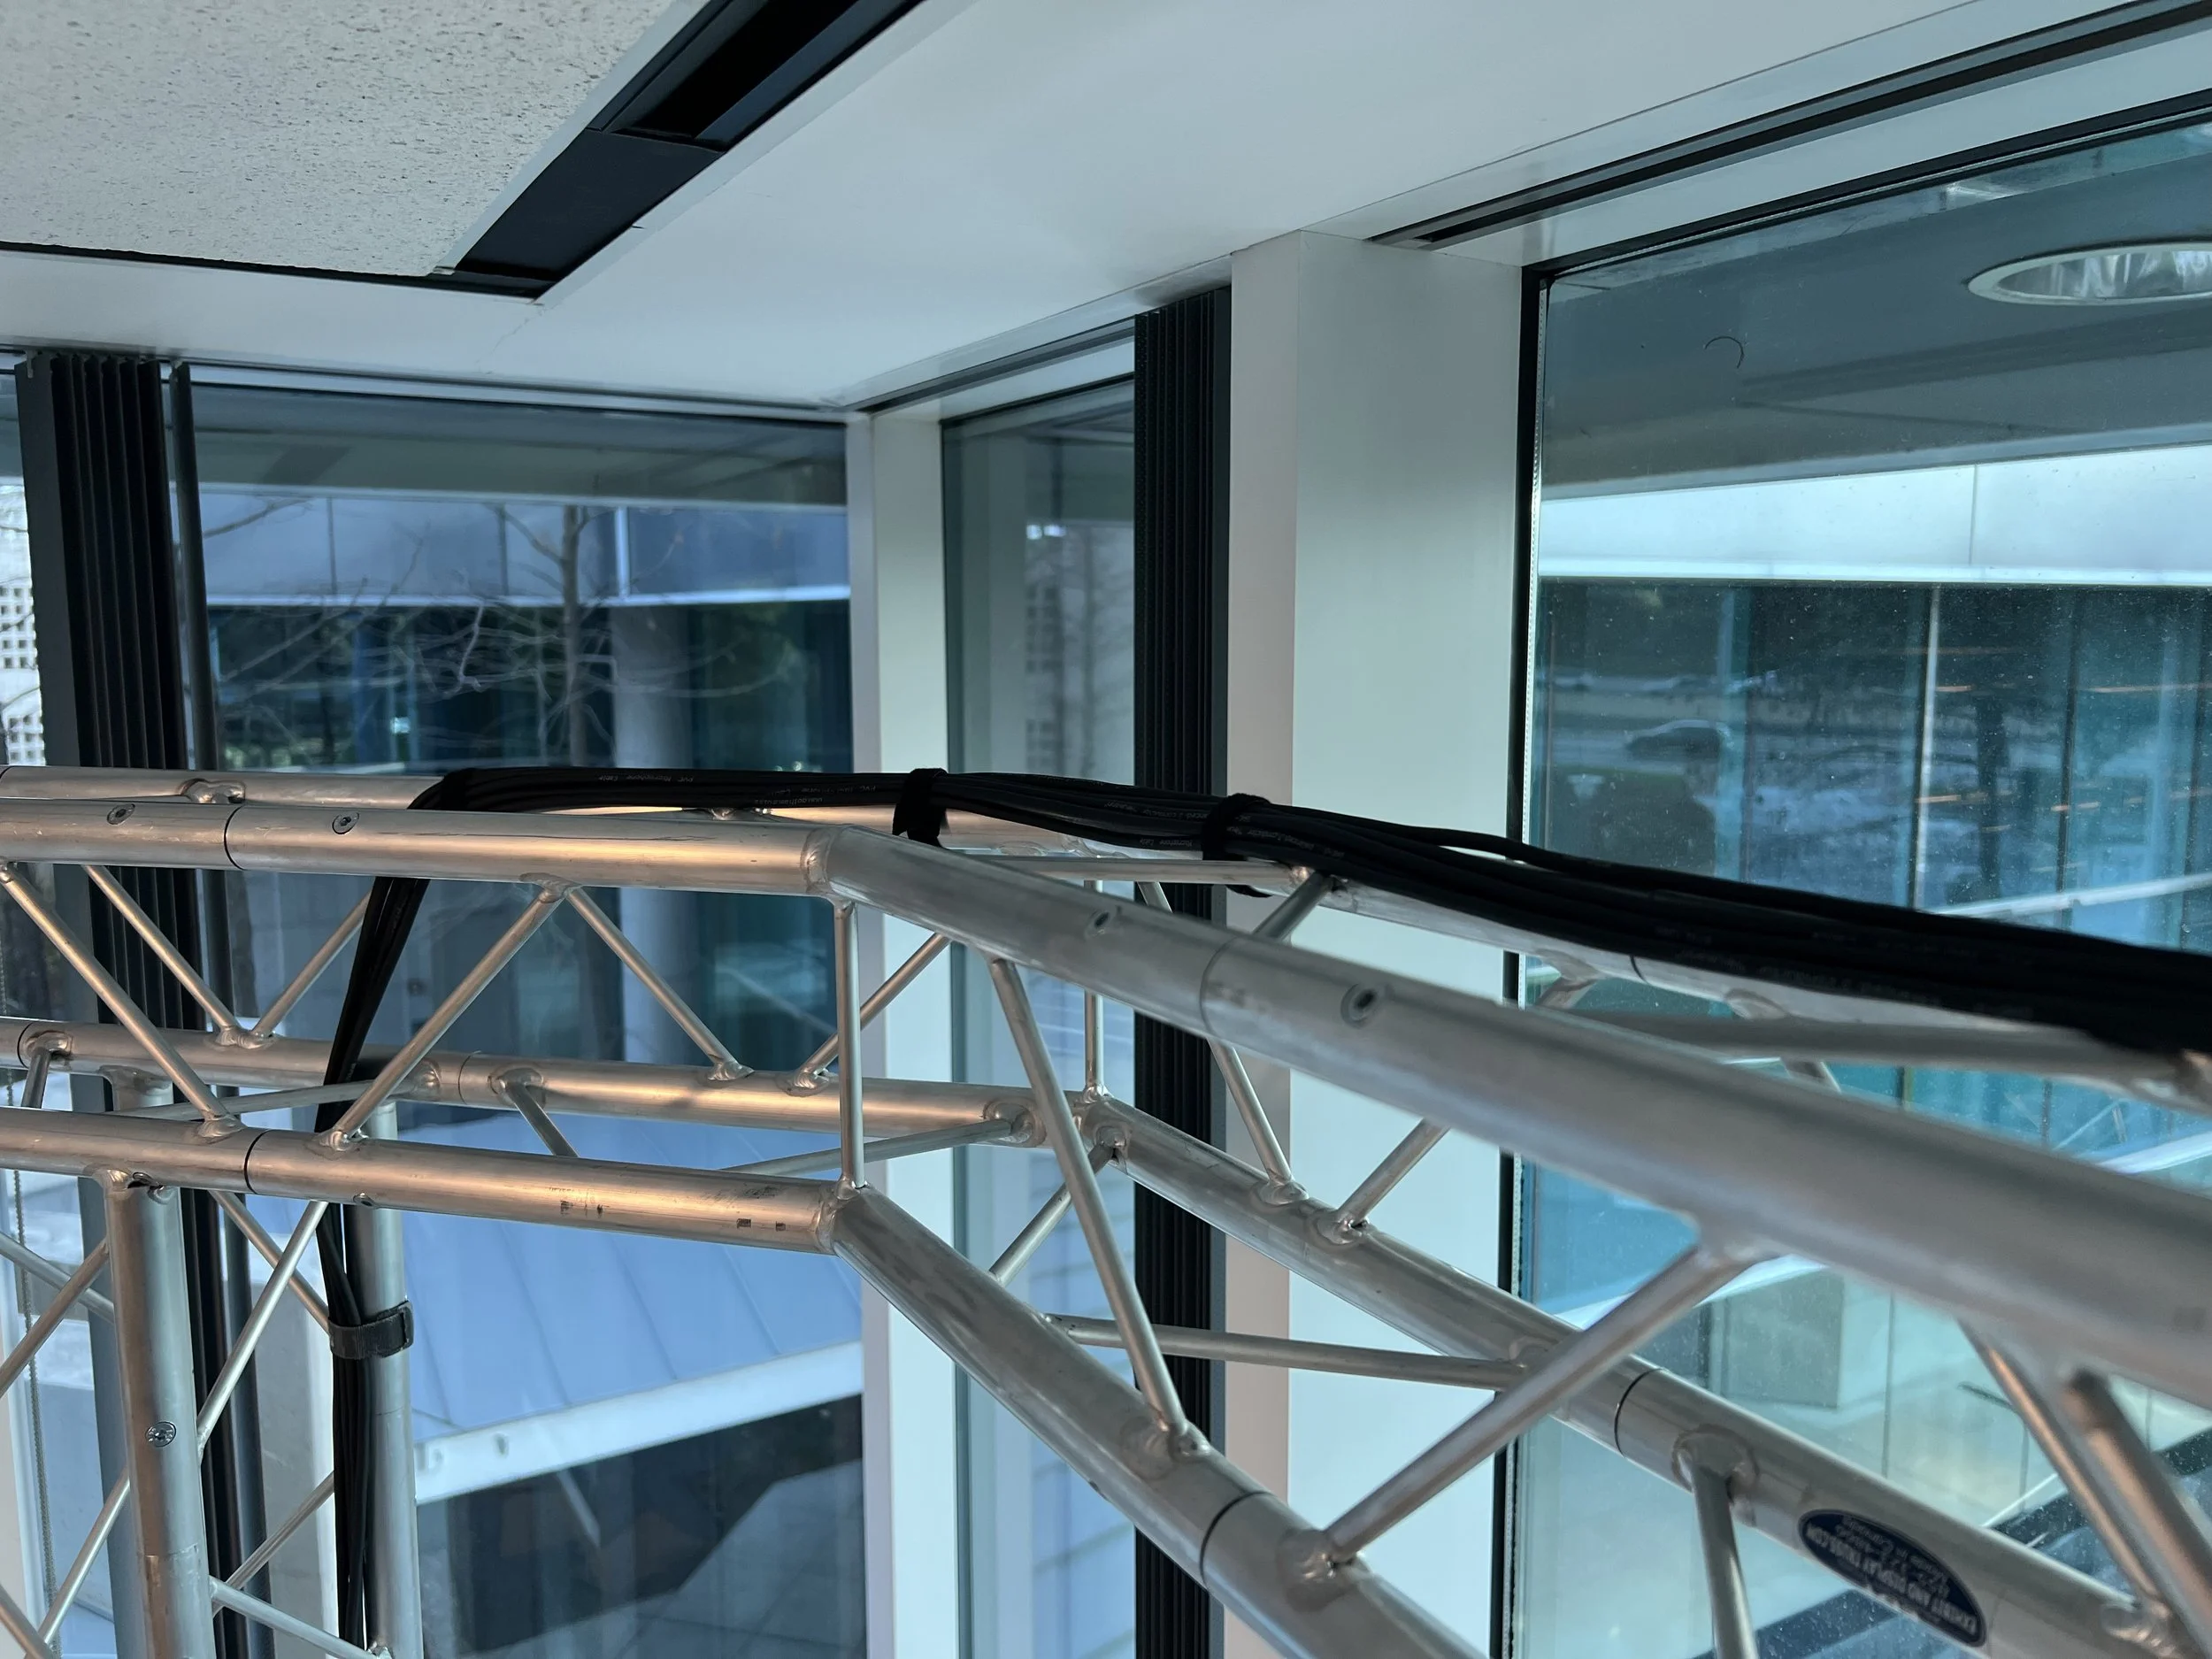
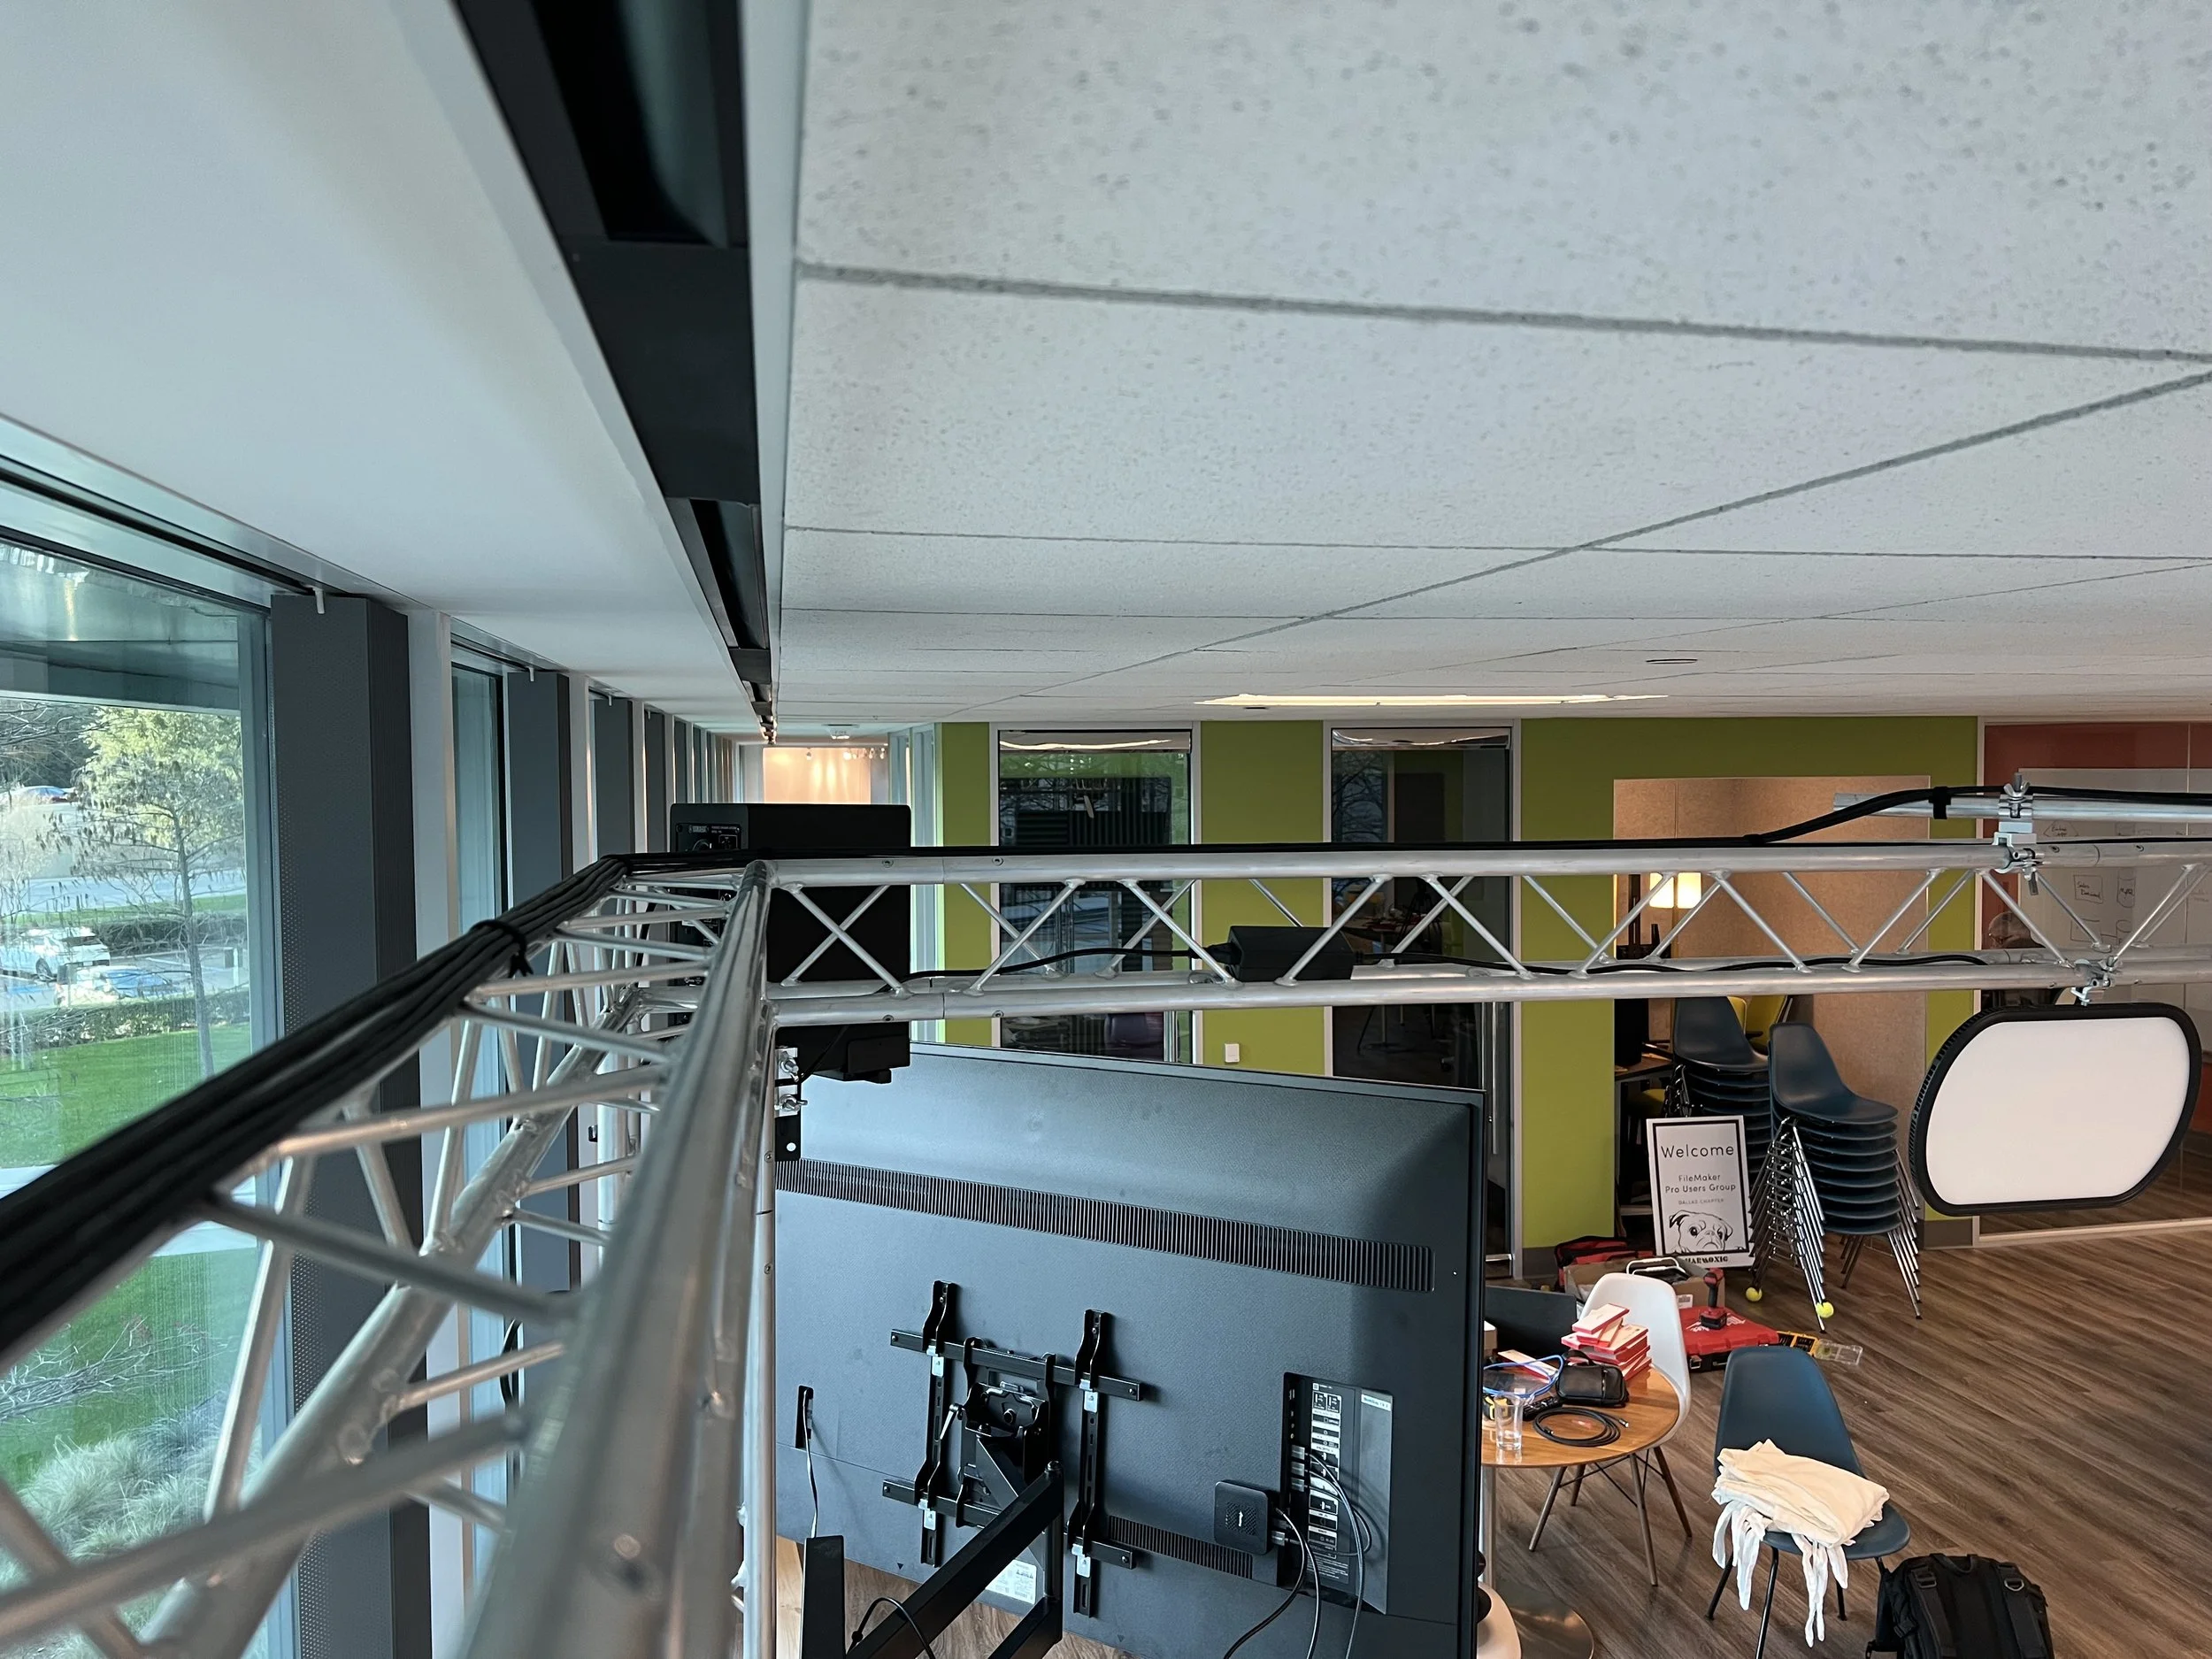
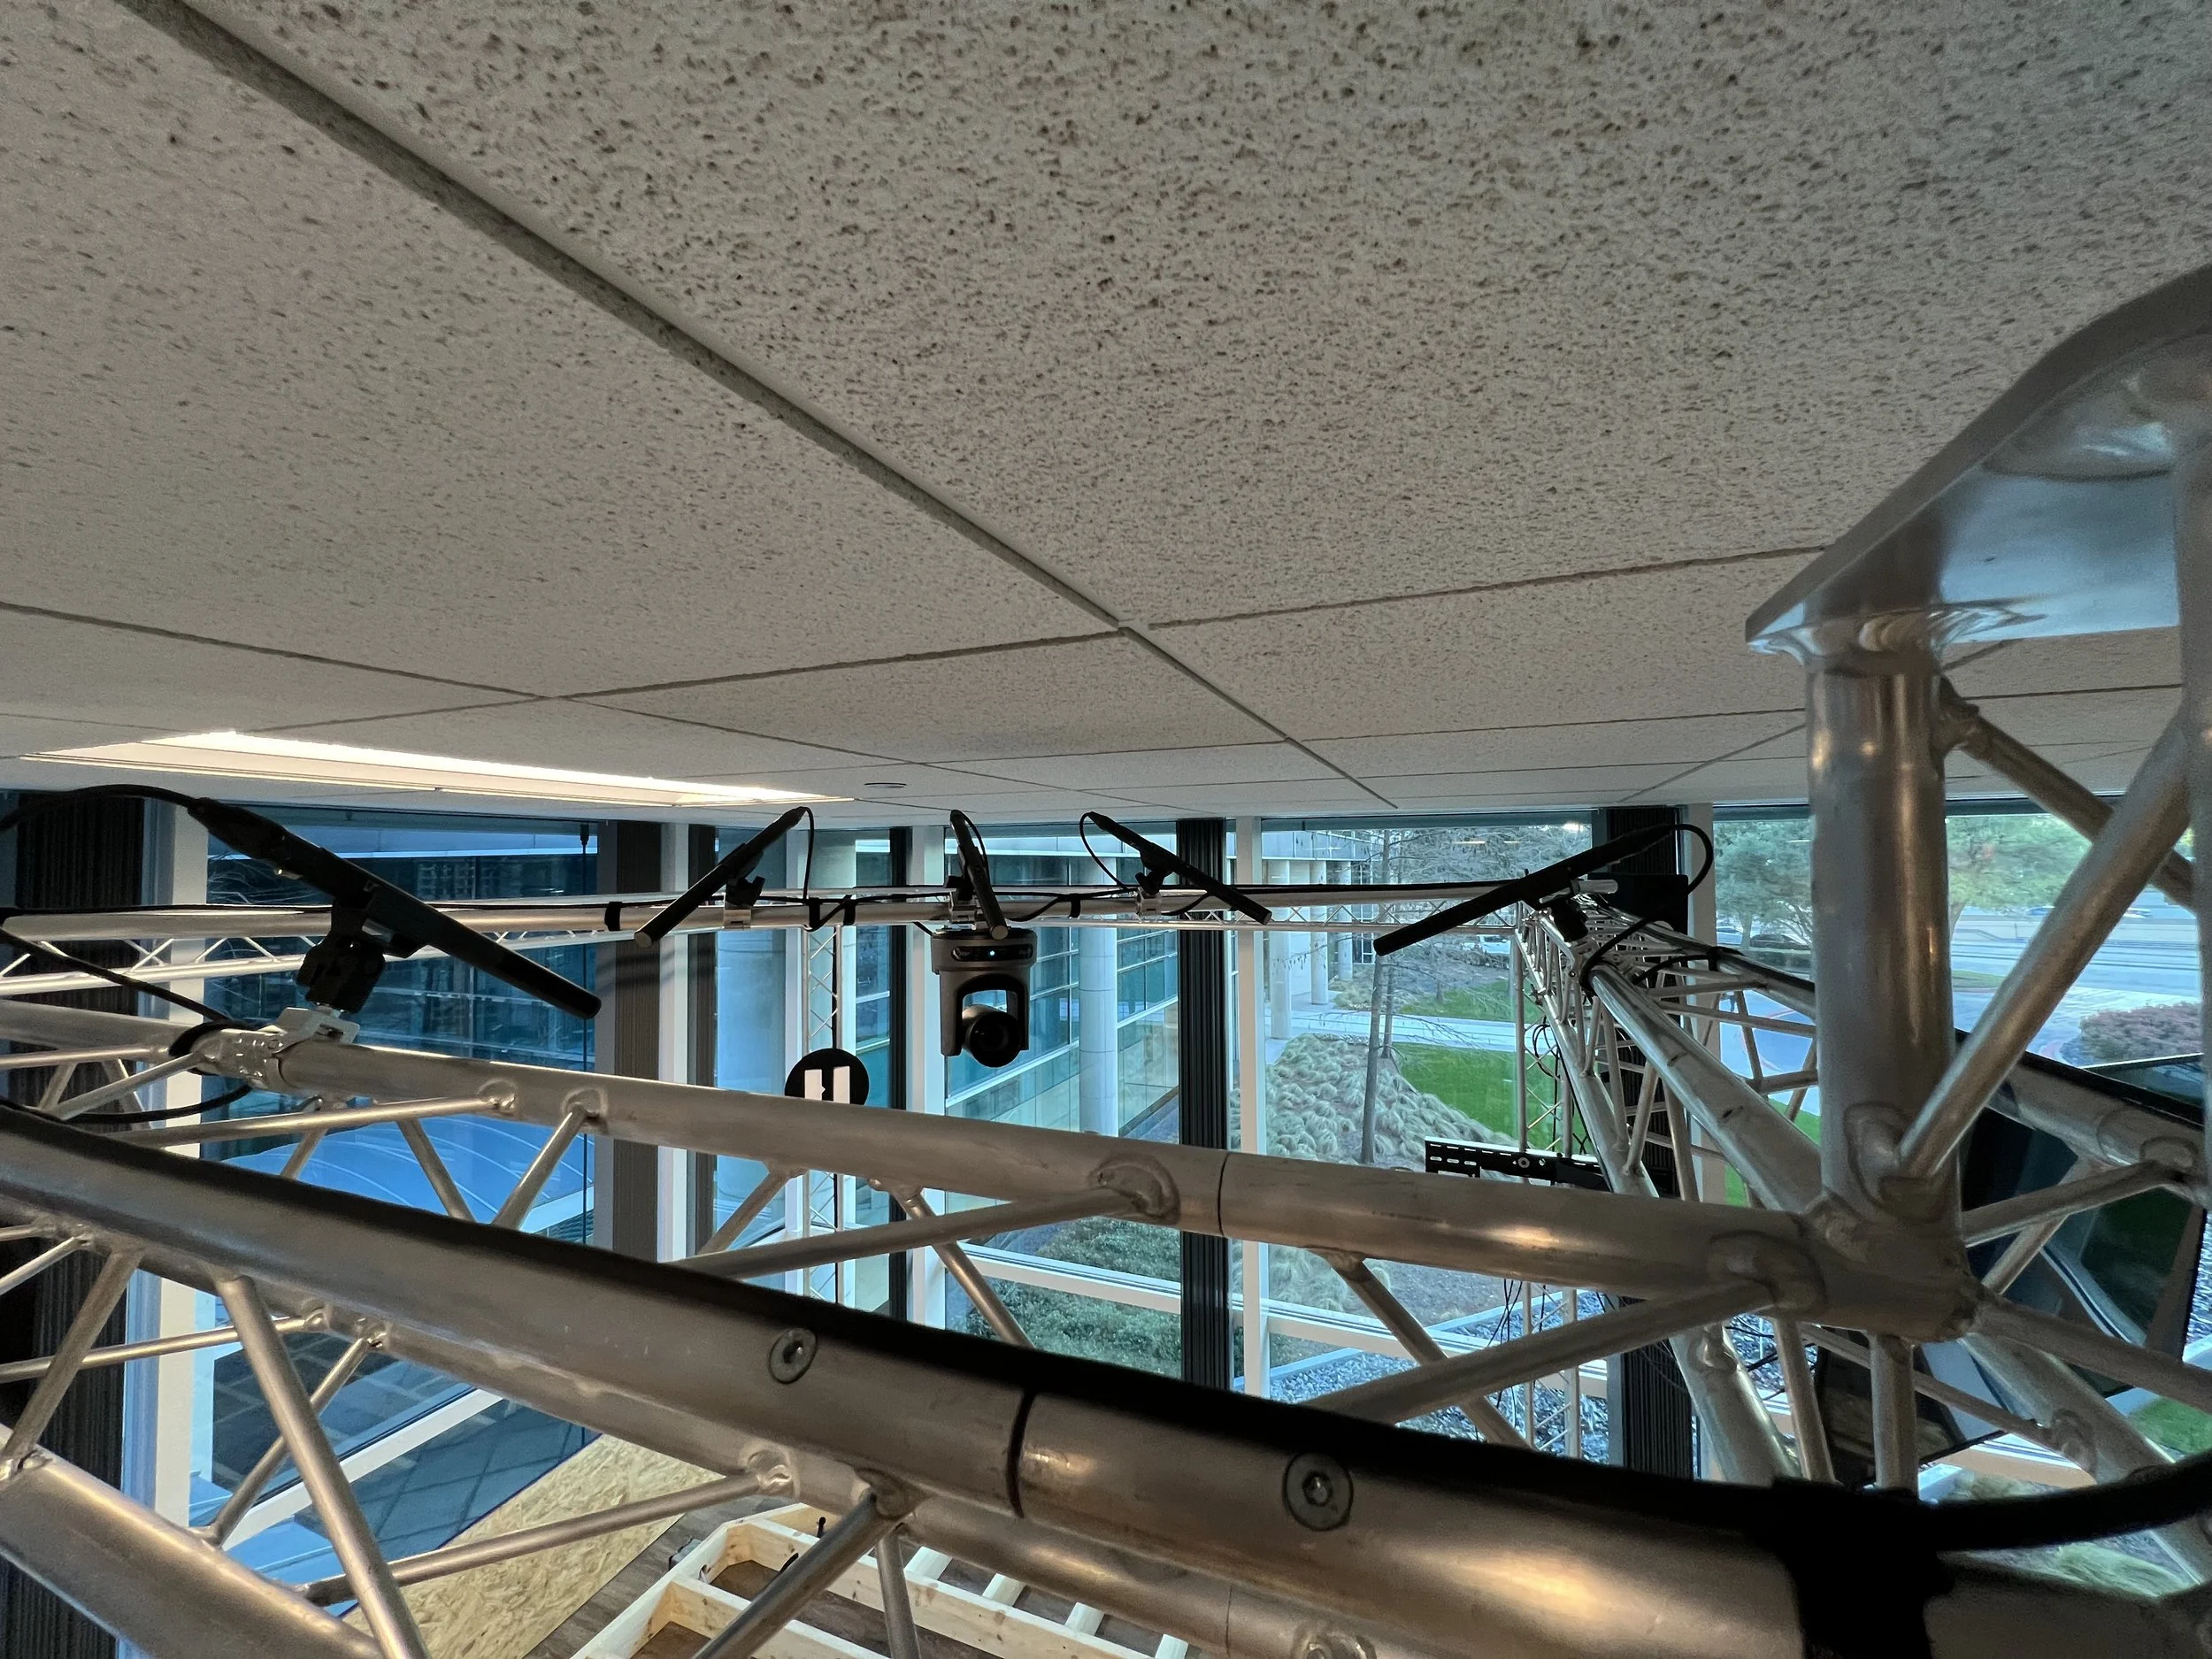
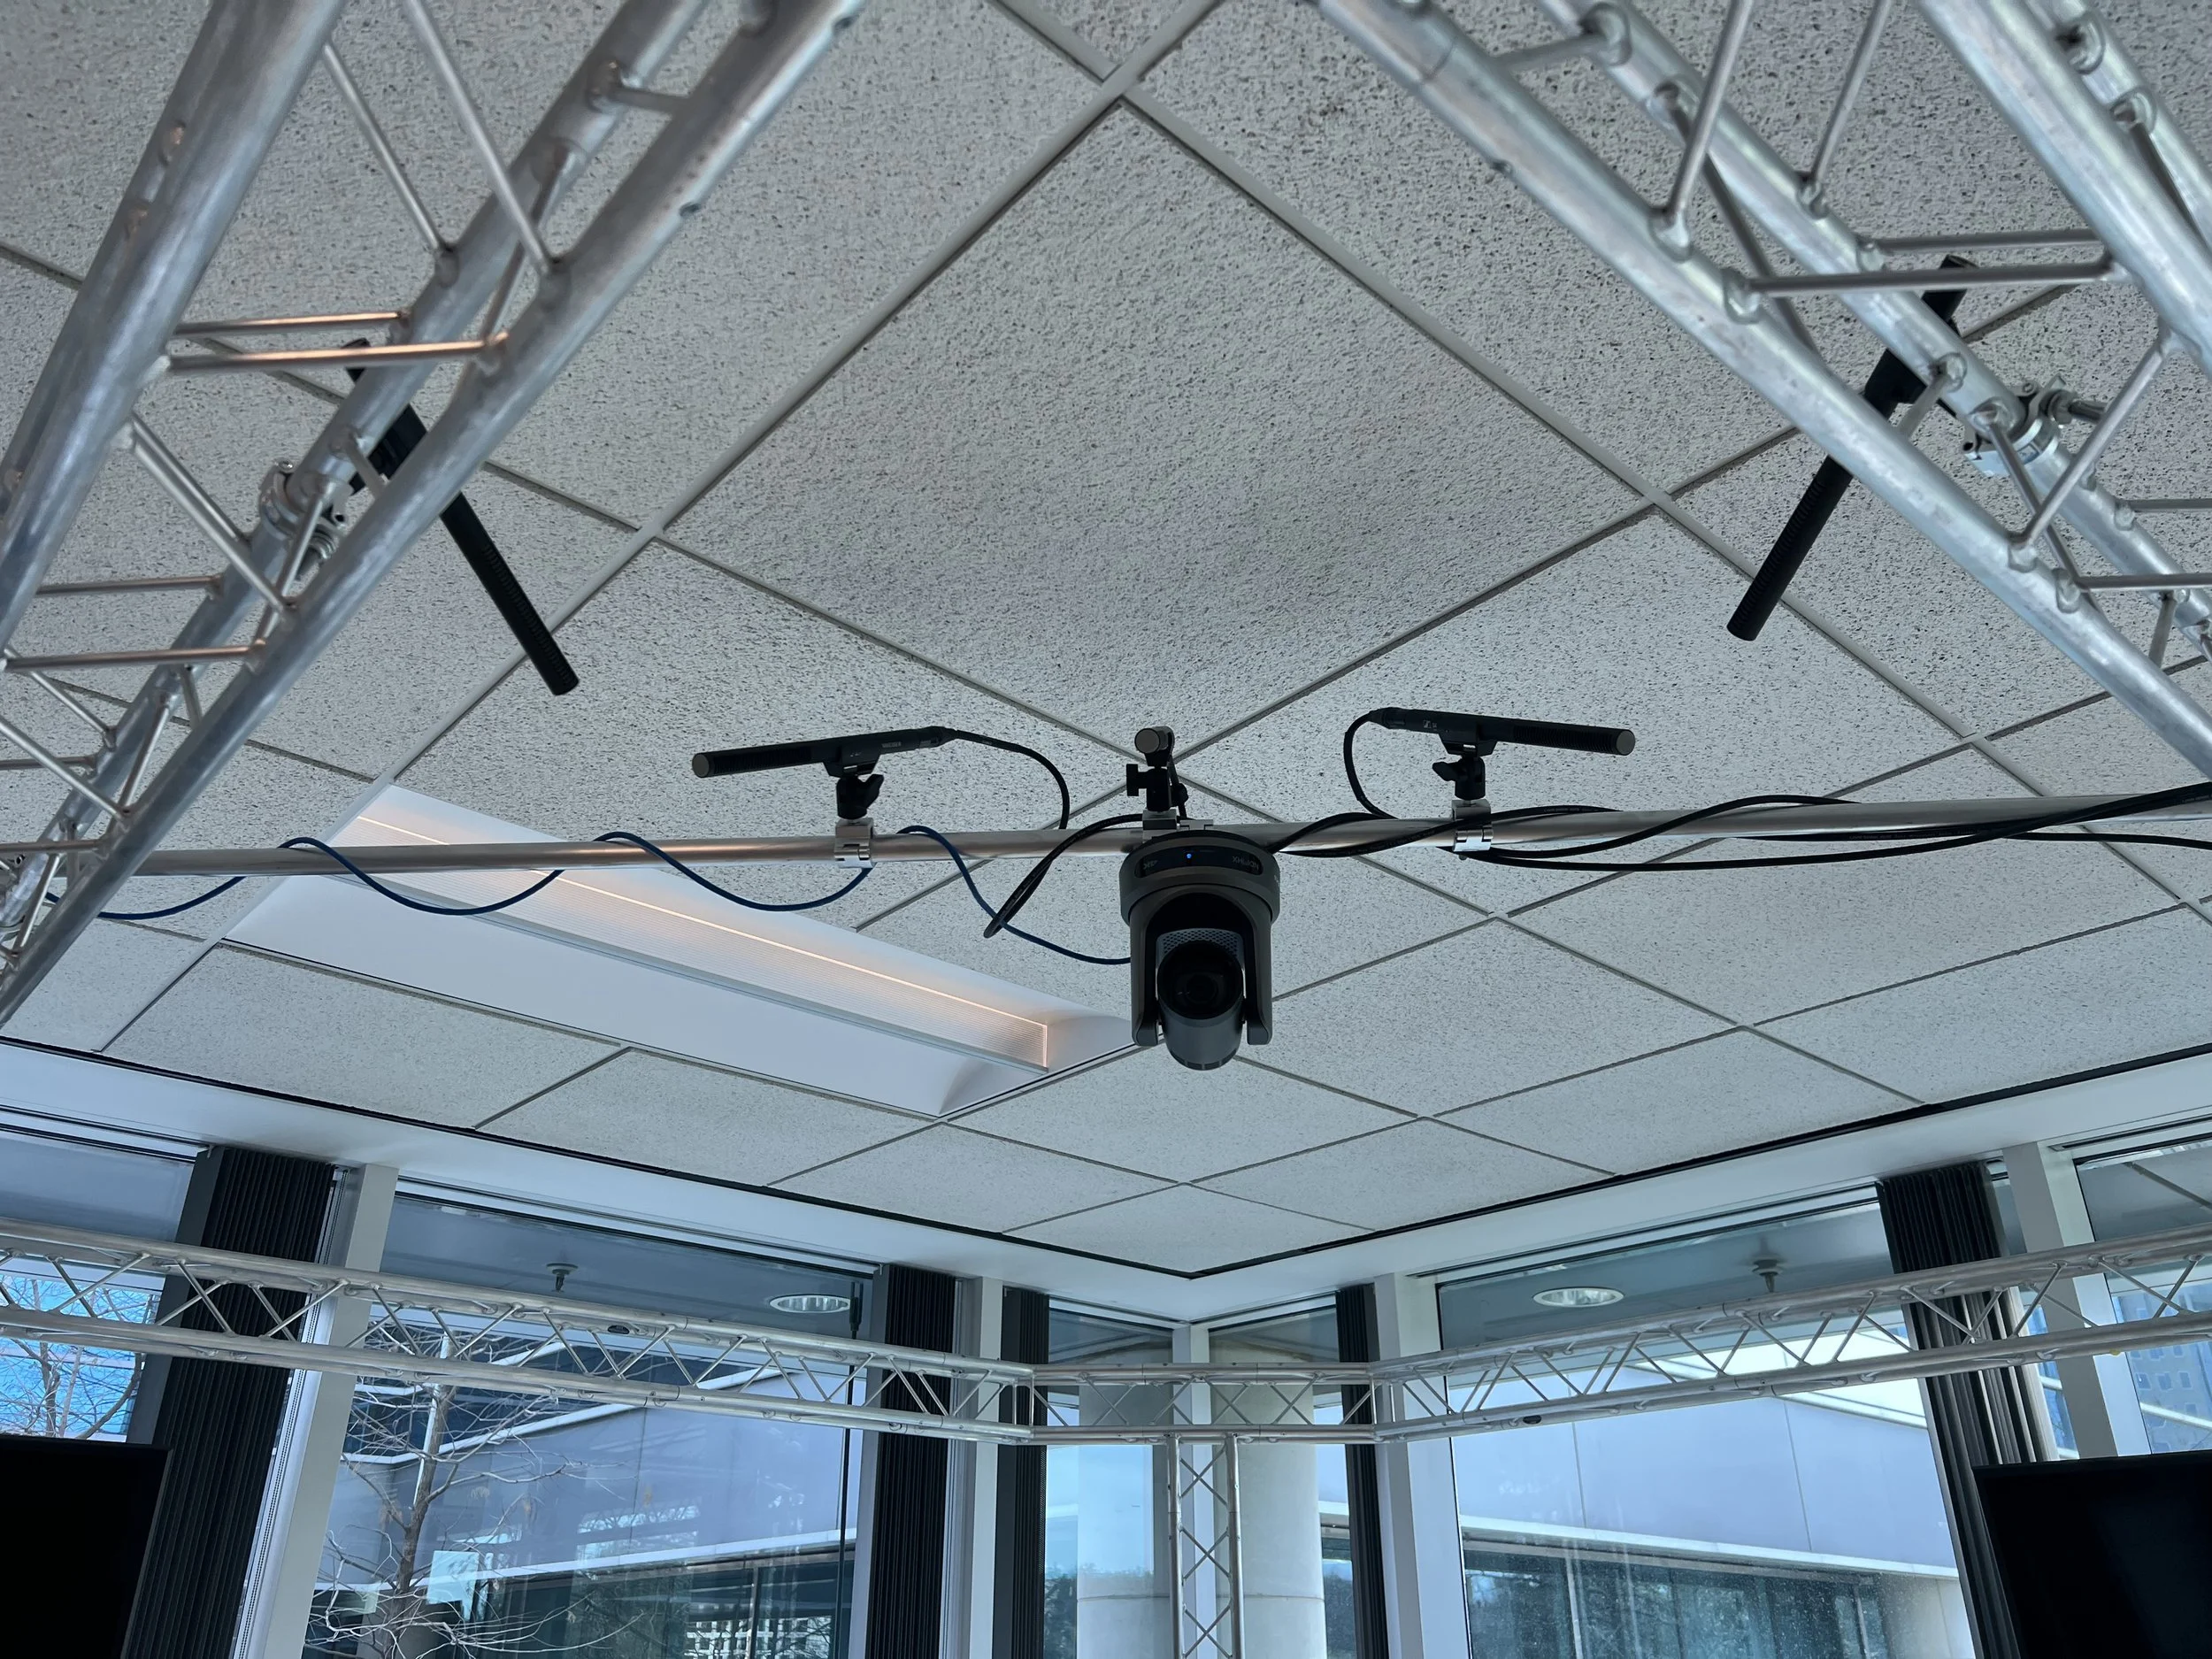
The stage was based around a 10’ x10’ aluminum truss (used for mounting camera’s, lights, permanent mics, and Tv’s) the stage was built using 1’ on center deck style construction using 2×6’s topped with 3/4” OSB. Inside the stage routing holes were cut for Network(BLUE), HDMI(YELLOW) and XLR(RED) cables to connect all devices through custom aluminum bulkheads (to reduce potential damage point), In addition 120V AC power was ran through flex conduit and EMT to 5 Quad outlets installed under the stage and on the truss to power all devices. In the CAD you can see care was taken to minimize power (Green) and low voltage overlap. two trap doors were cut into the floors to house the stage’s equipment. on the bottom left you see the stage power trapdoor (used to power any onstage presentation equipment) and near the top left you see the AV trapdoor which contains the 3 Dante devices and audio cables, the 2 NDI HDMI converters and HDMI Cables, and the network connections for all devices. you can also see how the cables route from the AV trapdoor out to the top right and bottom left leg Bulkheads. also in the AV trapdoor is a thunderbolt 5 Caldigit dock to give the presenters laptop a single cable connection for Internet,Power, and dual HDMI outputs. due to the amount of equipment in this box air intake holes were cut on the longer side and outlet holes were cut on the short side. at the left edge of the stage 2 240mm industrial Noctua fans create a consistent stream of airflow cooling all of the equipment. This entire stage was then covered in industrial carpeting to deaden noise. At the 2 outer legs of the truss bulkheads with 2 HDMI ports 2 ethernet ports and 1 XLR output allow for the cabling to be run up the legs and to the appropriate devices. the 5 Shot gun mics are mounted to the Aluminum truss and an aluminum crossbar with 3 mics pointing out to capture the audience and 2 mics pointing inwards to capture the speakers. The Mic cables run along the truss to the back leg and into the stage floor using custom length cables. The Move4k Camera is also attached to the aluminum crossbar pointing out as an audience camera. This positioning of camera and microphones was tested to have the best coverage while retaining quality recording capabilities. 2 light panels are also attached to the truss to help light the presenters who are captured on the studio4K which sits on a tripod in the audience and is manually controlled by the camera operator who also controls the Move4K with the super-joy controller. Also in the audience is a TV on a cart which can receive any of the NDI feeds from the ethernet cable running to its cart. this is often used to show the presenters screen or online participants who are asking questions.
System spec sheet
2x Shure ani4in Dante mic pre’s
Shure ani4out Dante line out
5x Sennheiser MKE 600 Shotgun mics
2 Yamaha HS5 Studio monitors
Move4K PTZoptics NDI camera
Studio4K Ptzopics NDI camera
PTZopics Superjoy controller
2x 4KHDMI Birddog NDI converter’s
5x Birddog Play NDI converters
Netgear m4250 switch
Initial setup of aluminum truss
Testing presenter microphones
Testing curtain acoustics
Testing audience camera location
Start of stage construction
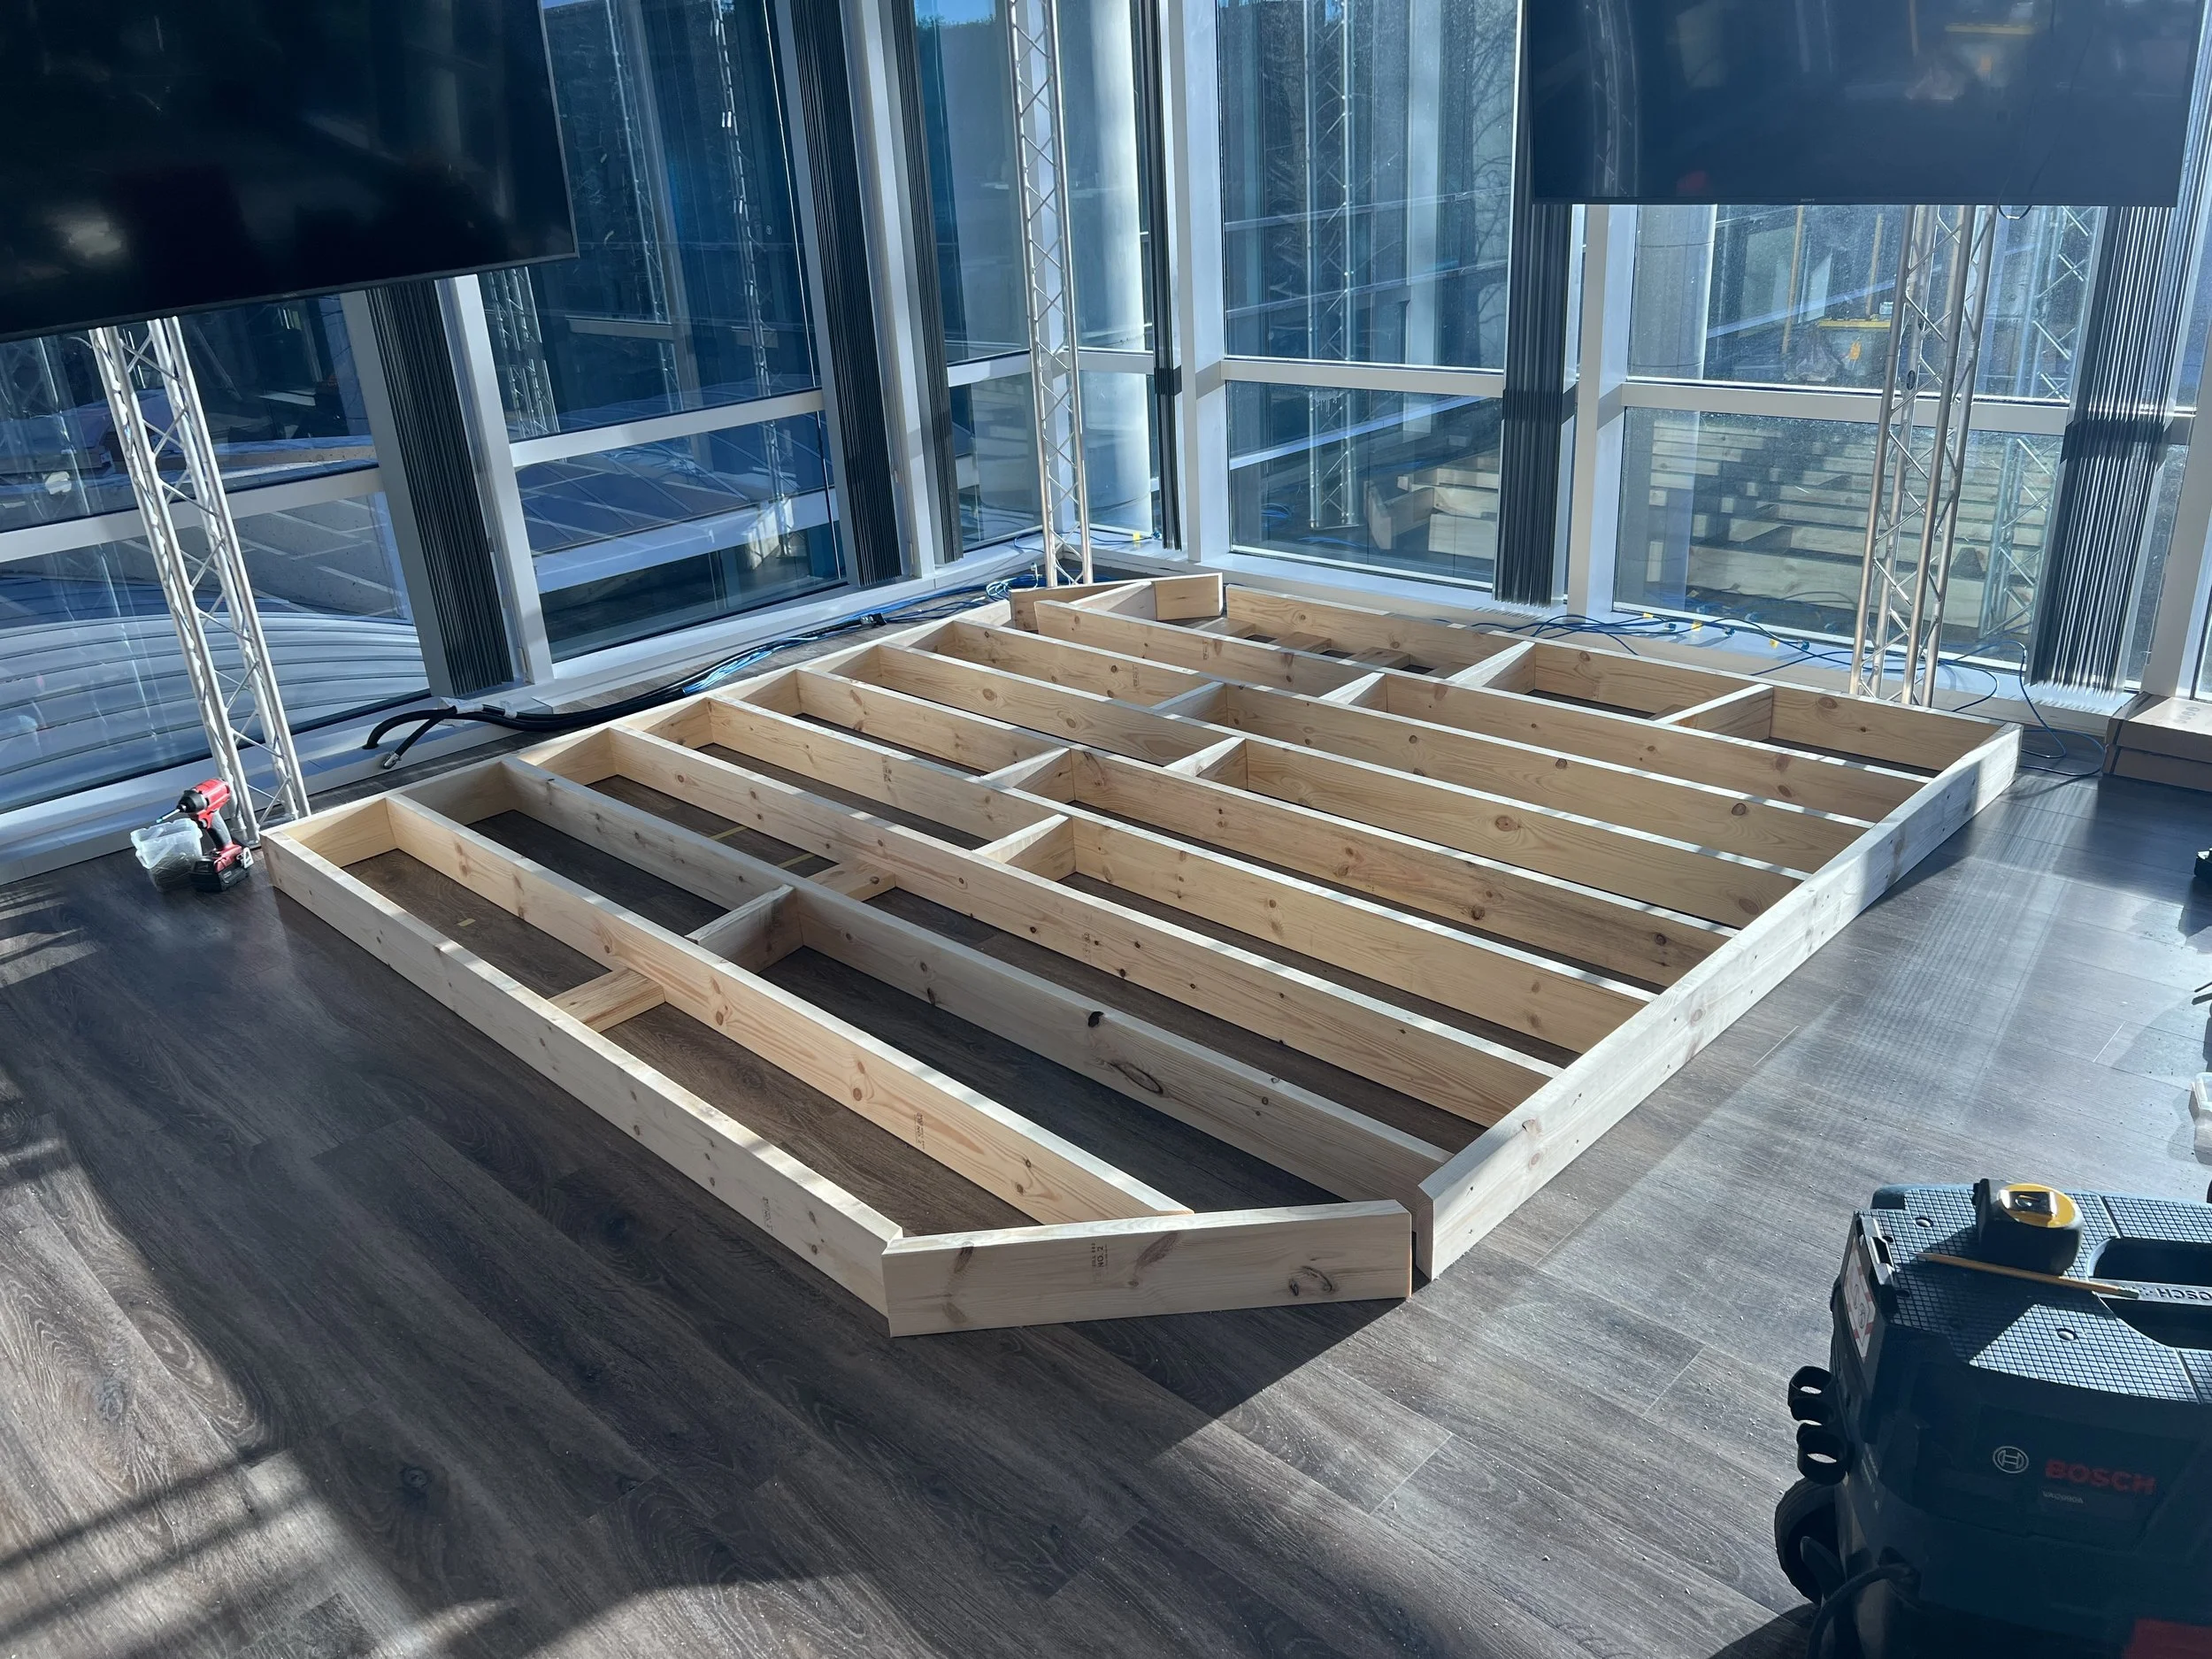
stage frame cut
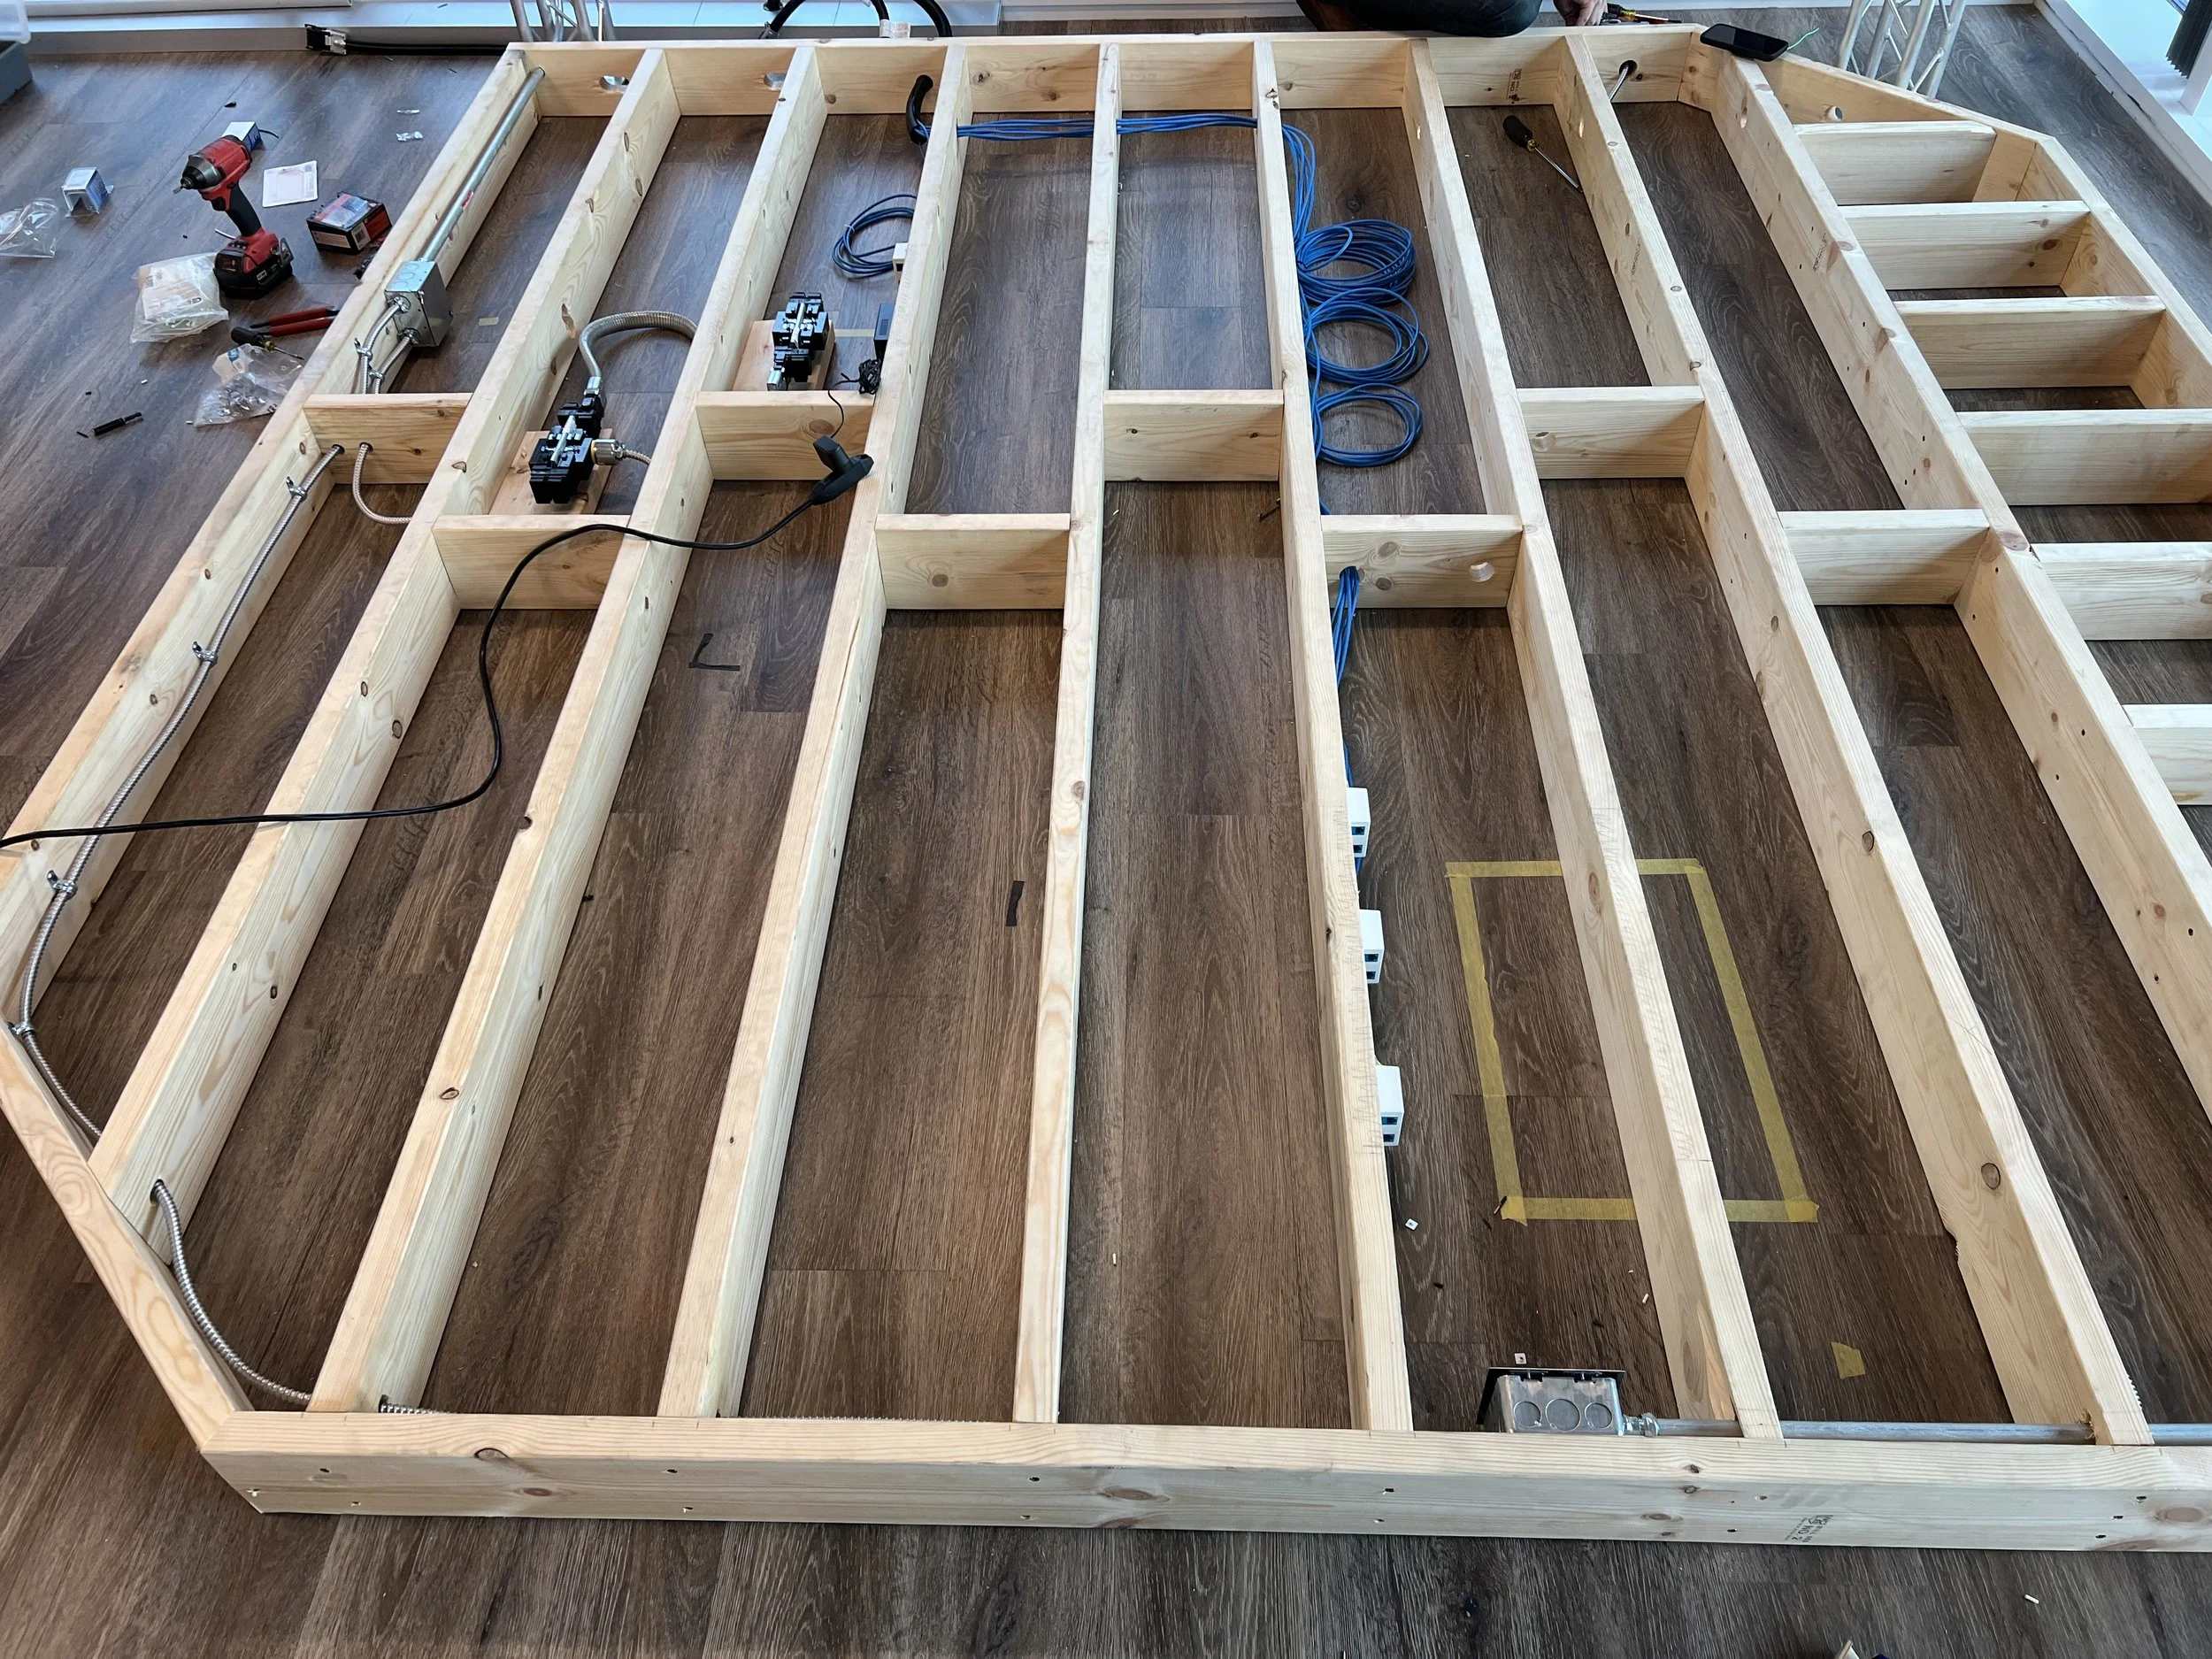
Power and ethernet cables routed
Cutout for bulkhead 1/2
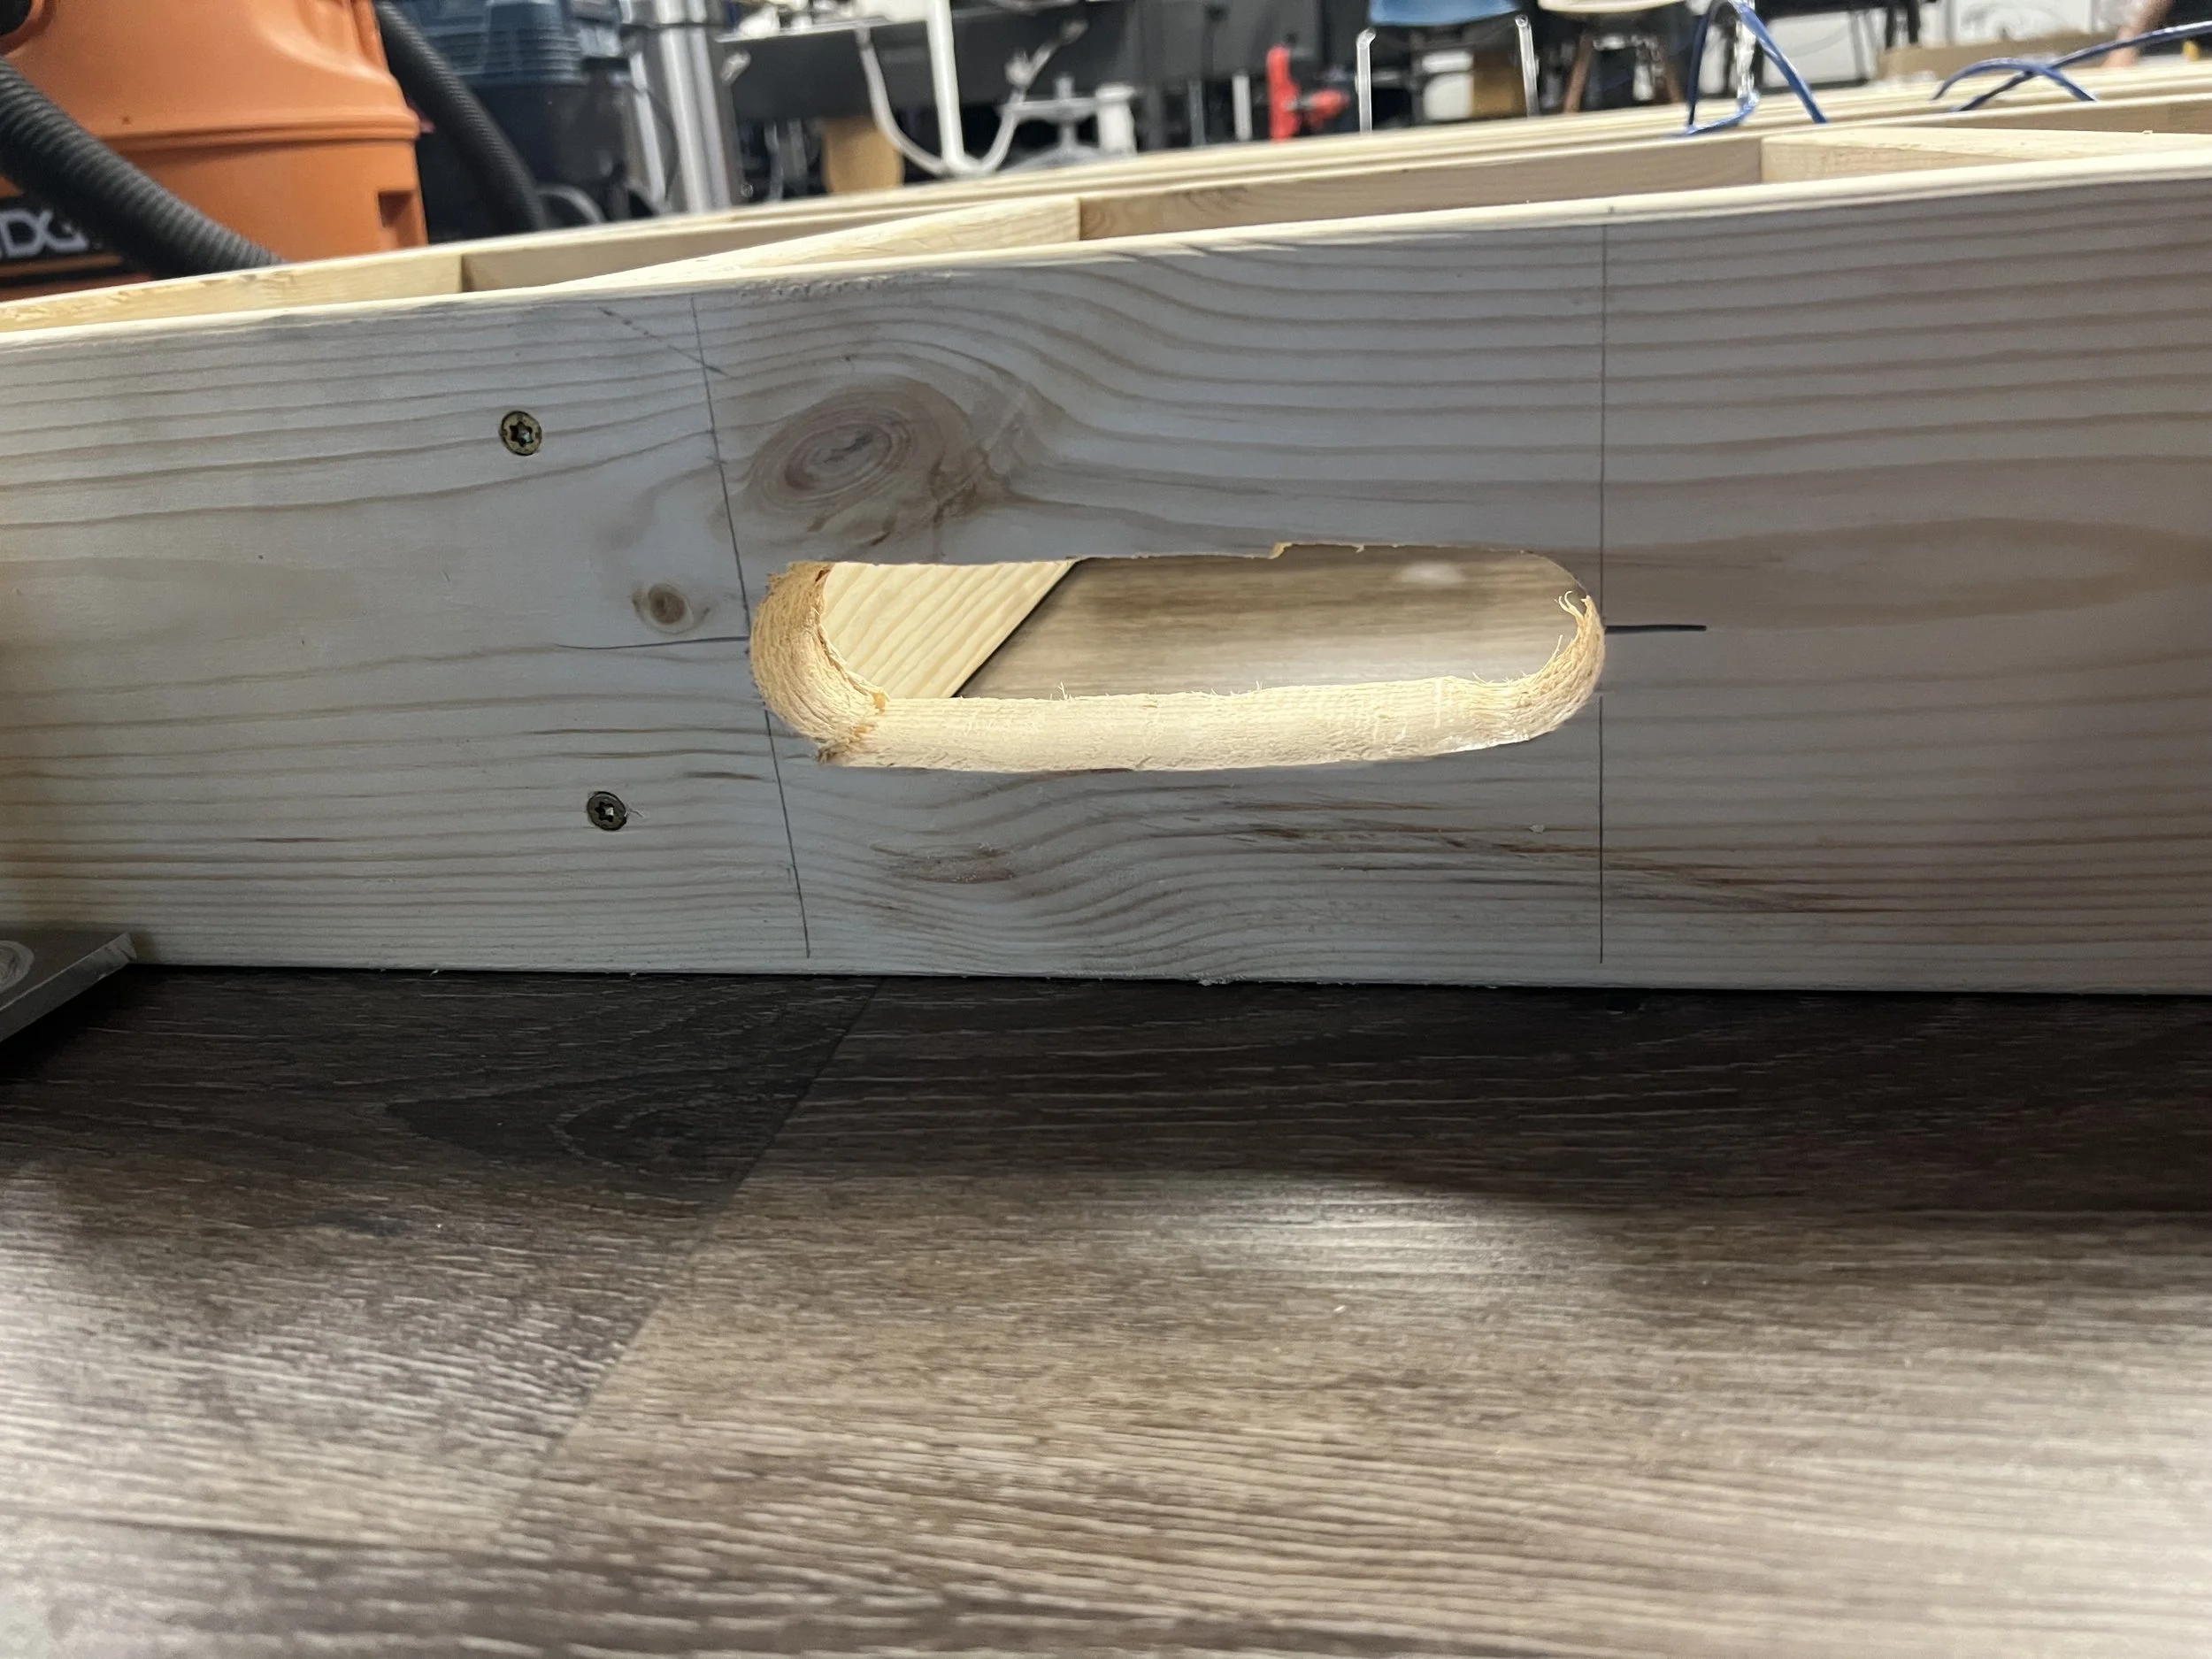
Cutout for bulkhead 2/2
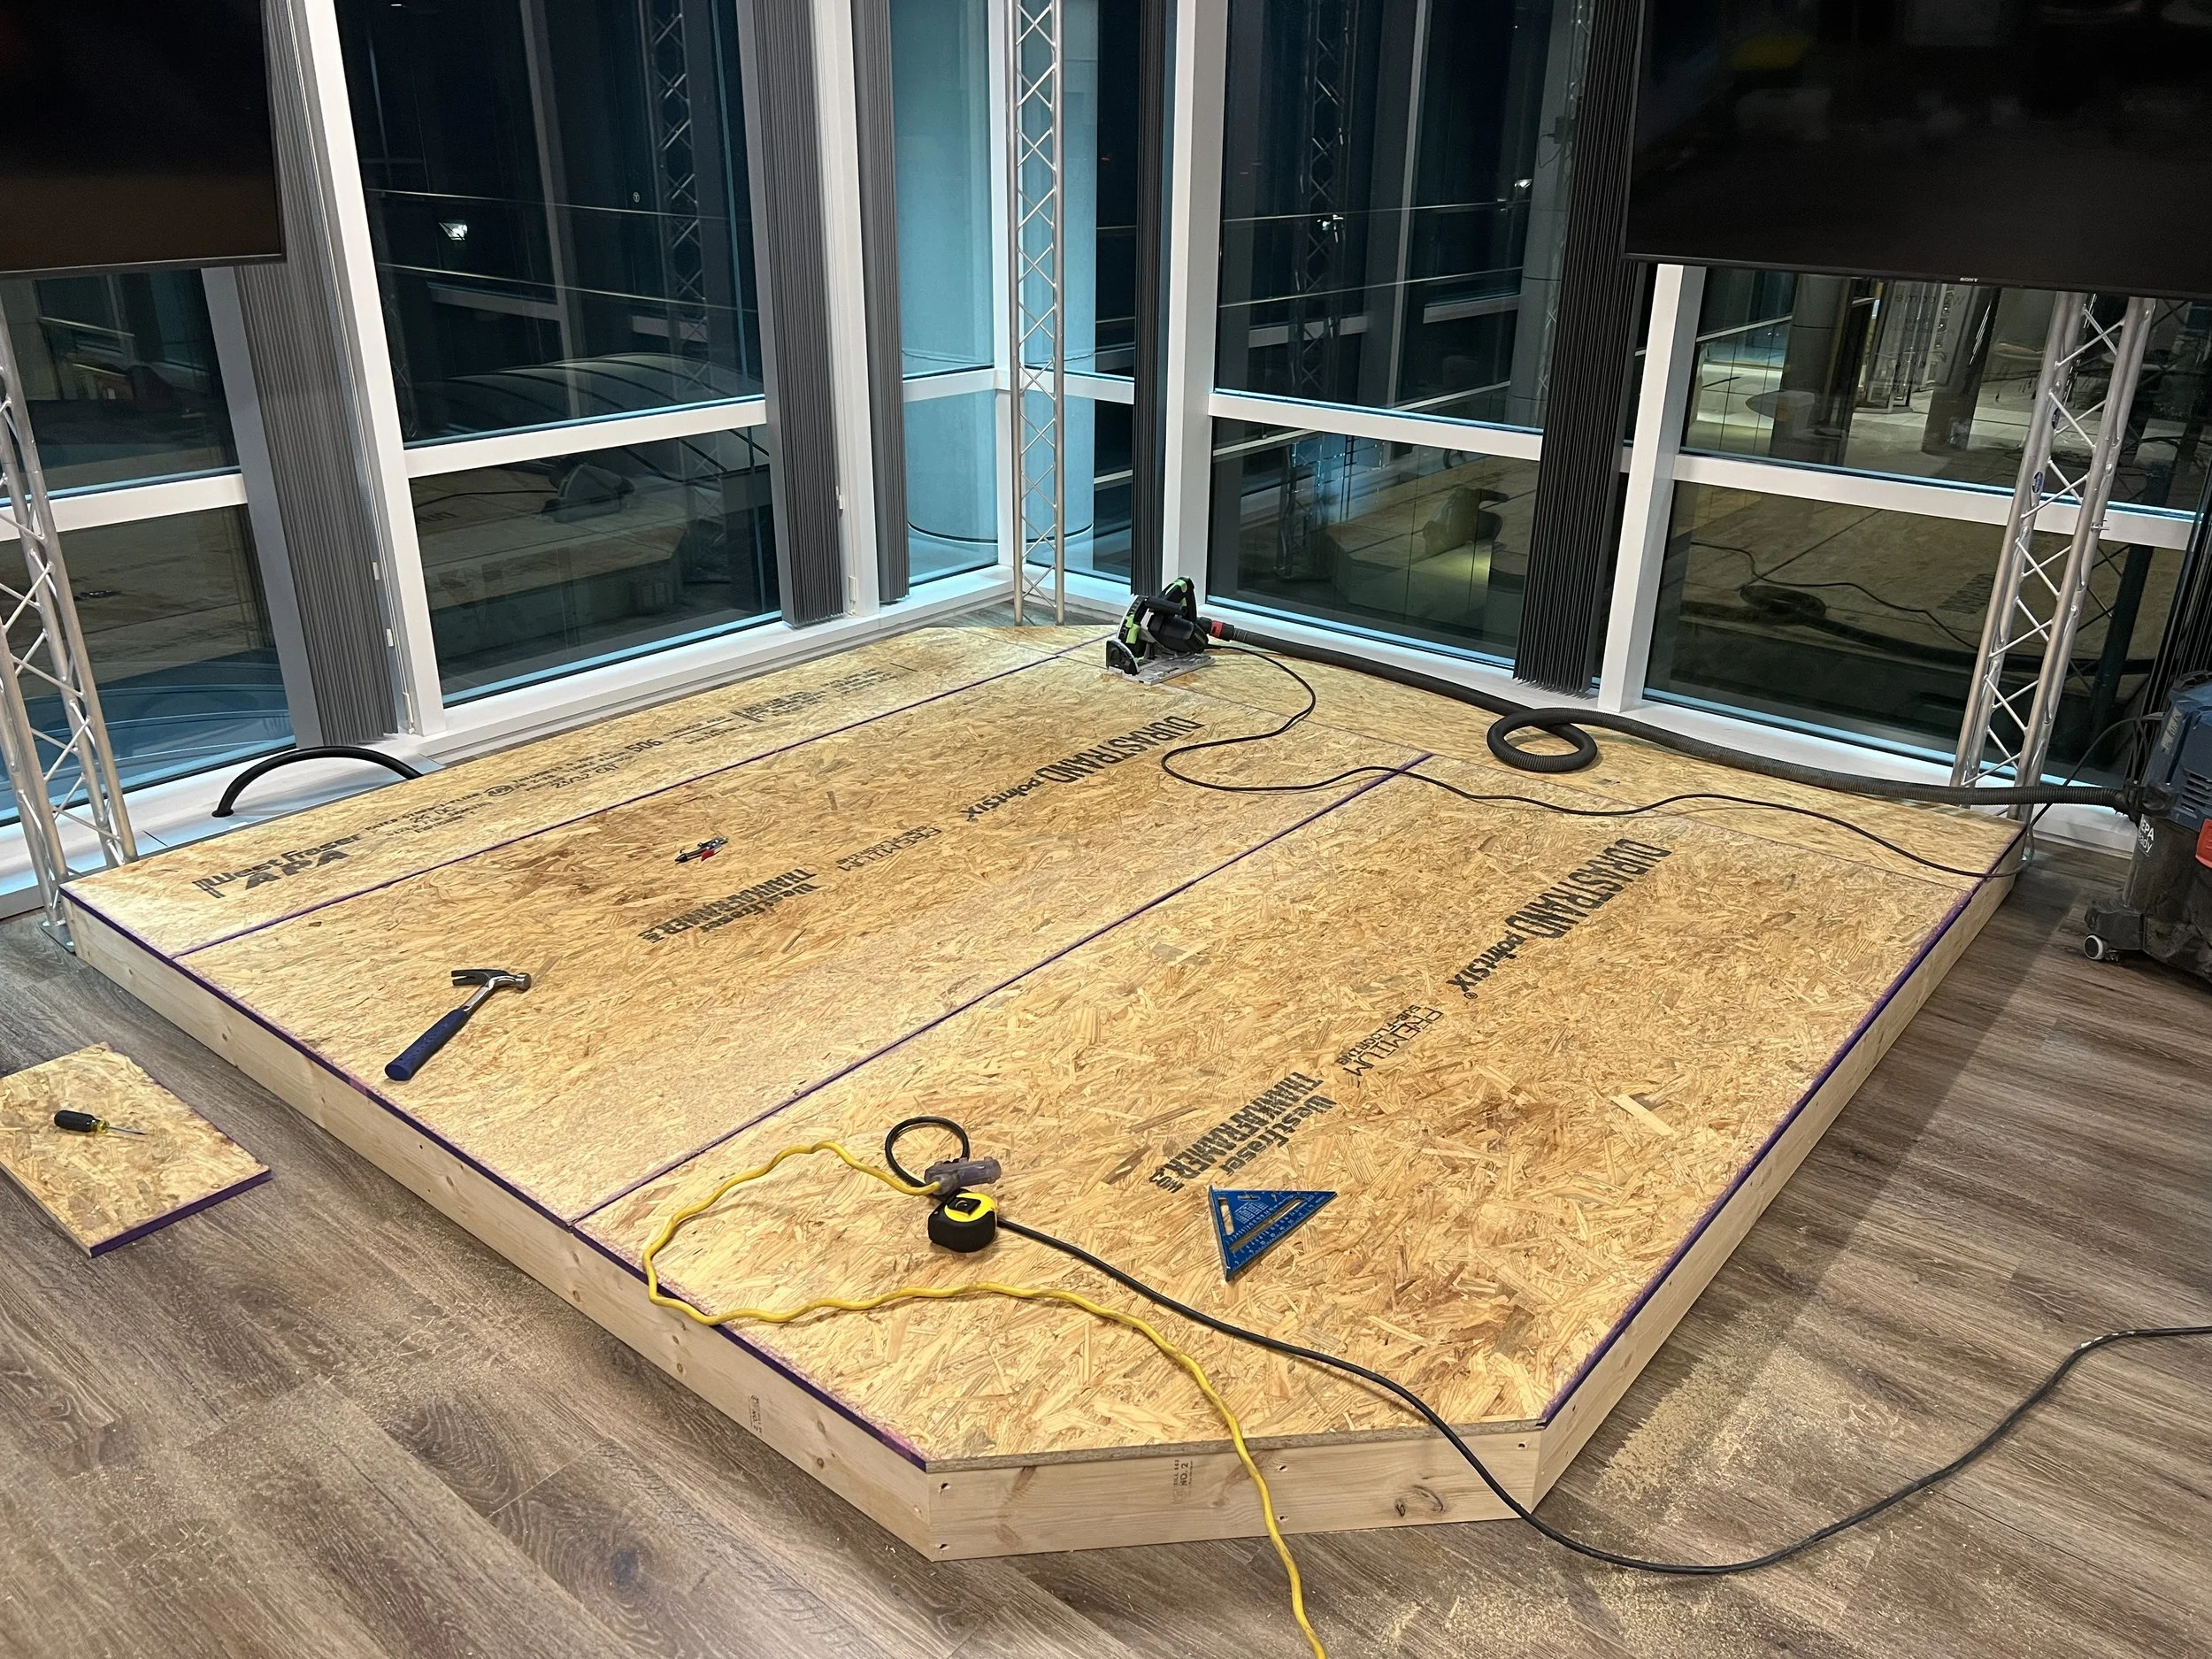
Stage floor cut to shape
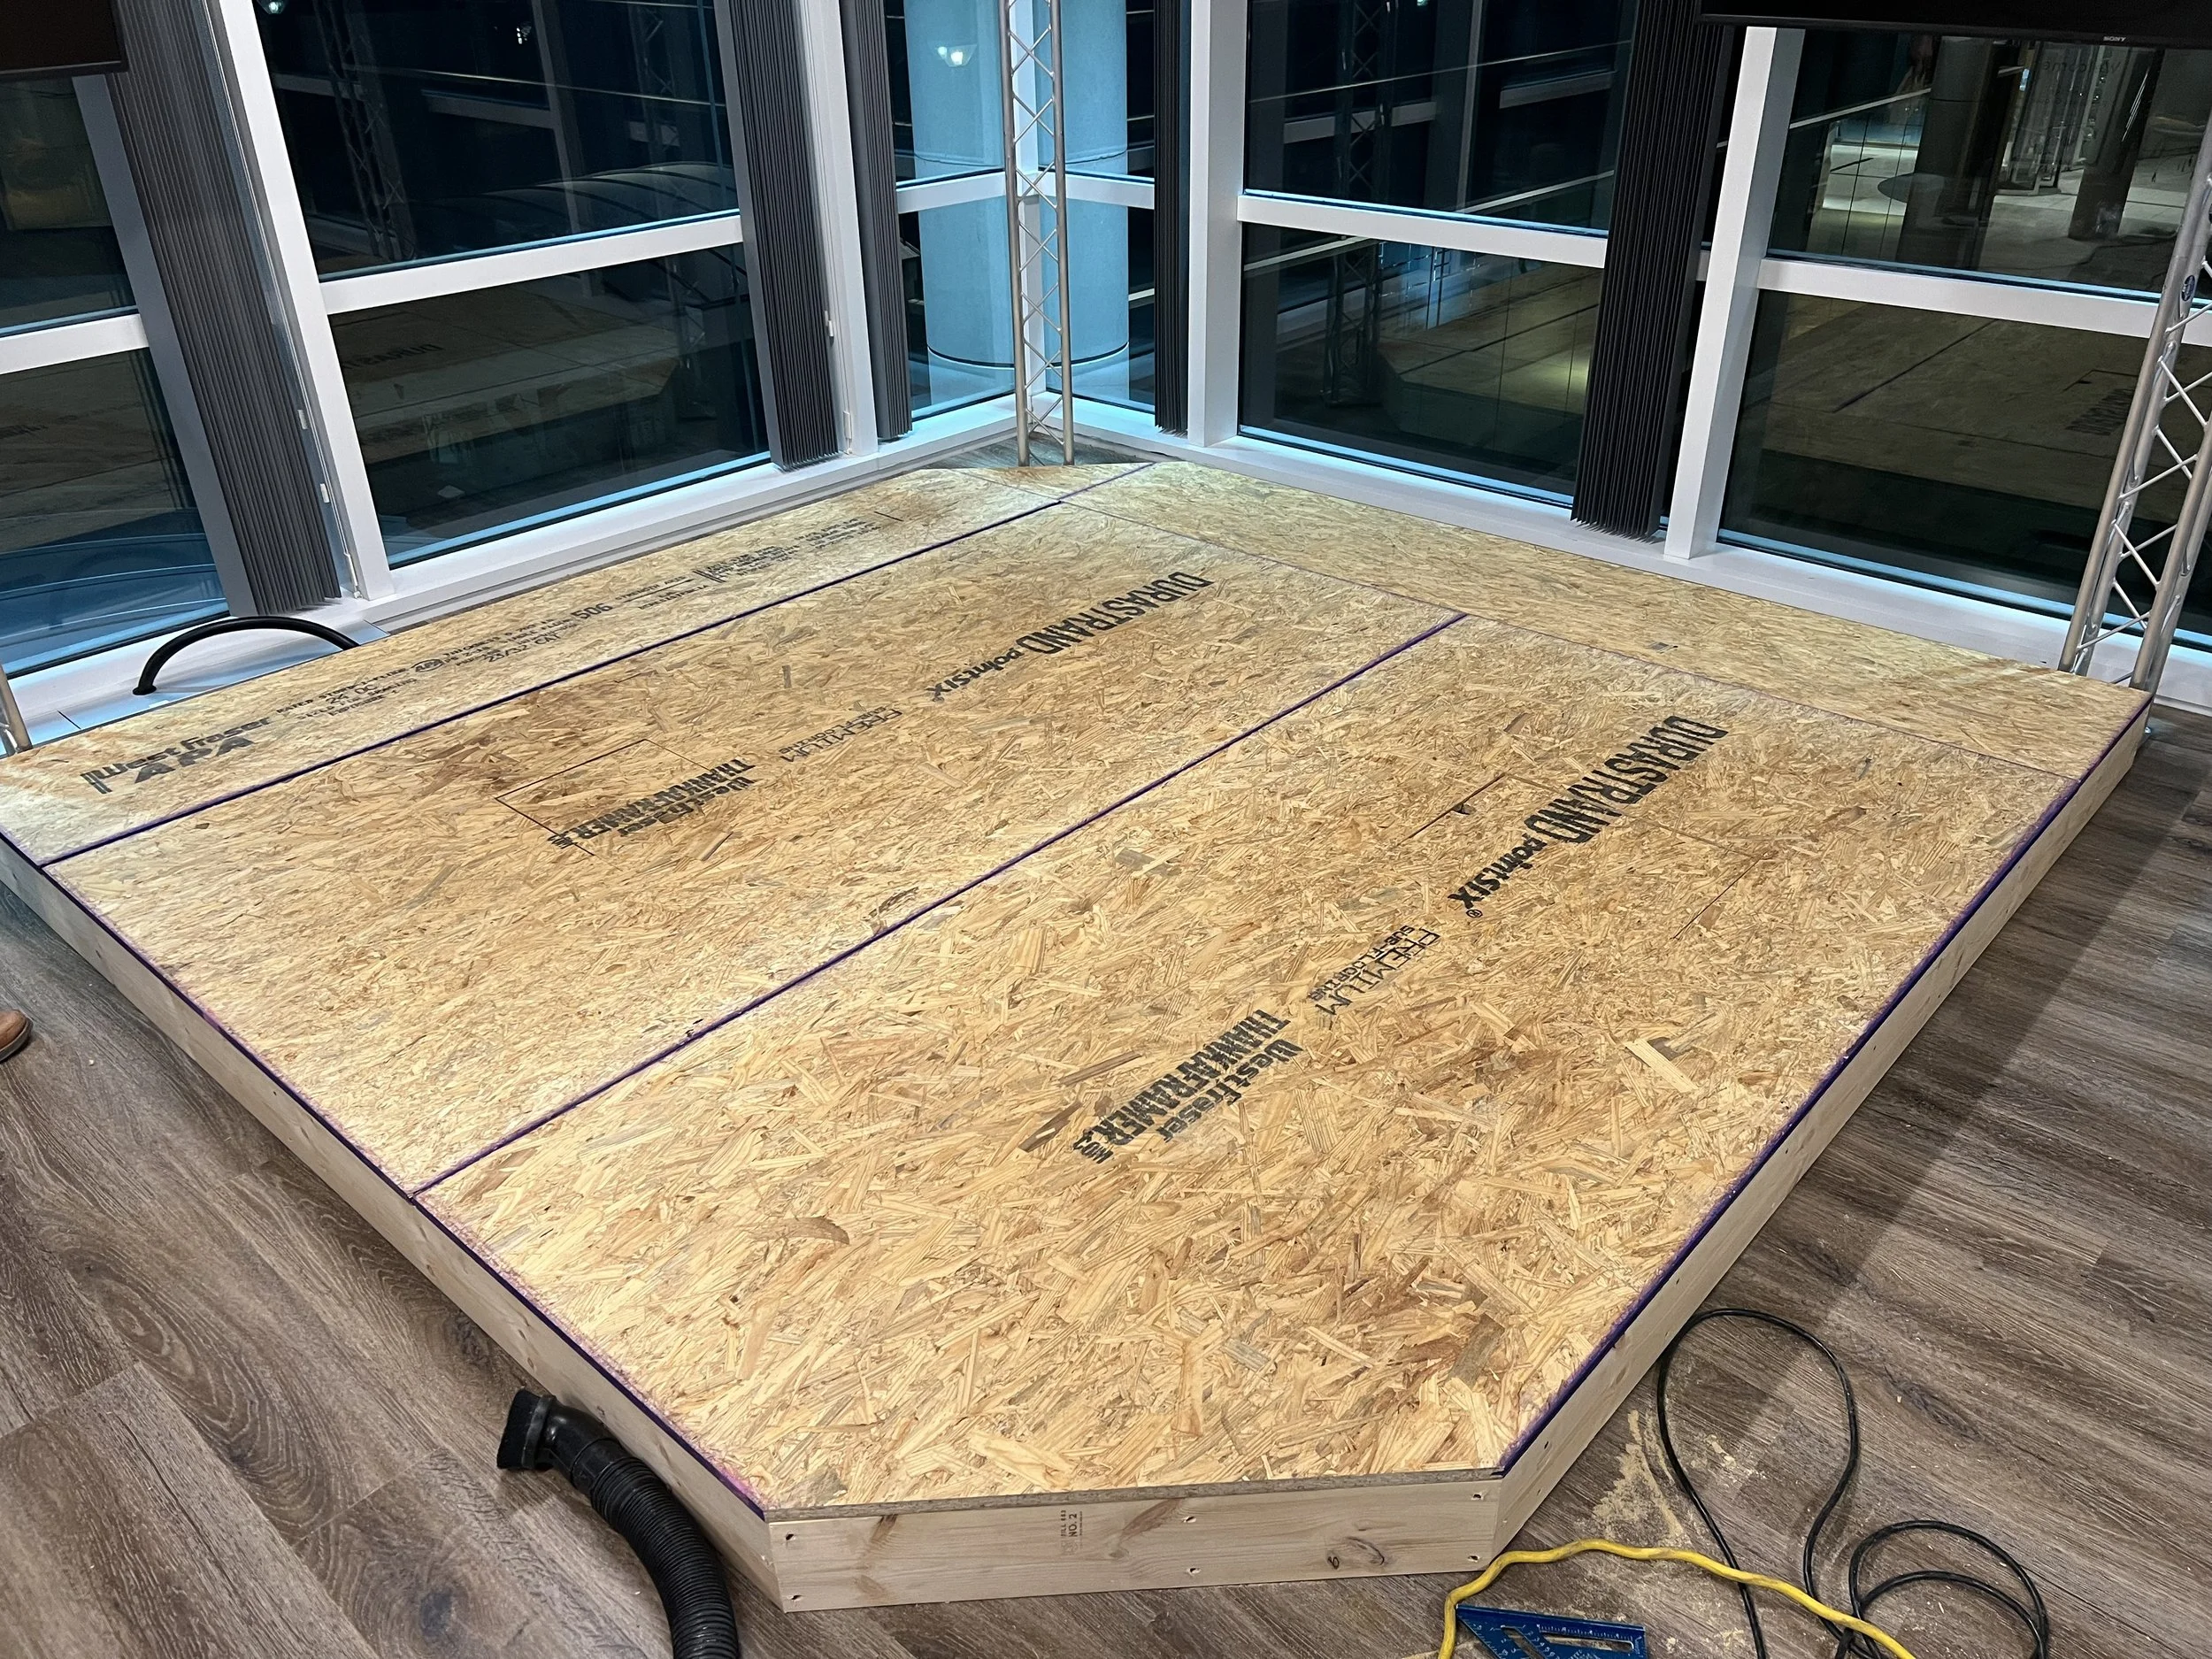
Stage floor installed
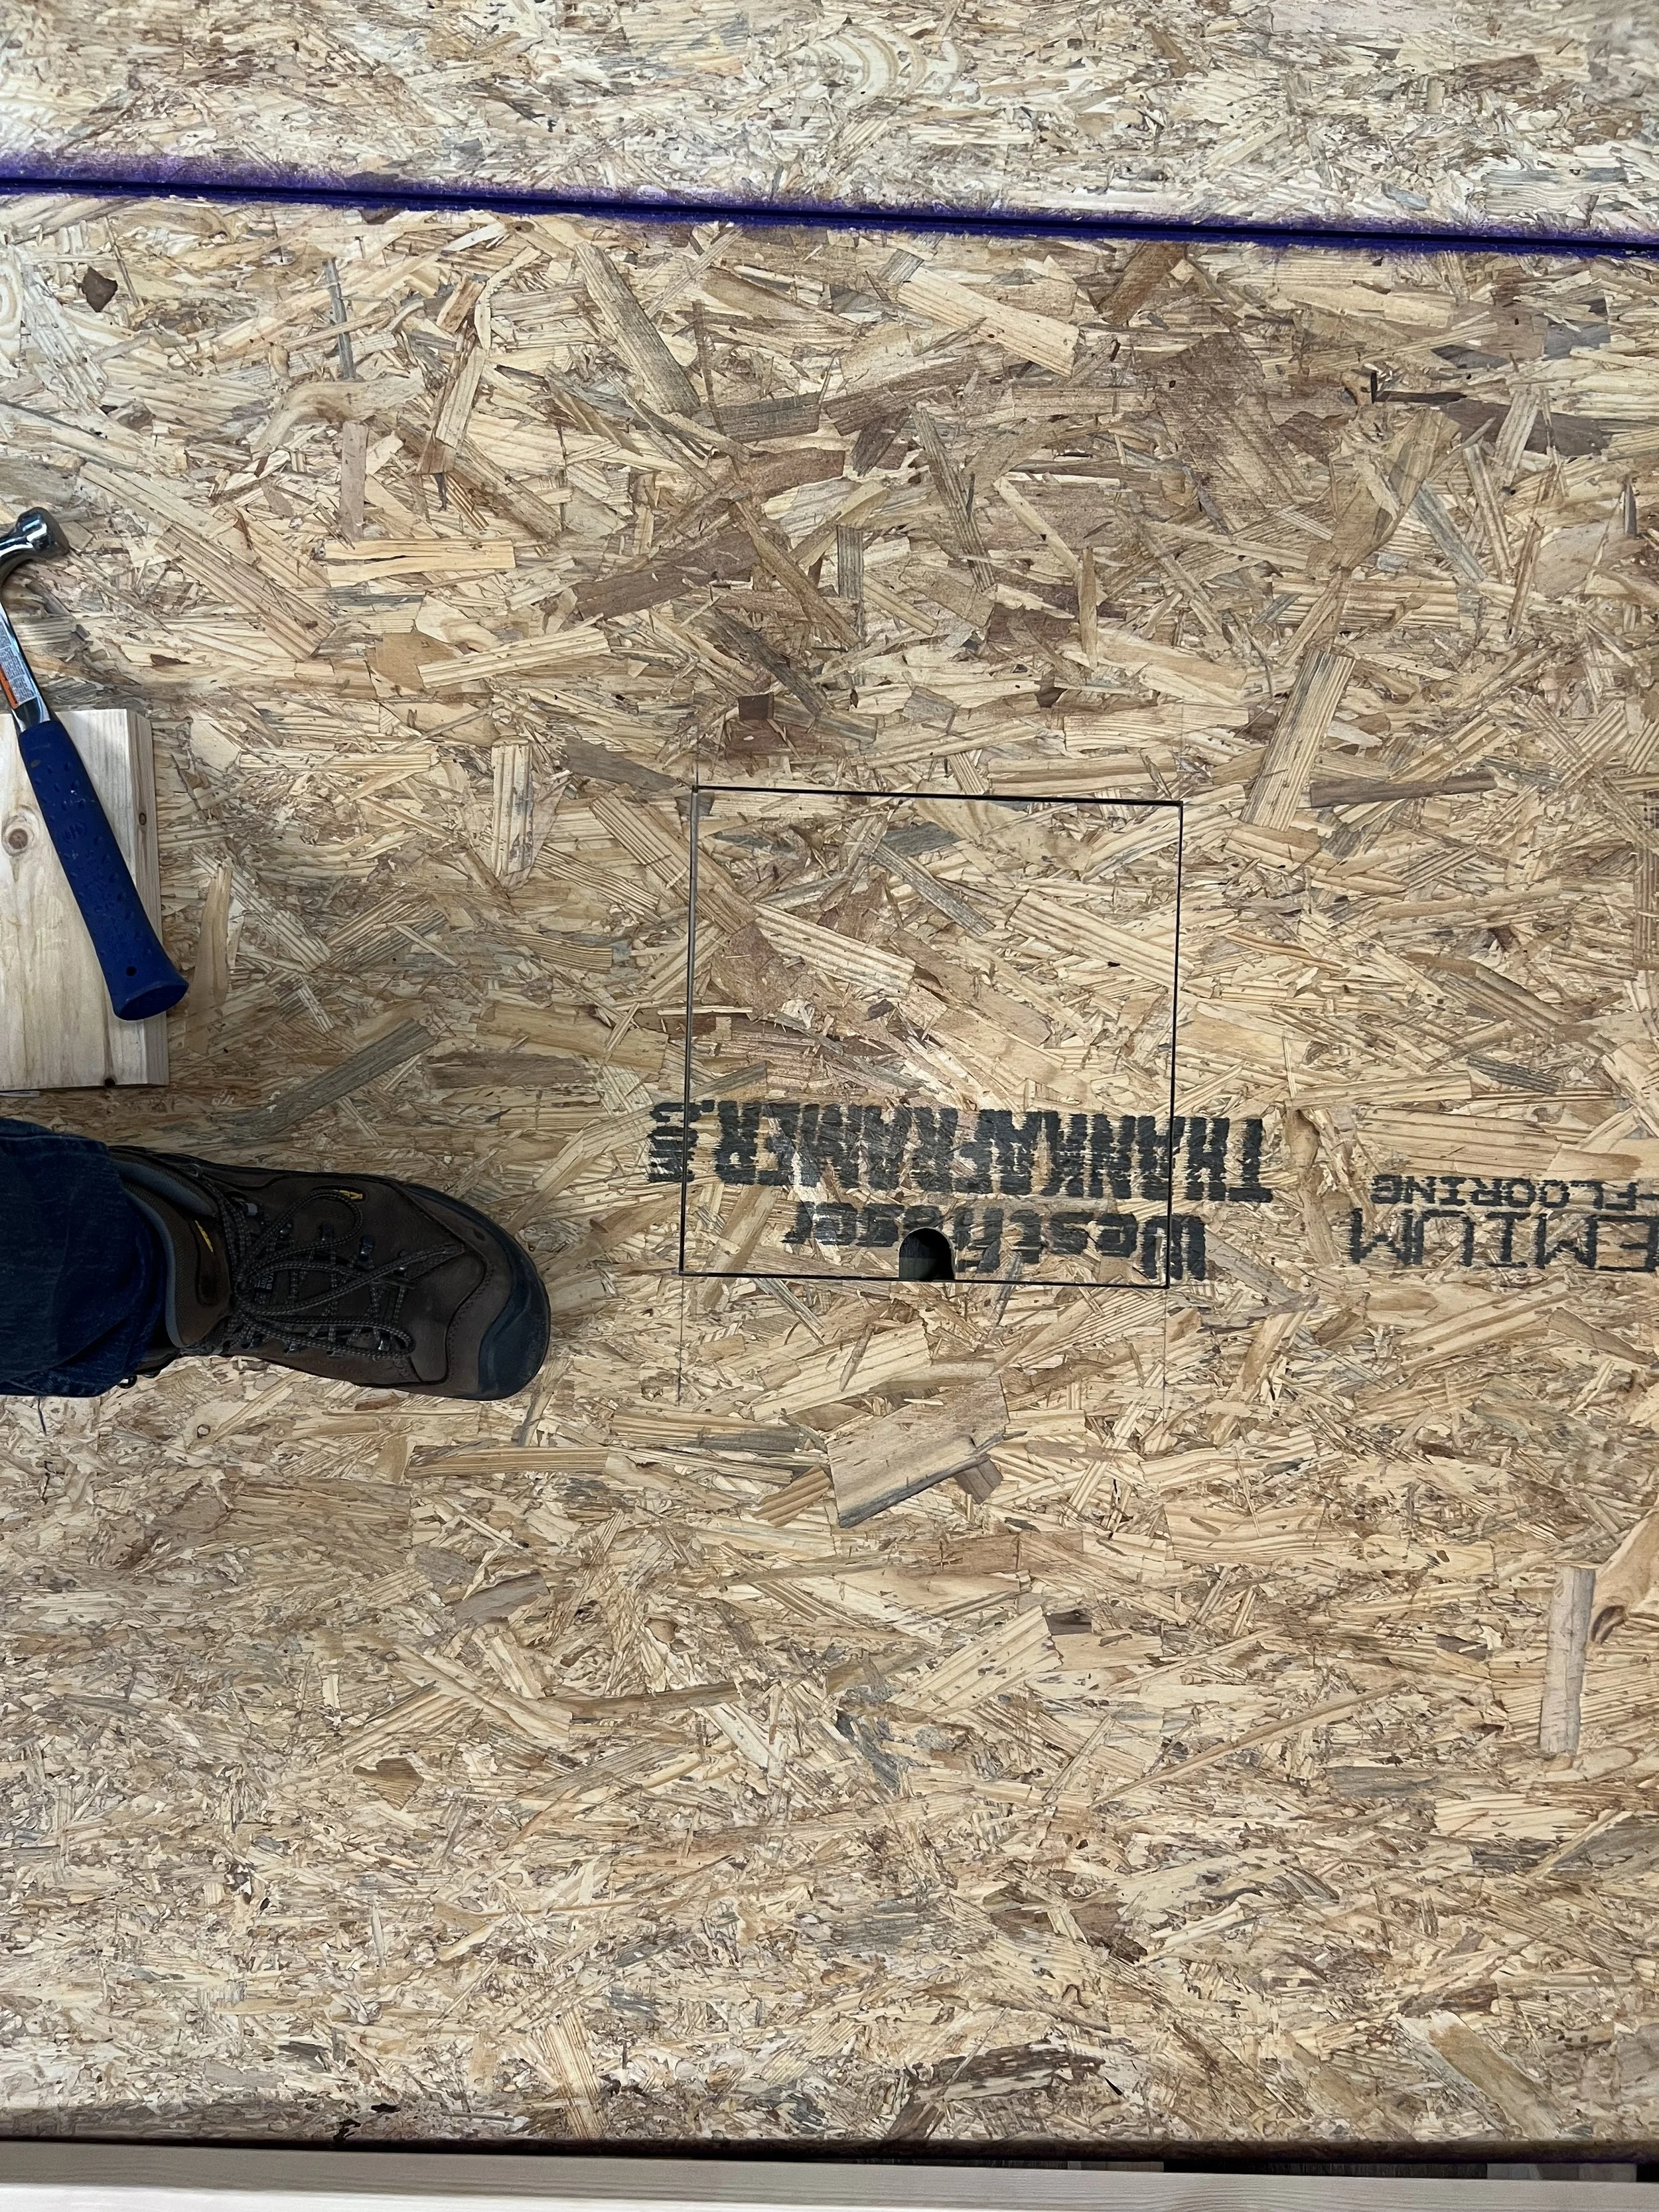
Power Trapdoor

AV Trapdoor
NDI system test

Prototype setup for first production
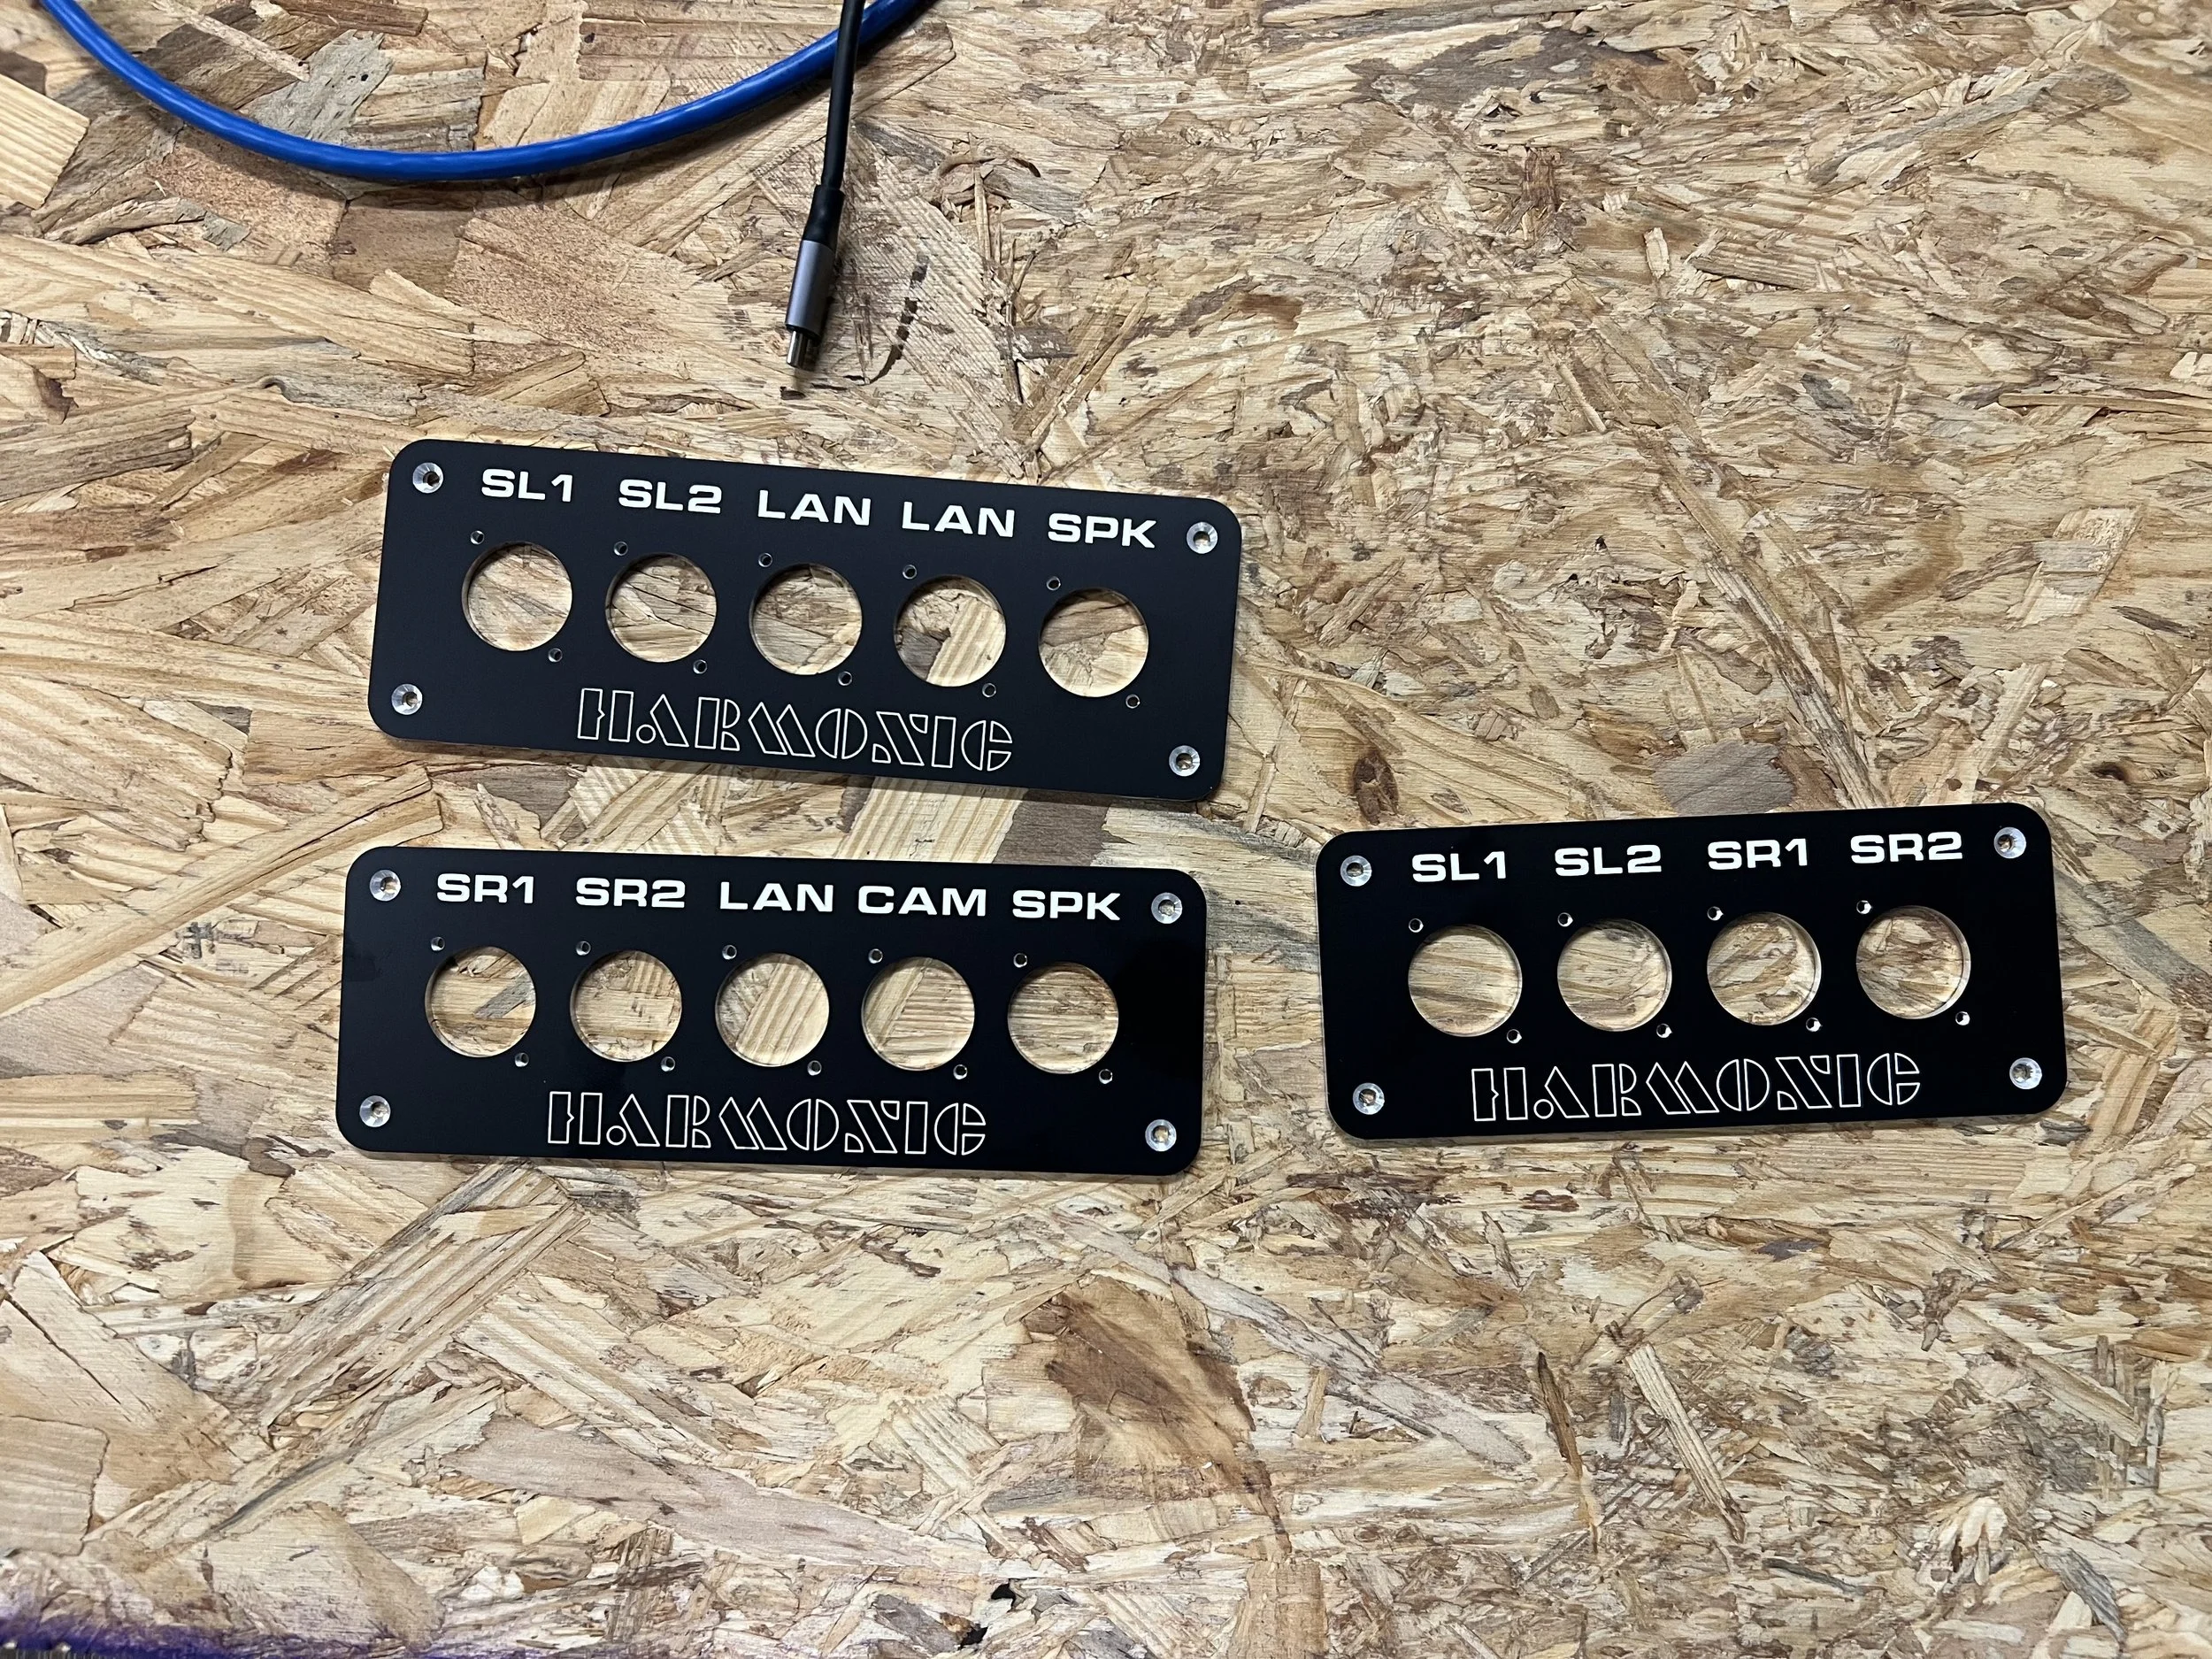
Custom bulkheads
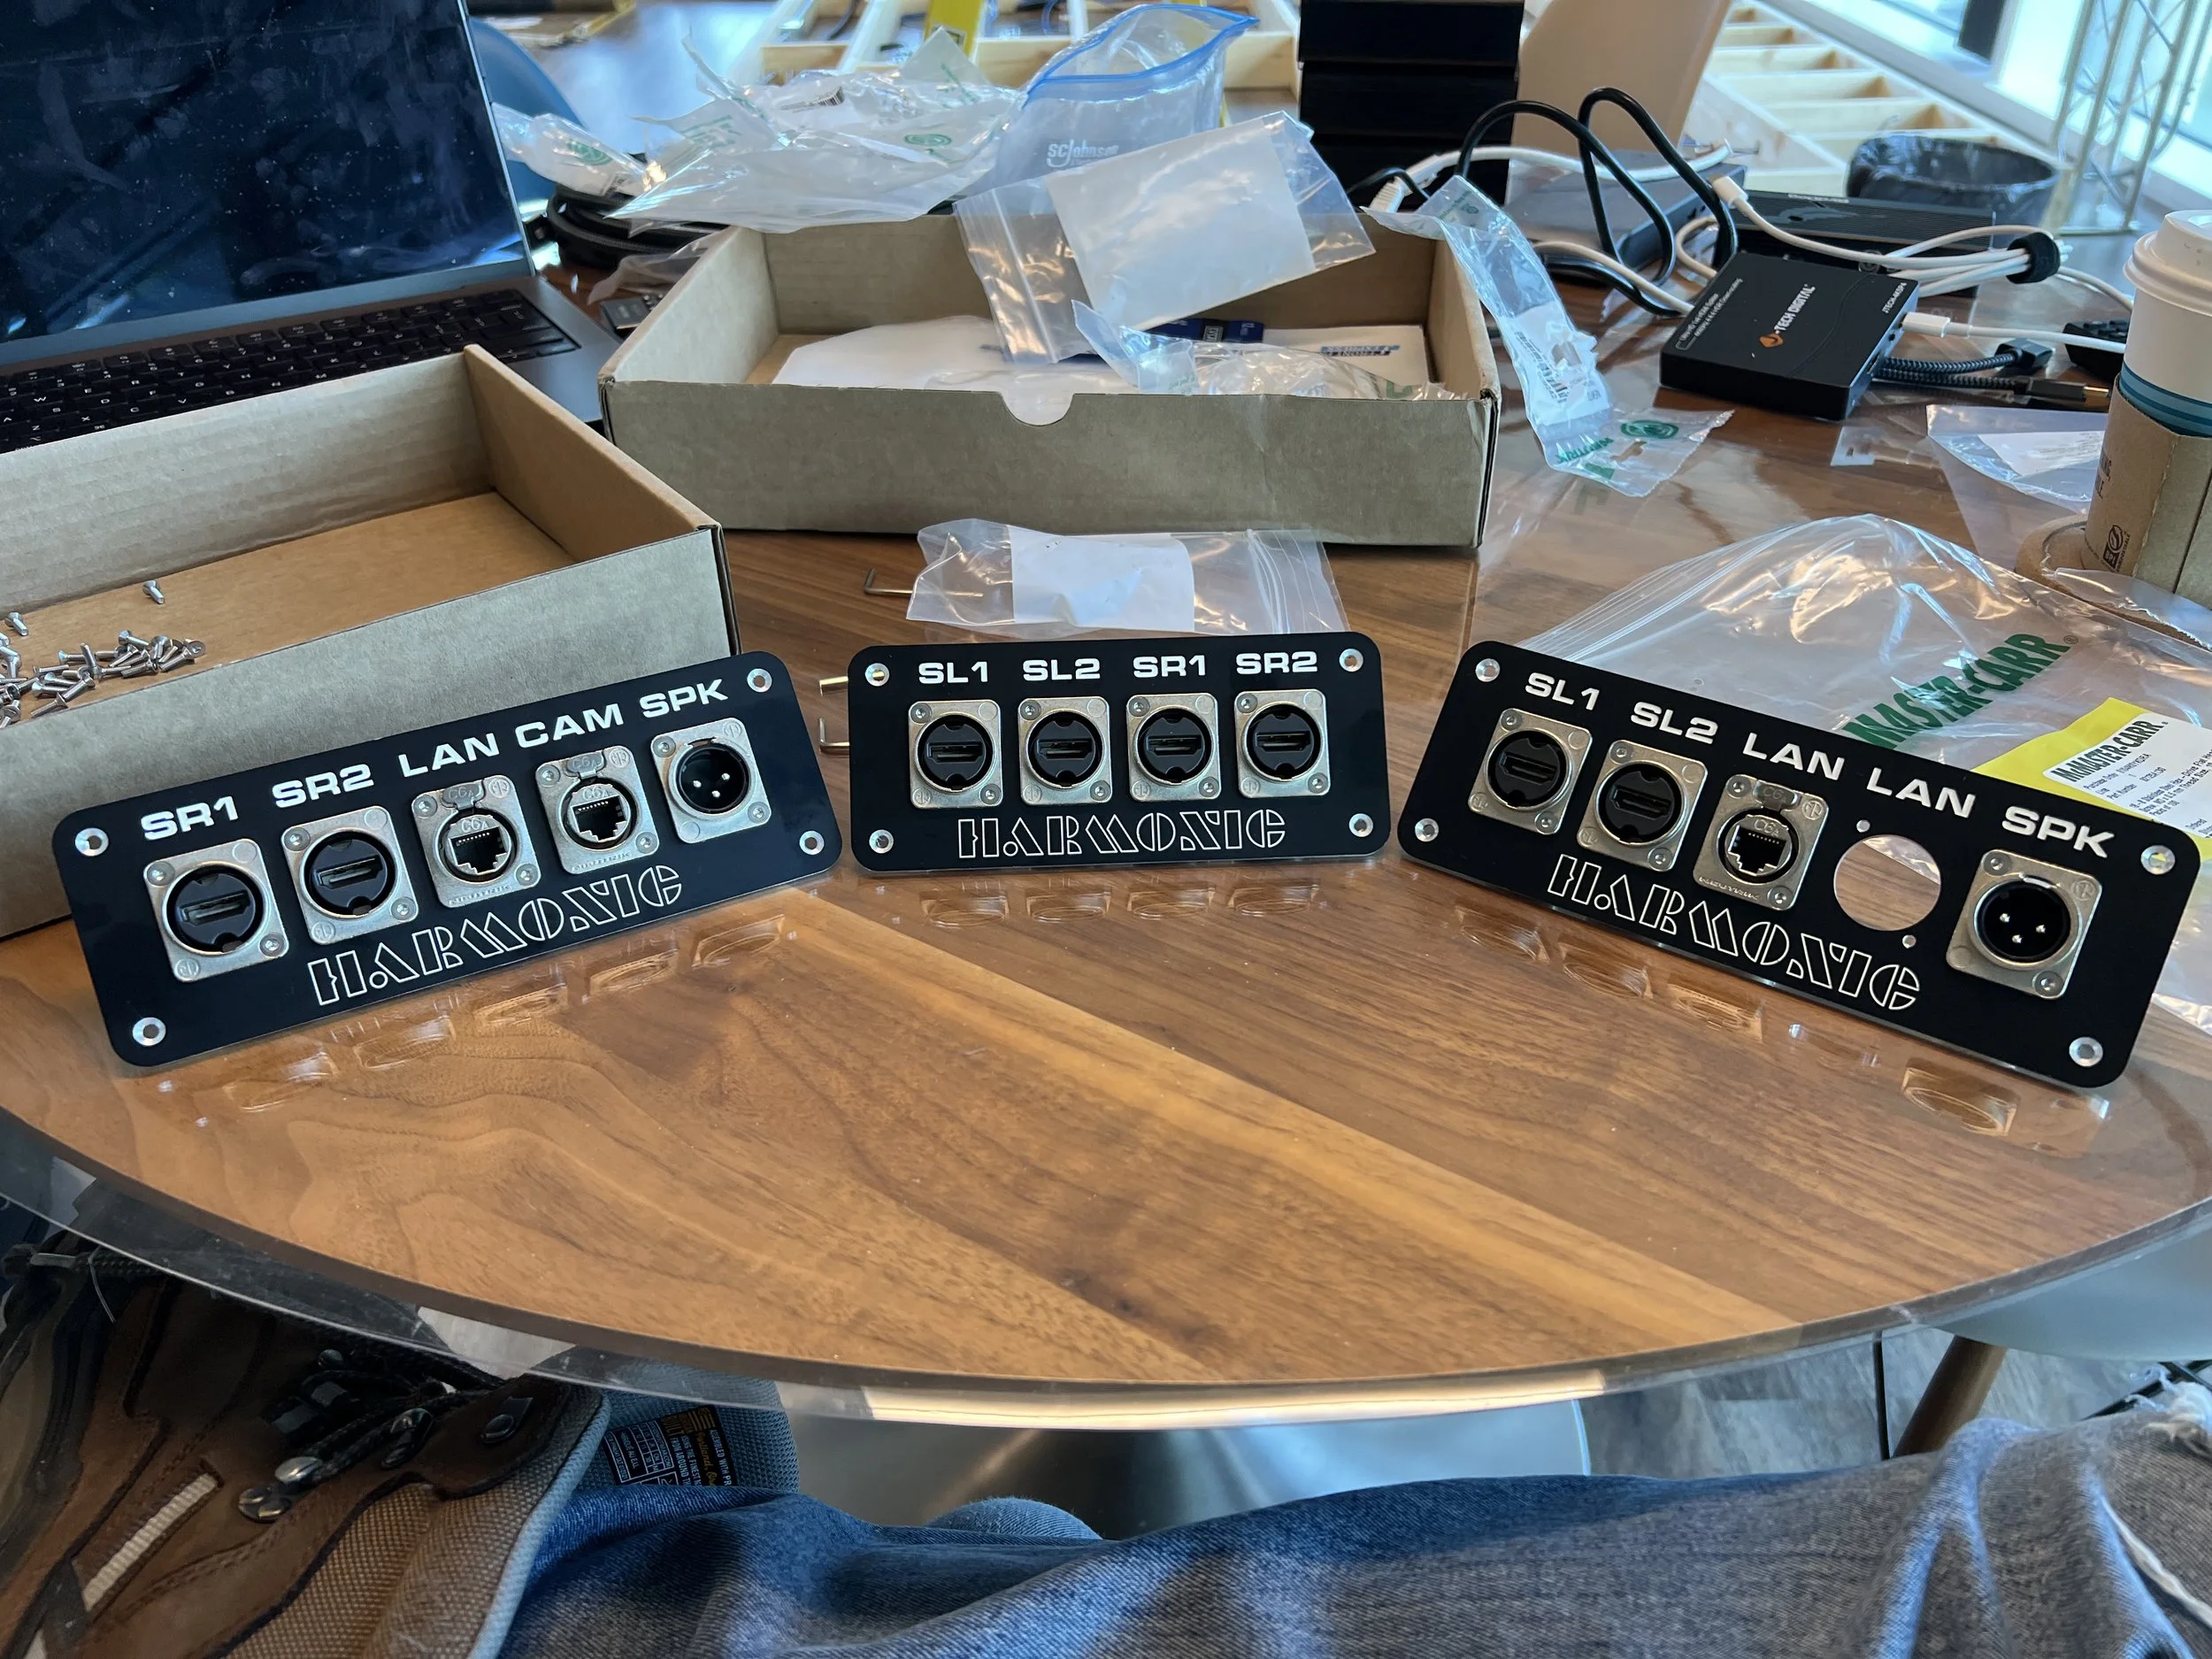
Populated bulkheads
Stage right bulk head installation
Stage left bulk head isntallation
Av bay prototype install
Stage internals/wiring 1/2

Stage internals/wiring 2/2
Edge banding installed
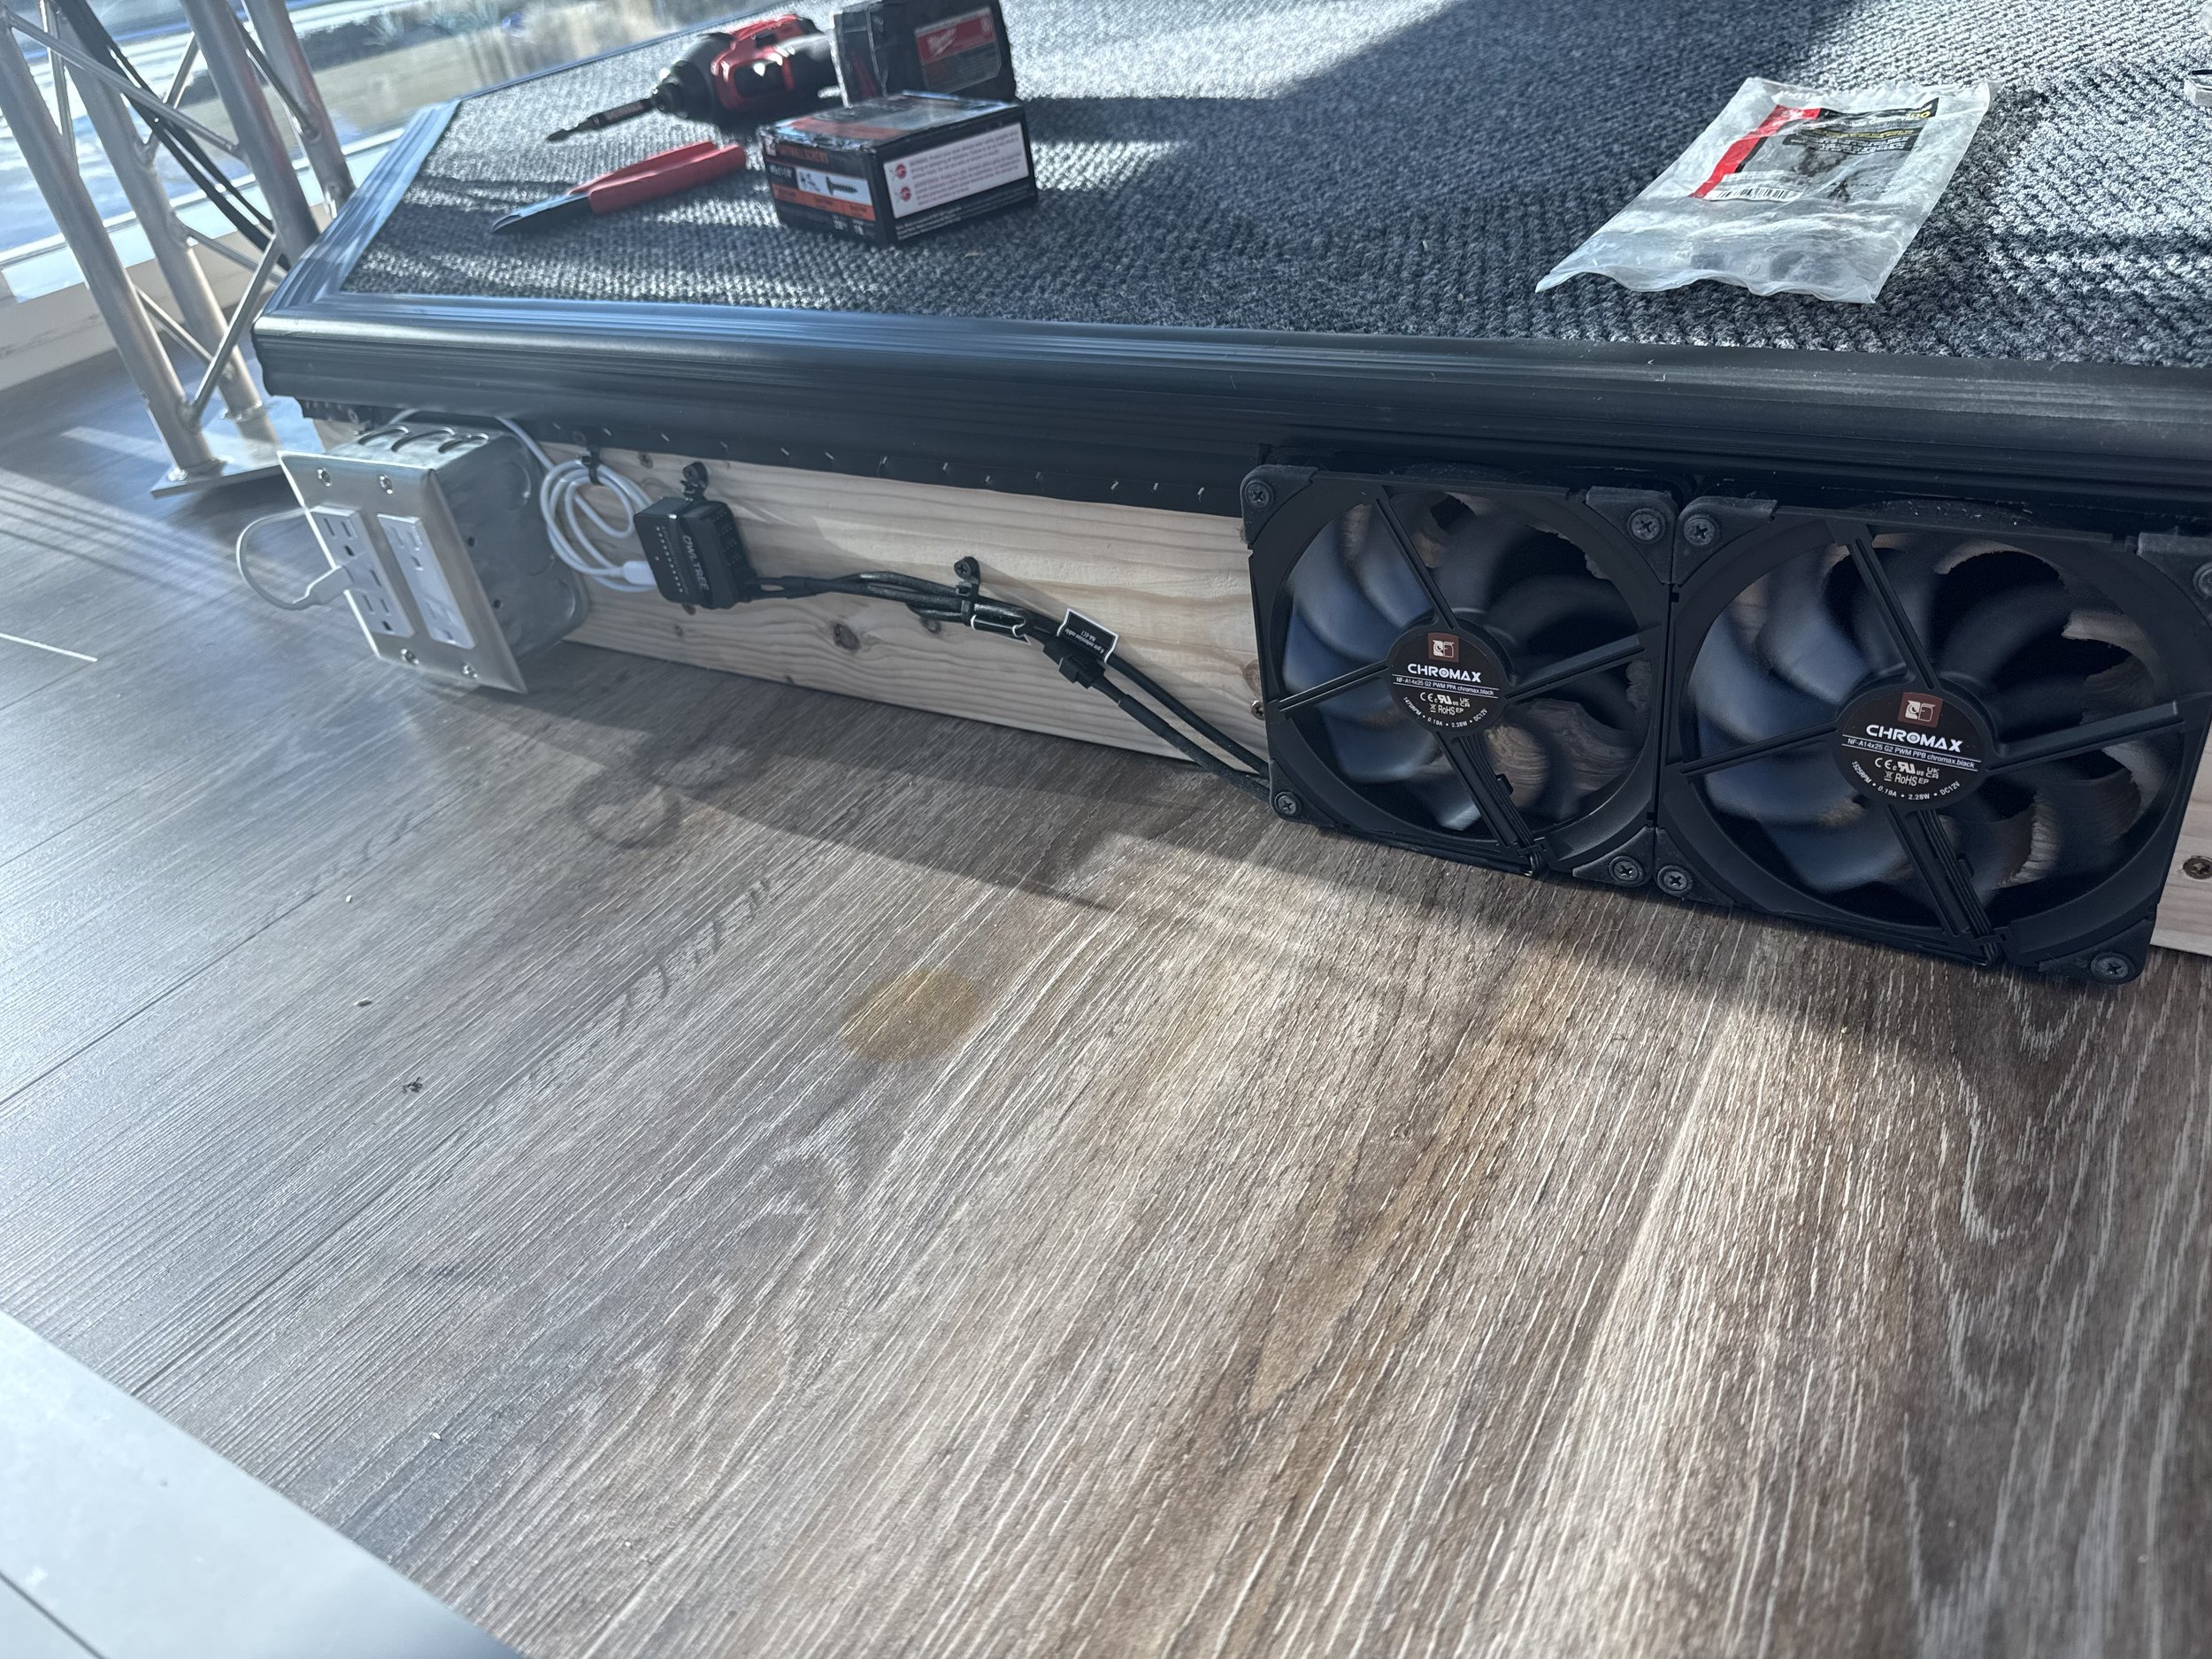
AV Bay Cooling fans

Completed stage (No carpet)
Microphone cable routing 1/3
Microphone cable routing 2/3
Microphone cable routing 3/3
Microphone and camera installation
AV Trapdoor (Carpeted)

Network Management
When setting up the software side of the stage Stability and ease of use were the primary concerns. To achieve this the best method is to keep the NDI and Dante networks totally isolated from the companies network and from each other. This was done by using port and MAC based vlan configurations and putting the devices on different subnet with no gateways. Using the Netgear m4250 switch’s capabilities we were able to configure each port to recognize the device by its MAC address and tailor the settings so that it works best for an NDI, Dante, or network device respectively. Because of this separation of networks to communicate with the Mac Studio we created 3 virtual network interfaces in our computers system so that it could talk to all the devices without them talking to each other. In addition to this the Mac Studio was plugged into a 10Gig port to remove any chance of network bandwidth issues. in addition to these steps all devices were adjusted to listen to the same time server and message priorities were enabled based off of DANTE and NDI’s recommendations to maximize performance. with this setup we are able to have multiple computers connect to the NDI system using the correct subnet and a dedicated Dock in the vlan. while letting the MAC studio have full access and control of all systems at the same time.
Production software
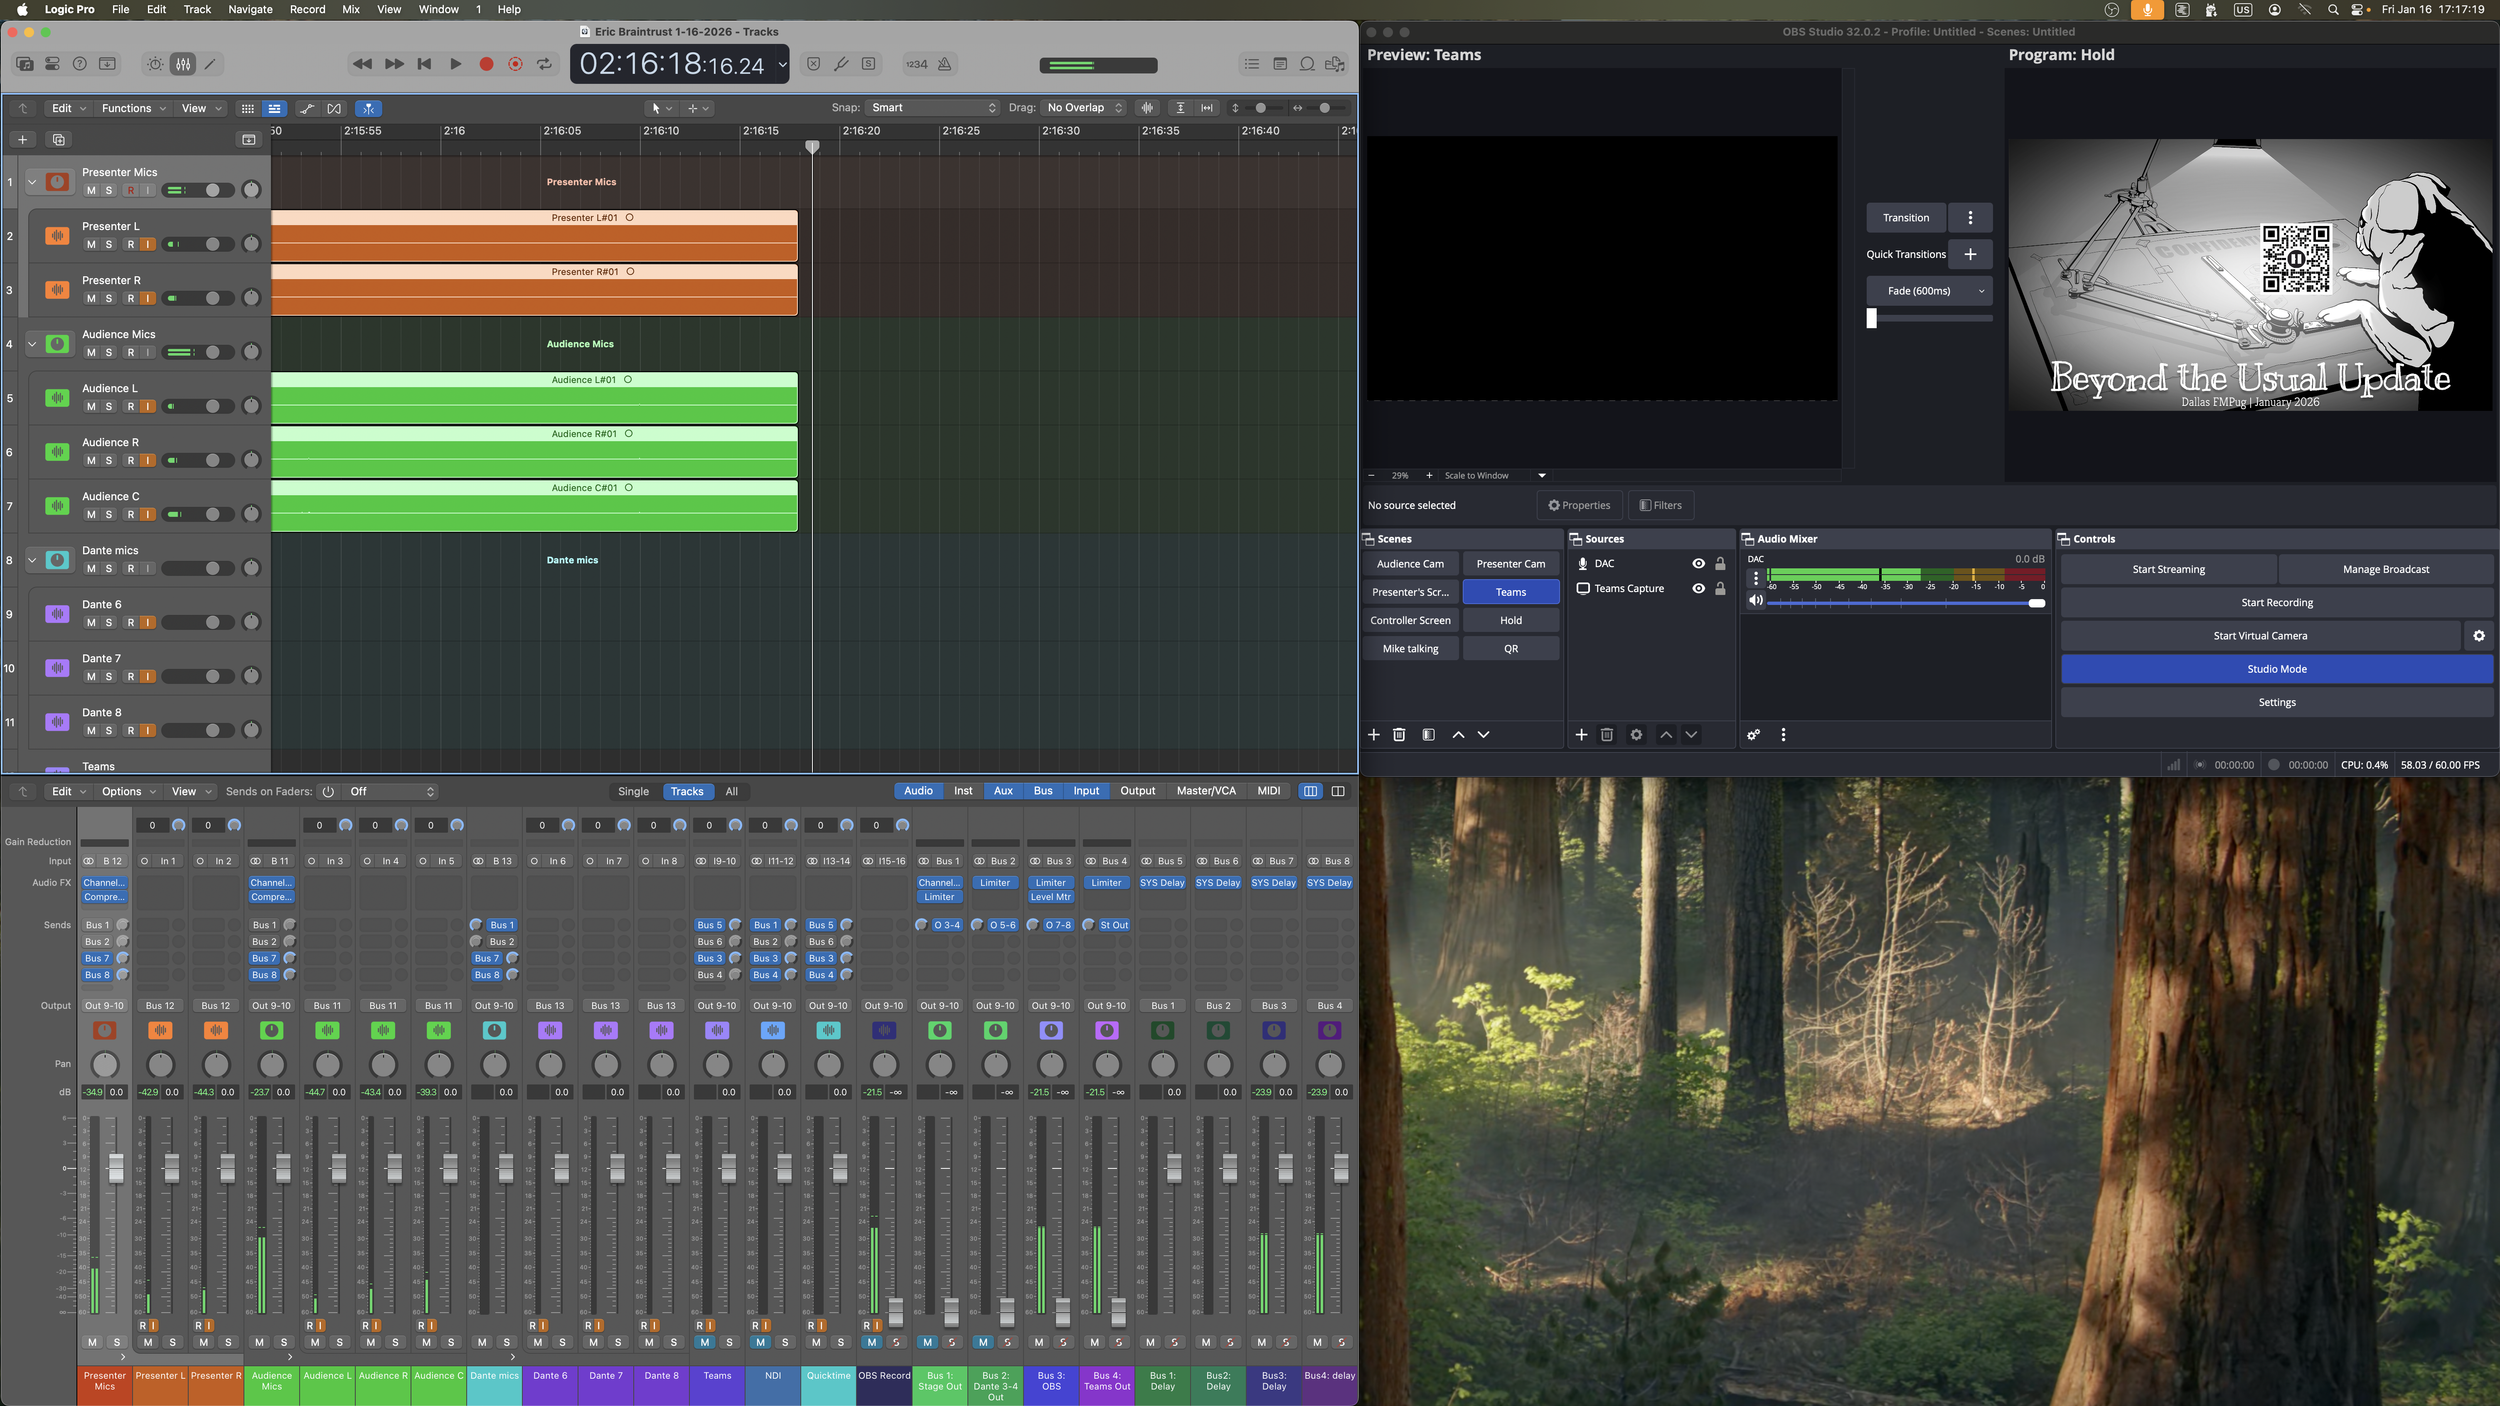
Given the modularity of the system all of the audio and video recording, routing, live-streaming, and editing is taking place digitally within the Mac Studio. This is accomplished through 4 main applications Logic Pro, LoopBack, OBS, and Dante Virtual Soundcard. Dante virtual Soundcard acts as the audio send and receive from the stage. OBS acts as the NDI Receiver, video recorder, and livestream output, and Logic acts as the audio recorder, editor and mixer. Finally loopback connects and routes all of the audio for these applications, Loopback can create unlimited virtual audio devices which can hijack audio from any other audio source. Using this feature you can create a modular audio device which aggregates all sources for logic to record. these audio streams are then edited and mixed in logic before being routed out of 4 busses back into loopback and being sent to their various locations. This allows online participants to be heard in the room for Q&A sessions and streaming to multiple locations such as YouTube and Microsoft teams without redundant audio (YouTube needs to hear the teams audio but teams shouldn’t hear itself). Finally OBS using a couple plug ins is able to receive and create its own NDI feeds as well as record every single camera source at the same time allowing for 100% flexibility in post production.
Device management
One of the primary reasons to use the NDI system is it allows us to send the feed of any source to any receiver and duplicate the signal repeatedly. This routing is controlled through the various browser UI’s for each device as well as custom coded scripts which can be sent over the network to switch what the TV’s on stage and in the audience are showing. Controlling the cameras and microphones is also done through the use of browser UI’s when being managed from the control room. The Camera operator station is equipped with a PTZ optics Super-joy which allows them to directly control all the setting on both cameras
Presentations from the Stage
Stage Documentation:
My original documentation on the stage can be viewed in these expandable menus
-
Harmonic Stage Documents
Hardware
Stage:
Audio:
2 SHURE ANI4IN
1 SHURE ANI4OUT
5 Sennheiser MKE Shotgun Mics
2 Yamaha HS5 monitors
Video:
2 65” SONY TV’s
2 4KHDMI’s
5 BIRDDOG play’s
1 PTZOptics Move4K
1 PTZOptics Studio4K
1 PTZOpics Superjoy
Design:
The Design of the Stage is intended to be used with minimal setup and lots of flexibility. With
all connections beyond the stage being over ethernet.
At the Right leg there is a faceplate with 2 HDMI’s (SR1, SR2) these route back to the AV
trapdoor Faceplate (SR1, SR2) on the right leg faceplate you will find 2 network ports 1
Labeled CAM routes directly back to the m4250 switch the other port labeled LAN routes to a 5
port gigabit switch underneath the Power trapdoor for low priority NON-POE AV items (Birddog
plays) finally there is a male-XLR port labeled SPK this is connected directly to the ANI4OUT
port 2 in the AV Trapdoor. SR1 and SR2 should connecter to HDMI 1 and 2 on the TV
respectively. CAM routes up too the MOVE4K camera on top of the truss and the SPK
generally routes up the truss leg to the Yamaha HS5.
On the Left leg there is a nearly Identical Faceplate. 2 HDMI’s (SL1, SL2) routing back to the AV
Trapdoor faceplate (SL1, SL2) 2 LAN network ports routed to the low priority gigabit switch
found in the power trapdoor, and a male XLR labeled SPK routed to the ANI4OUT port. Again
the HDMI’s are intended to connect to HDMI 1 and 2 on the TV and SPK routes up to the
Yamaha HS5 speaker.
Midway up the Left and Right legs are Quad power boxes each with USB C power. These
power the Birddog plays as well as the 65” TV’s mounted midway up each leg.
Under the AV trapdoor we find 1 more faceplate with4 HDMI’s (SL1, SL2, SR1, SR2) which
connect to the left and right leg faceplates. In this bay you can also find the 3 SHURE DANTE
Boxes with 2 open Male XLR ports (audio output) and 3 available Female XLR Ports (wireless
or podcast microphone inputs). In addition to the Dante Boxes are 2 HDMI splitters and 2
4KHDMI birddogs and a Caldigit dock with a 4 meter thunderbolt cable to connect to a
presenters laptop. All of these devices are connected to the 6 ethernet ports on the wall (5 goto the AV switch port D34 goes to the Standard Cisco switch each Box is labeled by the port
on top e.g. D29, D31,D33 the ports beneath them are D30, D32, D34 respectively) the Birddogs
Caldigit dock and HDMI Splitters are able to be connected in any setup outputting through the
HDMI faceplate. Also under the AV trapdoor are 5 microphone cables (PRESL PRESR AUDL
AUDR AUDC) these cables route to the back leg and up through the truss to the 5 Shotgun
microphones (3 facing the audience 2 facing the presenters) there is a also Quad Power box
with 2 USB C 5 volt power ports for AV power in the AV trapdoor. Underneath the Power
Trapdoor is 3 open 120v AC power plugs and the low priority AV gigabit switch.
Away from the Stage there are 3 AV switch ports to connect the Studio4K PTZOptics Superjoy
and a TV cart with a BirddogPlay. The TV is generally used to let the presenter see their own
notes or computer screen and the Studio4K/Superjoy are setup at a Camera Operator station
who can view the NDI streams through Caldigit dock.
Microphones:
There are 5 permanently installed Microphones on the truss 2 presenter and 3 Audience mics.
The 2 presenter mics are aimed so that anybody sitting or standing on the stage can speak
comfortably and will be recorded. The 3 Presenter Mics are aimed to clearly capture the Whole
Audience of the stage. Changing the angles of any of these microphones (even by a few
degrees) will result in drastically different audio capture. The shotgun mics are particularly
sensitive to an indoor environment like this. To add any microphones plug into the 3 empty
ports under the AV trapdoor and route any wires. !!If you disconnect a microphone cable
ensure phantom power is disabled from the SHURE WebUI!!
Cameras:
The Move4K mounted inverted on the truss bar is intended as an Audience camera to film any
back and forth conversations. The Studio4K mounted on a tripod in the audience is meant to
be a direct view on presenters.
TVS:
The 2 65” TV’s are able to display any feed we want though they are most often used to show
the presenters screen. The TV in the audience is most often used to let the presenter see his
own screen or notes. We also have the ability to display to 2 additional TV’s in the office using
Birddog play’s if the scenario calls for it.
Power:
There are multiple power boxes on the stage. On the Left and right Leg you can find a Quad
box with 2 USBC ports by the rear leg of the stage there is another quad with 2 USBC ports.
Finally underneath the Power trapdoor are 3 available 120V AC outlets.
-
Harmonic Stage Documents
LOGIC
Audio devices
Logic input (loopback)
Logic output (Loopback)
Channels setup
Each logic channel takes an audio signal from Loopback apples some FX (often EQ and
compression) then output it to 5 locations (Busses1-4 and monitors{Zoom p8})
You control routing of audio signals by turning on and off the bus sends of each channel. Each
send also has its own volume fader that can be adjusted. For most signals though the Primary
volume fader also adjusts the send output volumes.
Buss outputs
The 4 main busses combine the audio signals and then output them to their designated
location these busses are solo safe so that if the engineer wants to solo a microphone to adjust
EQ it will not stop audio output to teams or the Livestream.
Delay busses
There are 4 additional busses for when we need to sync up video and audio signals. DANTE is
85 milliseconds faster than the NDI video feed. These busses have been solo safe and setup to
route the signals related to video outputs These should not need to be touched or adjusted.
Limiters
Every Bus has a limiter on it so that the system will never distort or clip any of our audio
equipment acting as a safeguard
Stage Mic FX
The Audience mics and Presenter mics both have EQ’s and substantial compression applied to
them (this is not saved in the multitrack recording) this is to allow quiet and loud speakers to be
heard at a similar volume for virtual audiences and control room noise
-
Harmonic Stage Documents
Setup/Troubleshooting
Setup
The Mac Studio is the Nexus point for the whole AV system combining our network Audio and Video before redistributing and Live-streaming.
Network Setup:
For any of the systems to work the Network settings must be correct. The Mac Studio has 3 active network interfaces. The default ethernet interface(DANTE) , NDI VLAN, Network VLAN. The IP addresses and VLAN tags can be found in the networking documentation. Make sure that the NDI VLAN is first in the network priority followed by network and the Default ethernet interface.
Audio setup:
The Mac Studio controls and routes all audio from DANTE to a variety of source in the computer and physically. This is done with a couple applications. DANTE VSC (DVS), LoopBack, and Logic. Using LoopBack we create multiple Virtual interfaces which combine audio from DVS, Microsoft teams (through loopback passthrough), Quicktime player, and OBS) these audio signals get routed into the preset Logic project. This allows for simultaneous multi track recording of all audio sources. Within logic the audio signals get mixed and output to 4 different busses (all busses should be solo safe so their outputs are never accidentally muted) these busses then output to a loopback virtual interface which routes the audio signals to the Stage, OBS, and Teams as well as the Zoom p8 for monitoring)
Internal amplification
Loopback can also be used to route Dante microphones back to the stage for in house microphone amplification with minimal latency) this creates a parallel audio stream from logic of the in house microphones.
Video Setup:
The Mac Studio receives NDI video signals via the DistroAV NDI OBS Plugin. Using this we can directly receive all NDI streams and record them simultaneously using the source record plug in. OBS outputs its feed to Microsoft teams via the OBS Virtual camera. Outputting an NDI stream from the Mac Studio is done with NDI Screen convertor. The screen converter is set to capture a 16:9 4K window which is often a projector from one of the OBS sources.
Camer Operator:
The Camera Operator will have the SuperJOY and a laptop connected to the Studio CalDigit Dock this allows the Laptop access to the NDI VLAN and video streams so long as you set its IP address to 10.0.20.xxx (see networking for available IP’s) this will allow the operator to see all the camera streams in low latency and use the Superjoy to control everything about the cameras
DANTE Control:
Dante should only be adjusted during setup of a production Never during the performance Dante can be adjusted from the DANTE controller app as well as the SHURE web discovery app (used to find the web UI’s of the microphone boxes) using DANTE Controller you can adjust where DANTE audio signals are routed view the DANTE network stability and latency. Using the SHURE web ui’s you can adjust microphone preamps and EQ’s as well as speaker outputs. (Never set the Microphone preamps to Max +51db Never output an audio signal that clips on the Shure meters) while you can mute signals here it is better to mute and adjust volumes in logic on the fly. The Web UI settings should be used for adjusting total volume and microphone signals before starting the presentation. All other adjustments(Volume EQ Compression routing) should be done within logic to minimize complexity and failure points.
During setup of a production ensure all condenser microphones have phantom power and nothing else.
NDI Control:
All the NDI devices can be controlled through their WebUI’s which can be accessed by typing name.local or their individual IP address. This will allow you to switch which NDI source they are listening to and control the cameras (cameras can also be controlled via the Superjoy)
Audio troubleshooting:
If there are issues with audio the fastest way to diagnose and fix the issue is to follow the signal flow (where is the signal generated what does it route through and where is it being sent) starting at its source see where you lose signal (looking at meters) once you find where you lose signal see why (maybe a send is turned off in logic or loopback or the wrong audio device is selected in an apps settings)
If the issue is in OBS or teams often you just need to deselect and reselect the audio device. This can also happen to logic though far less frequently. If the issue is with a Dante device use it’s web UI to give it a reboot and this should fix the issue.
Example:
signal flow presenter mic to teams
Check that the Shure WEB UI shows audio, check that Loopback is receiving audio from DVS, check that the audio is entering logic in logic verify it is being sent to the teams bus, check the loopback output to teams, and check the teams audio input. Every application has audio meters allowing you to easily see where you do and don’t have audio.
Video troubleshooting:
If you are losing video signal the troubleshooting process is the same see where the signal is originating from and where its being lost. Often with NDI video signals the fastest method to resolve any issues is to reboot the device that is struggling. If the Issue is in OBS try changing the source to a difference input and then changing it back this should refresh the video feed and resolve any issues.
Production recommendations:
When producing content audio levels should be between -12 and -16 DBRMS with a peak of -1 DB this will ensure consistent volume relative to other content on the internet
Keep presenters behind the Cross Bar for Microphone pickup
Try to only use logic and OBS for controlling and adjusting audio and video signals. (Edge cases will require more steps but these should be minimized if possible)
For post production using the multitrack audio do a first pass in a copy of the logic recording to mute tracks at specific times and clean up audio before exporting a 2 track to use with video editing. (Logic will be the best tool at Harmonic for volume levels EQ and compression)
Use webUIS and DANTE controller to monitor the status of video feeds and audio during a production. If there are issues you can typically see something isn’t right before it causes major issues.
Have Members of the production crew on teams and the YouTube livestream as well as in the room to give feedback on various items and for notifying the AV engineer of issues in an expedient manner
Assume Microsoft Teams will break 3 times
Research and understand the systems we are using See the below resources
Resources: